


This article introduces the reader to various aspects of Docker, starting with how to install it.
Docker is basically a container management service. Some of the most common and important terms associated with it are containers, image, package, deploy, ship, etc. Docker is very handy for developing applications and software, and to then ship them into containers that can be deployed anywhere, irrespective of the platform. Importantly, Docker is open source, which means that anyone in the world can contribute to it and manipulate the code to meet one’s own needs if additional features that aren’t available are required.
Why Docker?
Docker has the ability to reduce the size of the deployment by providing a smaller footprint on the operating system via containers.
With containers, it becomes easier for groups of people across different units, such as the development team, to work seamlessly across applications.
Docker containers can be deployed with your applications, anywhere, on any physical and virtual machine.
Installing Docker in Linux
The following steps can be followed to install Docker in Ubuntu.
Step 1: Docker is only designed to work on Linux kernel version 3.8 and later, for which you need to check the kernel version. That can be done by using the following command:
$ uname -a
If your Linux kernel version is earlier than 3.8, then upgrade it using the following command:
$ sudo apt-get update
Step 2: The next step is to install the necessary certificates that will be required to work with the Docker site later on, in order to download the necessary Docker packages. This can be done with the following command:
$ sudo apt-get install apt-transport-https ca-certificates
Step 3: Next, add the new GPG key, which is required to ensure that all data is encrypted when downloading the necessary packages for Docker.
The following command will download the key with the ID 58118E89F3A912897 C070ADBF76221572C52609D from the key server hkp://ha.pool.sks-keyservers.net:80 and add it to the adv keychain. Do note that this particular key is required to download the necessary Docker packages.
$ sudo apt-key adv \ --keyserver hkp://ha.pool.sks-keyservers.net:80 \ --recv-keys 58118E89F3A912897 C070ADBF76221572C52609D
Step 4: Next, depending on the version of Ubuntu you have on your device, you will need to add the relevant site to docker.list for the package manager to detect the Docker packages from the Docker site, and download them accordingly. The version here is Ubuntu 16.04.
$ echo “https://apt.dockerproject.org/repo ubuntu-xenial main”

| sudo tee /etc/apt/sources.list.d/docker.list
Step 5: Now update the packages on the Ubuntu system by using the following command:
$ sudo apt-get update
To verify whether the package manager is pointing to the right repository, run the following command:
$ sudo apt-cache policy docker-engine
Step 6: You have to install the linux-image-extra-* kernel packages, which allow one to use the aufs storage driver (this driver is used by the newer versions of Docker). This can be done by using the following command:
$ sudo apt-get install linux-image-extra-$(uname -r)
linux-image-extra-virtual
Step 7: The final step is to install Docker, as follows:
$ sudo apt-get install -y docker-engine
Here, apt-get uses the install option to download the Docker-engine image from the Docker website and get Docker installed. The Docker-engine is the official package from the Docker Corporation for Ubuntu based systems.
To check the Docker version running currently, use the following command:
$ sudo docker version
To get detailed information on the Docker service installed, enter the following command:
$ sudo docker info
This will give information on:
- The number of containers
- The number of images
- The storage driver used by Docker
- The root directory used by Docker
- The execution driver used by Docker
With this, Docker is installed in your machine. To understand more about its functionalities, you need to learn about the Docker Hub.
Docker Hub
Docker Hub is the world’s largest public repository of container images with an array of content sources including container community developers, open source projects and independent software vendors (ISV) building and distributing their code in containers. Developers can store and share their personal projects and see what the container community is building. Docker Hub is a registry service on the cloud that allows you to download Docker images. To use Docker Hub, go to https://hub.docker.com/.
Docker images
An image is an inert, immutable file that’s essentially a snapshot of a container. Images are also known as a combination of a file system and of parameters. Images are created with the build command and produce a container when started with the command run. They are stored in a Docker registry such as registry.hub.docker.com.
Local images can be listed by running the following command:
$ docker images
Let’s look at the example of the following command in Docker:
$ docker run hello-world
In the above case, the Docker command is specific and tells the Docker program on the operating system that something needs to be done.
The run command is to mention that we want to create an instance of an image, which is then called a container.
Finally, ‘hello-world’ represents the image from which the container is made.
The Docker images on the system can be removed via the docker rmi command.
$ docker rmi ImageID
Docker containers
A Docker container is an executable package of software that includes everything needed to run it. An application requires code, runtime, system tools, system libraries and settings. Docker containers are the new form of virtualisation.
To use a programming metaphor, if an image is a class, then a container is an instance of a class, which is also known as the object. Containers are lightweight and portable encapsulations of an environment in which applications can be run.
The running of containers is managed with the Docker run command. To run a container in an interactive mode, first launch the Docker container as follows:
$ sudo docker run -it hello-world
Docker daemon
The background service running on the host that manages building, running and distributing Docker containers is the Docker daemon. The daemon is a process that runs in the operating system to which clients talk. It is what makes the Docker engine work.
To view local running containers, use the following command:
$ docker ps -a
With the following command, you can see all the commands that were run with an image via a container:
$ docker history ImageID
Dockerfile
This is one of the most important topics. To familiarise oneself with a Dockerfile, look at the following example:
#This is a sample Image
FROM ubuntu
MAINTAINER demousr@gmail.com
RUN apt-get update
RUN apt-get install -y nginx
CMD [“echo”,”Image created”]
Let us now look at how the Dockerfile is written and use it according to requirements with a simple hello world application in PHP:
//index.php
<?php
echo “Hello World”;
To execute this file and host it, you need a Web server. You can create one using Docker and configure the environment. To host a Web server, you will need Apache. You don’t have to start from scratch because you can create a file with an existing Docker image. You can find the existing images in Docker Hub.
As you can see, there is a long list of images with the name php. Select the one that you require and mention it in the Dockerfile.
//Dockerfile
FROM php:7.0-apache
COPY src/ /var/www/html
EXPOSE 80
Now, in the folder where the Dockerfile is present, run the command, and the output you will get is as follows. The build command is used when you want to create your own Docker images.
$ docker build -t hello-world .
Since you have successfully completed building the image, let us now test it.
$ docker run -p 80:80 hello-world
You need this -p tag to forward a Port 80 from the host to Port 80 in the container, to get the desired output. But when you change the code in index.php, the change won’t be reflected in the new version of the file because when you built the image, it made a copy of the file you wrote. This is where we require volumes.
This concludes the basic concepts for using Docker. But before I end, let me answer two common questions with respect to Docker, to dispel any misconceptions about it.
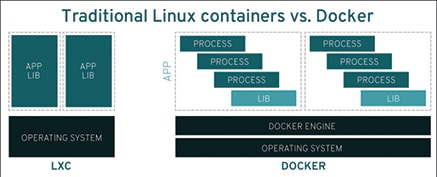
Is Docker technology the same as traditional Linux containers?
No, it’s not the same. The Docker container technology was initially based on Linux containers technology. Linux containers were useful for lightweight virtualisation, but didn’t offer a great user experience. Docker technology not only has the capability to run containers and deploy software and applications, but also simplifies the process of creating and building containers, shipping images, and versioning of images.
What is the difference between virtual machines (VMs) and containers?
In a nutshell, a VM provides an abstract machine that uses device drivers targeting this abstract machine, while a container provides an abstract OS. The most important difference between the two is that containers provide ways to virtualise an OS; hence, multiple workloads can run on a single OS instance. With virtual machines, on the other hand, the hardware is also virtualised to run multiple OS instances. Compared to VMs, containers have more speed, agility and portability.


