


Whenever we compile any code, the output that we get is an executable file, which we generally don’t bother about. We execute it on our desired target. If it is an embedded system, we flash it to the target device and run it. Usually, this executable file is the ELF (Executable and Linkable Format) file. In this article we will analyse the compilation process as well as ELF.
To begin with, there are many compilation stages so let us look at them more closely.
Compilation stages
To understand the stages of compilation, let us write a simple program and compile it. For compilation purposes, we will use the GCC open source compiler. So, let us consider a file study.c that contains the following program:
#include <stdio.h>
#define NUMBER_1 1
#define NUMBER_2 2

int main(void)
{
int a,b,c;
a = NUMBER_1;
b = NUMBER_2;
c = a + b;

printf("Output: %d\r\n", c);

return 0;
}
We use the following command to compile this study.c programming file:
gcc study.c -o study
Note: GCC or other tools mentioned in this article need to be installed before they are used.
The above command compiles ‘study.c’ and produces an executable file,‘study’. Type the following command to see the file type of this executable:
file study
Output:

study: ELF 64-bit LSB shared object, x86-64
From the output, it can be seen that the file format of the executable study is ELF. What GCC has done is, it has passed study.c through the following stages of compilation to convert the study.c file to a final executable:
- Pre-processing
- Compiling (assembly file creation)
- Assembler (object file creation)
- Linking (links all object files to create an executable)
So, let’s explore each stage to understand how each process works in compilation.
Pre-processing
This is the first stage of compilation in which the source code is processed.
The following high-level tasks are done at the pre-processing stage:
- Removal of comments from source code
- Expanding #include files
- Macro expansion
- Conditional compilation
Now let’s try to pre-processed our study.c file and look at its output. The following is the command by which we can restrict the compiler to just pre-process the study.c file and generate the pre-processed file instead of the executable:
gcc -E study.c -o study.i
Here, study.i is the pre-processed file. Open the study.i file, and you should see the following contents:
[lines omitted for brevity]
extern void funlockfile (FILE *__stream) __attribute__ ((__nothrow__ , __leaf__));
# 868 "/usr/include/stdio.h" 3 4
# 2 "study.c" 2
# 6 "study.c"
int main(void)
{
int a,b,c;
a = 1;
b = 2;
c = a + b;
printf("Output: %d\r\n", c);
return 0
}
From the study.i file, it can be seen that the statement #include <stdio.h> has been replaced by the contents of the stdio.h file. Macros NUMBER_1 and NUMBER_2 are not present in the output. Besides, wherever these macros were used, their values are replaced by macro values. So a
= NUMBER_1 is replaced by a = 1.
In this compilation stage, any line that starts with # is interpreted as a pre-processing command. These commands have their own language format (which is not discussed in detail here since online sources describe it in detail).
Note: Try to write different macros and conditional compilation commands in the code, then run the provided pre-processing command and see the output in order to understand pre-processing in detail.
Compilation
What this stage is called is confusing, as it converts pre-processed code into assembly code. In this stage, all programming symbols are converted to assembly instructions, which are native to the target processor architecture. This is also the stage where inline assembly code in high-level programming languages is processed.
Now let’s compile our study.c file and produce the equivalent assembly instruction file. The following command restricts the compiler to convert the study.c file to an assembly file.
gcc -S study.c -fverbose-asm -o study.s
After running the above command, open the study.s file, which contains the assembly equivalent of the program. This file will also show assembly code generated for each line of C code that we have written. Using this, you can understand how assembly instructions and C programming syntax are related.
Note: Modify the above program and run the above command to see how assembly instructions are generated for different C syntaxes.
Assembling
This stage is used to convert assembly instructions to machine code or object code. This object code is the actual machine instructions that run on the target processor. This is the first stage in which the ELF file is generated. The output file is known as an object file which has an extension .o and has the file format ELF. This file cannot be directly executed, but needs to be linked using Linker, which is the final stage of compilation.
To convert our study.c file to an object file, we will use the following command:
gcc -c study.c -o study.o
study.o cannot be directly opened as it is a binary file. To open this file, we can use binary utilities.
ELF files and binary utilities
To understand the final stage of compilation, which is linking, and to visualise how ELF files are structured, we need to understand object files, particularly ELF files. We were able to generate object files in the previous stage, but we were not able to open them. To open this file, we need to understand the structure of an object file.
ELF object files contain five kinds of information:
- ELF header
- Section header and different sections
- Program header and different program sections
- Object code
- Debugging information
ELF header
All ELF object files start with the ELF header. It is in binary but has the following data structure format:
# define EI_NIDENT 16

typedef struct {
unsigned char
e_ident[EI_NIDENT];
Elf64_Half e_type;
Elf64_Half e_machine;
Elf64_Word e_version;
Elf64_Addr e_entry;
Elf64_Off e_phoff;
Elf64_Off e_shoff;
Elf64_Word e_flags;
Elf64_Half e_ehsize;
Elf64_Half e_phentsize;
Elf64_Half e_phnum;
Elf64_Half e_shentsize;
Elf64_Half e_shnum;
Elf64_Half e_shstrndx;
} Elf64_Ehdr;
e_ident: This variable marks the file as an ELF object file and provides information about the object file.
e_type: This member determines the object file type.
e_machine: This member specifies the architecture for which this ELF is compiled.
e_version: This member provides information about the version of the ELF object file.
e_entry: This is the entry point or the start address of the program.
e_phoff: This member provides offset from the ELF header at which the program header is present.
e_shoff: This member provides offset from the ELF header at which the section header is present.
e_flags: This member holds processor specific tags.
e_ehsize: This member holds the ELF header size in bytes.
e_phentsize: This member holds the size in bytes of one entry in the file’s program header table.
e_phnum: This member holds the number of entries in the program header table.
e_shentsize: This member holds a section header’s size in bytes.
e_shnum: This member holds the number of entries in the section header table.
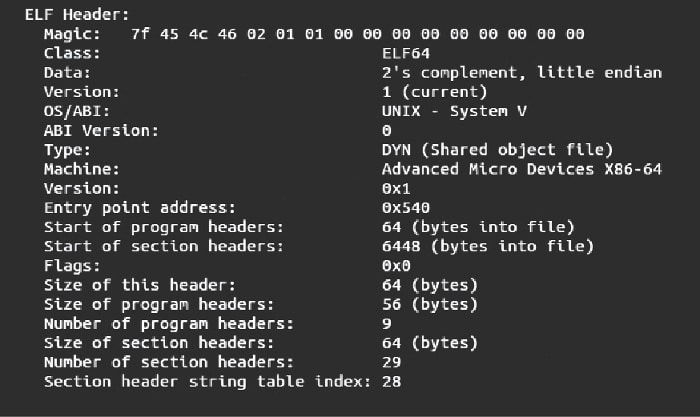
To read the ELF header of our object file,‘study’, we will use a binary utility tool called readelf. The following is the command to read the ELF header of any object file:
readelf -h study
The output is seen in Figure 1.
As can be seen from the ELF header, the object file format is ELF64. The object file is Little Endian. The ELF file is built for an x86-64 bit machine.
There are two important pieces of information present in the ELF header. One is the ELF program header part and the other is the ELF section header part.
ELF sections
When a program is compiled, different things are generated after compilation. I have grouped these into raw groups as shown below:
- Binary executable code
- Code for initialised variables
- Code for uninitialised variables
- Constant strings
- Information about the variable and function names used in the program
- Debugging information
There could be other information but I will only discuss what has been mentioned here.
These groups are combined and they are provided specific names. Compilers generally have common names for these mentioned groups. All binary executable code goes into the .text section, all initialised variables are grouped in the .data section, all uninitialised variables are grouped in the .bss section, all constant strings are grouped in .shstrtab section, all variable and function names go in .symtab (which is called the symbol table) and all debug information is grouped in the .debug section. All this information is put in the section part of the ELF file. The location of the section header in an ELF file is provided by the e_shoff variable, which is present in the ELF header. e_shoff provides the offset at which the ELF section header is present in the ELF file. e_shnum is the number of section header entries in the ELF file and the size of each entry is e_shentsize.
Use the following command to see all the sections that are present in our study.c example:
readelf -S study
From the output, it can be seen that there are .text, .data, .bss, .symtab and .shstrtab sections. To check the code that is present in .text, use the following command:
objdump -d study
This will dump all the code that is present in our study.c example. Try experimenting with objdump, hd and readelf commands to analyse each section of the ELF file. Modify the program, compile it and see how different information in the section changes.
So how does the compiler come to know where to put each section in the final ELF. This is where the linker comes in. Linkers use a file known as the linker descriptor file. This contains information about all the memory in the target machine (Flash, RAM, QSPI, SDRAM, etc) with its starting address and size. It also contains information about the different sections that should be present in the final ELF file and where each section should be loaded in the target machine. The following is a simple linker descriptor file:
MEMORY
{
FLASH (rx) : ORIGIN = 0x0, LENGTH = 0x020

RAM (rwx) : ORIGIN = 0xA0, LENGTH = 0x00A0000 /* 640K */
}

ENTRY(Reset_Handler)

SECTIONS

{
. = 0x0000;
.text : { *(.text) }
. = 0xA0;
.data : { *(.data) }
.bss : { *(.bss) }
}
The above linker script file informs linker about the following:
- The system has two memories — Flash and RAM.
- Put all executable code that is present in the .text section at the address 0x00000 in the target machine.
- Put all data (.data and .bss) starting at address 0xA0.
ELF program header
The program header in the ELF specifies which section of the ELF file goes to a particular memory location. The program header location in the ELF file is provided by the e_phoff variable present in the ELF header. e_phoff provides the offset at which the ELF program header is present in the ELF file. e_phnum is the number of program header entries in the ELF file and the size of each entry is e_phentsize.
Use the following command to see the program header information of our study.c example:
readelf -l study
Linker
This is the final stage of compilation. In this stage, the final executable ELF is generated. Linker takes all object files generated for each programming file in previous stages as inputs. It also takes a linker descriptor file as input. Linker combines sections from all object files into one final ELF. It instructs the linker descriptor file as to what addresses are to be provided for each section. It also resolves the symbols used by each object file. If any symbol is not defined, then linker gives an error. These are the stages by which a final executable is generated.
In the case of ARM and other microcontroller platforms, Hex files are present. These are generated from ELF files using the following command:
objcopy -O -ihex study study.hex
Program execution
If you execute any C program, then main() is always the entry point. This is because a startup code is always linked to your original program by linker. This startup code consists of a startup function, which usually is __start or Reset_handler. This is placed at the address that the processor will execute at boot. This function calls the main() function, which is the starting point of the application. Generally, in embedded systems, there is a startup.s file which contains a vector table where the Reset_Handler function is placed, which the controller executes at startup. This Reset_Handler will copy all initialised variables to RAM, and then initialise all the memory used by the BSS section to zero. This Reset_Handler will then call the main() function. This is how an application is compiled and executed.


