


A theme in a website is a set of files that defines the overall look and the user experience of a website. It usually comprises all the graphical elements such as colours and window decorations that help the user to customise the website. Drupal provides the user with a bunch of basic custom themes for a website that are very generic. However, these default themes do not suit all types of users. So there is a need to build themes that meet one’s requirements.
Creating and customising themes in Drupal 8 is easy because of a modern template engine for PHP named Twig, which is a part of the Symfony 2 framework. Moving from a PHP template to Twig, and from the INI format to YAML, are some of the main changes in Drupal 8 theming. These changes in Drupal 8 have improved the security and inheritance, making theming more distinguished.
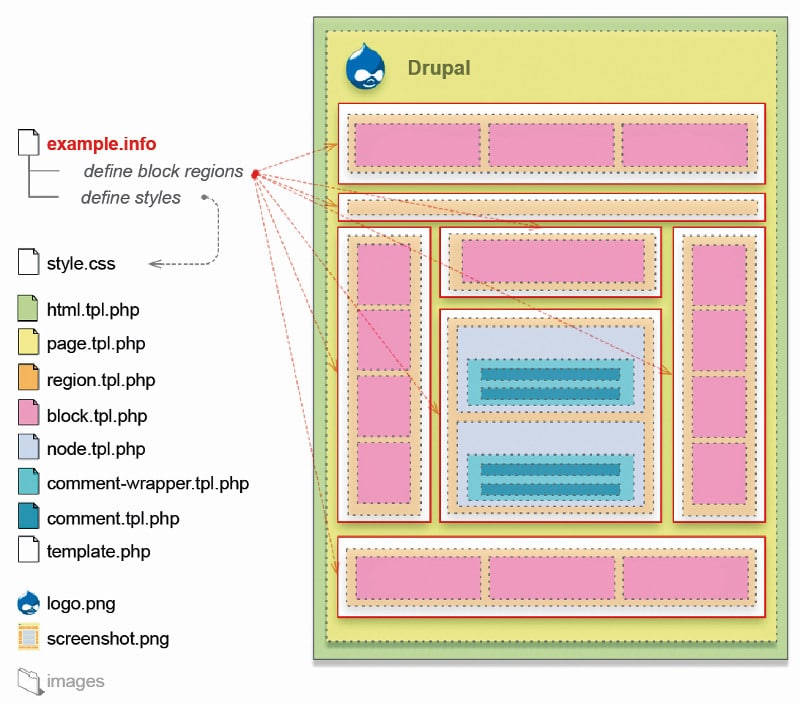
With reference to Figure 1,
- .info provides information about your theme.
- html.tpl.php displays the basic HTML structure of a single Drupal page.
- page.tpl.php is the main template that defines the contents on most of the pages.
- style.css is the CSS file that sets the CSS rules for the template.
- node.tpl.php defines the contents of the nodes.
- block.tpl.php defines the contents in the blocks.
- comment.tpl.php defines the contents in the comments.
- Template.php is used to hold preprocessors for generating variables before they are merged with the markup inside .tpl.php files.
- Theme-settings.php is used to modify the entire theme settings form.
- .libraries.yml defines your libraries (mostly your JS, CSS files).
- .breakpoints.yml defines the points to fit different screen devices.
- .theme is the PHP file that stores conditional logic and data preprocessing of the variables before they are merged with markup inside the .html.twig file.
- /includes is where third-party libraries (like Bootstrap, Foundation, Font Awesome, etc) are put. It is a standard convention to store them in this folder.
The basic requirement to create a new Drupal theme is to have Drupal localhost installed on your system.
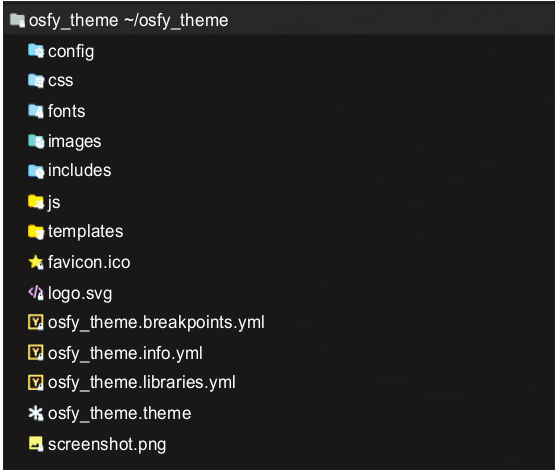
Drupal 8 theme structure
A custom theme can be made by following the steps mentioned below.
Step 1: Creating the custom themes folder
Go to the Drupal folder in which you can find a folder named Theme.
- Enter the folder ‘theme’.
- Create a folder ‘custom’.
- Enter the folder ‘custom’.
- Create a folder ‘osfy’.
Start creating your theme files over here. The theme name taken here is osfy.
Step 2: Creating a YML file
To inform the website about the existence of this theme, we use .yml files. The basic details required in the YML are mentioned below:
- Name
- Description
- Type
- Core
name: osfy
description: My first responsive custom theme.
type: theme
package: custom
base theme: classy
core: 8.x

regions:
head: head
header: header
content: content
sidebar: sidebar
footer: Footer

Stylesheets-remove:
-”Remove Stylesheets”
We can proceed once the theme appears in the uninstalled section of your website’s Appearance tab.
Open the Drupal website and check for the new theme in the Appearance section. It will be under the uninstalled list of custom themes in the Appearance tab.
| Note: 1. Base theme indicates which base theme your custom theme is going to inherit. The default base theme provided by Drupal is ‘Stable’.
2. Regions defines the regions in which your blocks are to be placed in your theme. If not declared, Drupal uses default regions from the core. |
Step 3: Adding the .libraries.yml file:
We have indicated all the libraries comprising JavaScript and CSS styling, and now we will define them in the libraries.yml file.
global-components:
version: 1.x
css:
theme:
css/style.css: {}
includes/bootstrap/css/bootstrap.css: {}
We will use style.css for the theme styling and bootstrap.css for responsive display using Bootstrap libraries. Style.css resides in the core/css folder, whereas bootstrap.css resides in the includes/bootstrap/css folder.
Step 4: Creating theme regions
To better understand how Twig has made things easier, use the following code:
<?php print render($title_prefix); ?>
<?php if ($title): ?>
<h1 class="title" id="page-title">
<?php print $title; ?>
</h1>
<?php endif; ?>

{{ title_prefix }}
{% if title %}
<h1 class="title" id="page-title">
{{ title }}
</h1>
{% endif %}
The template file functions are:
html.html.twig – Theme implementation for the basic structure of a single page
page.html.twig – Theme implementation to display a single page
node.html.twig – Default theme implementation to display a node
region.html.twig – Default theme implementation to display a region
block.html.twig – Default theme implementation to display a block
field.html.twig – Theme implementation for a field
To create the page.html.twig file, give the following commands:
/**
* @file
* Default theme implementation to display a single page.
*
* example code for basic header, footer and content page
**/

<div id="page">
{% if page.head %}
<section id="head">
<div class= "container">
{{ page.head }}
</div>
</section>
{% endif %}
<header id="header">
<div class="container">
{{ page.header }}
</div>
</header>
<section id="main">
<div class="container">
<div class="row">
<div id="content" class="col-md-10 col-sm-10 col-xs-12">
{{ page.content }}
</div>
{% if page.sidebar %}
<aside id="sidebar" class="sidebar col-md-2 col-sm-2 col-xs-12">
{{ page.sidebar}}
</aside>
{% endif %}
</div>
</div>
</section>
{% if page.footer %}
<footer id="footer">
<div class="container">
{{ page.footer }}
</div>
</footer>
{% endif %}
</div>
Step 5: Enabling the theme
To place content in the respective regions, in the Manage administrative menu, navigate to Structure > Block layout > Custom block library (admin/structure/block/block-content). Click Add custom block. The Add custom block page appears. Fill in the fields and click on Save.
The block design used here is as in Figure 2.
A few more things to do
- Place a logo.svg file in the theme folder. Drupal will look for it by default and enable the logo for the theme.
- To show your theme picture in the admin interface next to your theme name, place an image screenshot.png in your theme directory itself.
- Use your creativity from here onwards to style and customise the appearance of your theme.
- While writing the code for Twig files, remember to comment all the important information for future reference.
To make your theme work on your Drupal localhost, go to /admin/appearance where you can find the theme ‘osfy’. Choose the option ‘Set as default’.
You can start using your theme from now.


