


Booting an embedded device or a piece of telecommunication equipment quickly is crucial for time-critical applications and also plays a very major role in improving the user experience. This article gives some important tips on how to enhance the boot-up time of any device.
Fast booting or fast rebooting plays a crucial role in various situations. It is critical for an embedded system to boot up fast in order to maintain the high availability and better performance of all the services. Imagine a telecommunications device running a Linux operating system that does not have fast booting enabled. All the systems, services and the users dependent on that particular embedded device might be affected. It is really important that devices maintain high availability in their services, for which fast booting and rebooting play a crucial role.
A small failure or shutdown of a telecom device, even for a few seconds, can play havoc with countless users working on the Internet. Thus, it is really important for a lot of time-dependent devices and telecommunication devices to incorporate fast booting in their devices to help them get back to work quicker. Let us understand the Linux boot-up procedure from Figure 1.
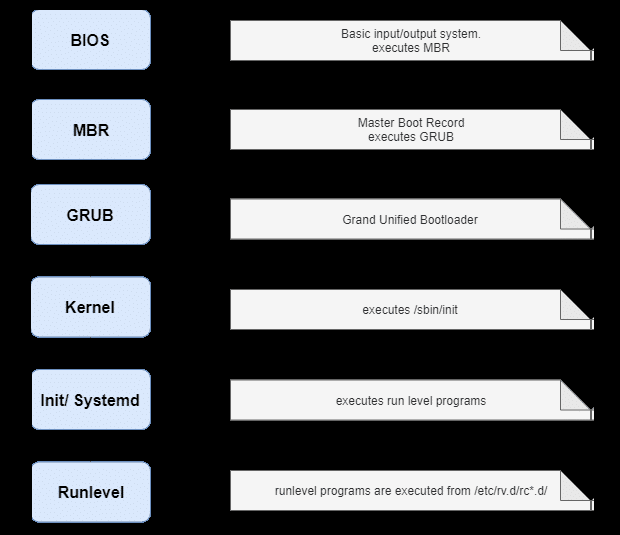
Monitoring tools and the boot-up procedure
A user should take note of a number of factors before making changes to a machine. These include the current booting speed of the machine and also the services, processes or applications that are taking up resources and increasing the boot-up time.
Boot chart: To monitor the boot-up speed and the various services that start while booting up, the user can install the boot chart using the following command:
sudo apt-get install pybootchartgui.
Each time you boot up, the boot chart saves a .png (portable network graphics) file in the log, which enables the user to view the png files to get an understanding about the system’s boot-up process and services. Use the following command for this purpose:
cd /var/log/bootchart
The user might need an application to view the .png files. Feh is an X11 image viewer that targets console users. It doesn’t have a fancy GUI, unlike most other image viewers, but it simply displays pictures. Feh can be used to view the .png files. You can install it using the following command:
sudo apt-get install feh
You can view the png files using feh xxxx.png.
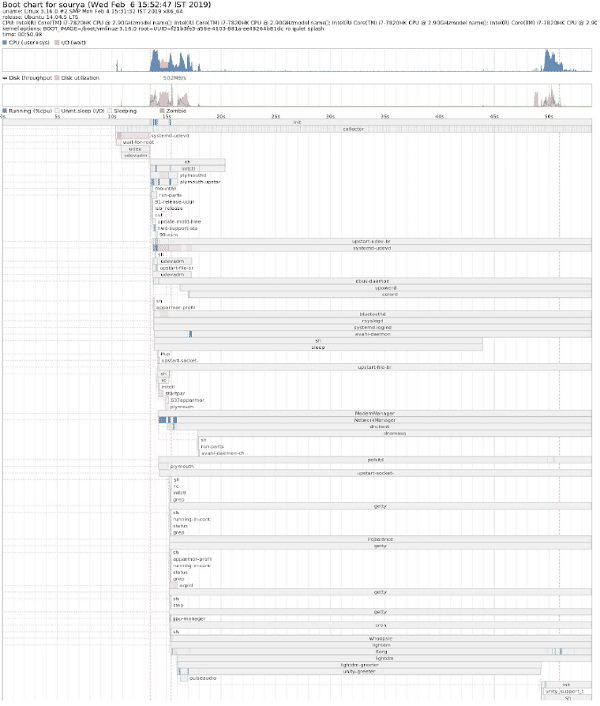
Figure 2 shows the boot chart when a boot chart png file is viewed.
However, a boot chart is not necessary for Ubuntu versions later than 15.10. To get very brief information regarding boot up speed, use the following command:
systemd-analyze

Figure 3 shows the output of the command systemd-analyze.
The command systemd-analyze blame is used to print a list of all running units based on the time they took to initialise. This information is very helpful and can be used to optimise boot-up times. systemd-analyze blame doesn’t display results for services with Type=simple, because systemd considers such services to be started immediately; hence, no measurement of the initialisation delays can be done.
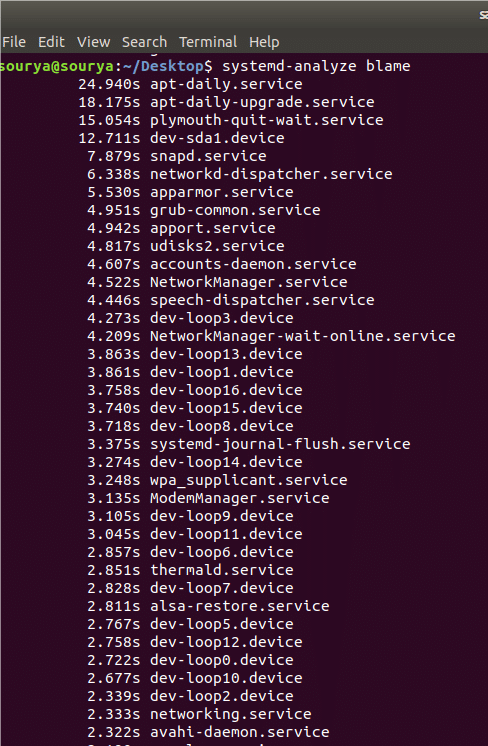
Figure 4 shows the output of systemd-analyze blame.
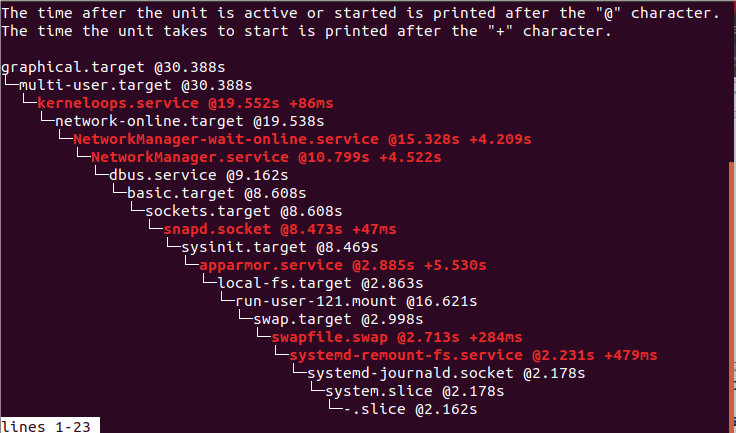
The following command prints a tree of the time-critical chain of units:
command systemd-analyze critical-chain
Figure 5 shows the output of the command systemd-analyze critical-chain.
Steps to reduce the boot-up time
Shown below are the various steps that can be taken to reduce boot-up time.
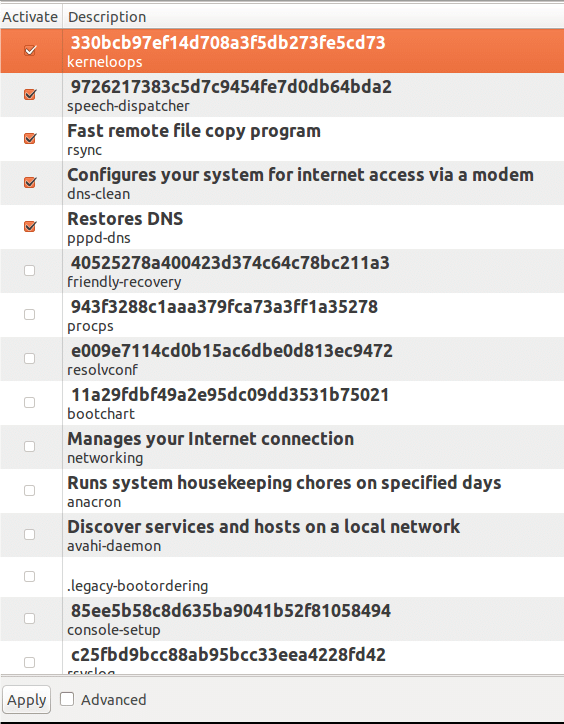
BUM (Boot-Up-Manager): BUM is a run level configuration editor that allows the configuration of init services when the system boots up or reboots. It displays a list of every service that can be started at boot. The user can toggle individual services on and off. BUM has a very clean GUI and is very easy to use.
BUM can be installed in Ubuntu 14.04 using the following command:
sudo apt-get install bum
To install it in versions later than 15.10, download the packages from the link http://apt.ubuntu.com/p/bum 13.
Start with basic things and disable services related to the scanner and printer. You can also disable Bluetooth and all other unwanted devices and services if you are not using any of them. I strongly recommend that you study the basics about the services before disabling them, as it might affect the machine or operating system. Figure 6 shows the GUI of BUM.
Editing the rc file: To edit the rc file, you need to go to the rc directory. This can be done using the following command:
cd /etc/init.d.
However, root privileges are needed to access init.d, which basically contains start/stop scripts that are used to control (start, stop, reload, restart) the daemon while the system is running or during boot.
The rc file in init.d is called a run control script. During booting, init executes the rc script and plays its role. To improve the booting speed, we make changes to the rc file. Open the rc file (once you are in the init.d directory) using any file editor.
For example, by entering vim rc, you can change the value of CONCURRENCY=none to CONCURRENCY=shell. The latter allows certain startup scripts to be executed simultaneously, rather than serially.
In the latest versions of the kernel, the value should be changed to CONCURRENCY=makefile.
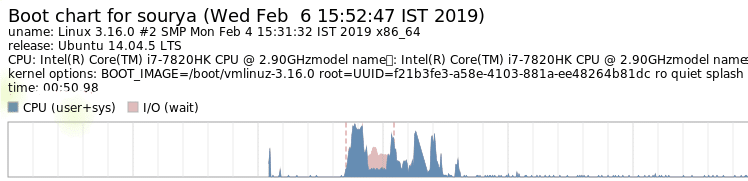
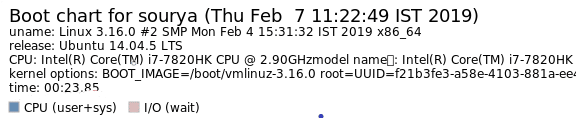
Figures 7 and 8 show the comparison of boot-up times before and after editing the rc file. The improvement in the boot-up speed can be noticed. The time to boot before editing the rc file was 50.98 seconds, whereas the time to boot after making the changes to the rc file is 23.85 seconds.
However, the above-mentioned changes don’t work on operating systems later than the Ubuntu version 15.10, since the operating systems with the latest kernel use the systemd file and not the init.d file any more.
E4rat: E4rat stands for e4 ‘reduced access time’ (ext4 file system only). It is a project developed by Andreas Rid and Gundolf Kiefer. E4rat is an application that helps in achieving a fast boot with the help of defragmentation. It also accelerates application startups. E4rat eliminates both seek times and rotational delays using physical file reallocation. This leads to a high disk transfer rate.
E4rat is available as a .deb package and you can download it from its official website http://e4rat.sourceforge.net/.
Ubuntu’s default ureadahead package conflicts with e4rat. So a few packages have to be installed using the following command:
sudo dpkg purge ureadahead ubuntu-minimal
Now install the dependencies for e4rat using the following command:
sudo apt-get install libblkid1 e2fslibs
Open the downloaded .deb file and install it. Boot data is now needed to be gathered properly to work with e4rat.
Follow the steps given below to get e4rat running properly and to increase the boot-up speed.
- Access the Grub menu while booting. This can be done by holding the shift button when the system is booting.
- Choose the option (kernel version) that is normally used to boot and press ‘e’.
- Look for the line starting with linux /boot/vmlinuz and add the following code at the end of the line (hit space after the last letter of the sentence):
- init=/sbin/e4rat-collect or try - quiet splash vt.handsoff =7 init=/sbin/e4rat-collect
- Now press Ctrl+x to continue booting. This lets e4rat collect data after booting. Work on the machine, open and close applications for the next two minutes.
- Access the log file by going to the e4rat folder and using the following command:
cd /var/log/e4rat
- If you do not find any log file, repeat the above mentioned process. Once the log file is there, access the Grub menu again and press ‘e’ as your option.
- Enter ‘single’ at the end of the same line that you have edited before. This will help you access the command line. If a different menu appears asking for anything, choose Resume normal boot. If you don’t get to the command prompt for some reason, hit Ctrl+Alt+F1.
- Enter your details once you see the login prompt.
- Now enter the following command:
sudo e4rat-realloc /var/lib/e4rat/startup.log
This process takes a while, depending on the machine’s disk speed.
- Now restart your machine using the following command:
sudo shutdown -r now
- Now, we need to configure Grub to run e4rat at every boot.
- Access the grub file using any editor. For example, gksu gedit /etc/default/grub.
- Look for a line starting with GRUB CMDLINE LINUX DEFAULT=, and add the following line in between the quotes and before whatever options there are:
init=/sbin/e4rat-preload 18
- It should look like this:
GRUB CMDLINE LINUX DEFAULT = init=/sbin/e4rat- preload quiet splash
- Save and close the Grub menu and update Grub using sudo update-grub.
- Reboot the system and you will find noticeable changes in boot speed.
Figures 9 and 10 show the differences between the boot-up time before and after installing e4rat. The improvement in the boot-up speed can be noticed. The time taken to boot before using e4rat was 22.32 seconds, whereas the time taken to boot after using e4rat is 9.065 seconds


A few simple tweaks
A good boot-up speed can also be achieved using very small tweaks, two of which are listed below.
SSD: Using solid-state devices rather than normal hard disks or other storage devices will surely improve your booting speed. SSDs also help in achieving great speeds in transferring files and running applications.
Disabling GUI: The graphical user interface, desktop graphics and window animations take up a lot of resources. Disabling the GUI is another good way to achieve great boot-up speed.


