


Continuous integration (CI) and continuous deployment (CD) are fast becoming accepted best practices in the software and application development world. Together, these strategies are known as continuous deployment. This article explores continuous deployment practices and focuses on Rundeck, a CD orchestration tool.
In this age, when technology is advancing quickly and becoming more widespread, minimising the time to market is very important for electronics products and services. Apart from a shorter time to market, the software of the product/service has to be constantly updated with the latest security patches, bug fixes and new features, to keep attracting new users as well as to maintain the existing user base. In addition, all the releases of the software have to be thoroughly tested and must be stable. All of this can be achieved by implementing continuous delivery and continuous deployment in the software delivery pipeline. Let us have a closer look at continuous deployment practices and the need for these in software development organisations. In this context, we will explore a service orchestration tool called Rundeck, and look at its features as well as installation procedure on Linux machines.
Introducing continuous practices
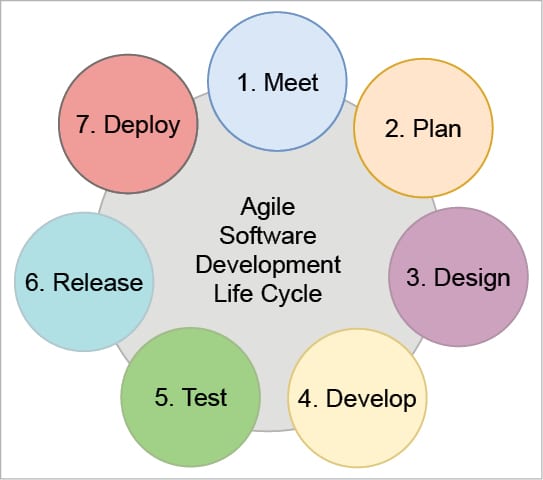
The various stages of the software development life cycle (SDLC), according to the Agile methodology, are meet, plan, design, develop, test, release and deploy, as shown in Figure 2. In organisations where there are hundreds of ongoing projects with more than one team working on the same project, there is a huge possibility of code conflicts, manual errors and configuration gaps, which result in delayed releases.
Building an automated CI/CD pipeline using tools for the build, testing, deployment and monitoring stages is an effective method to overcome these problems. Figure 3 shows a CI/CD pipeline of software delivery. The next section gives a brief explanation of CI and CD.

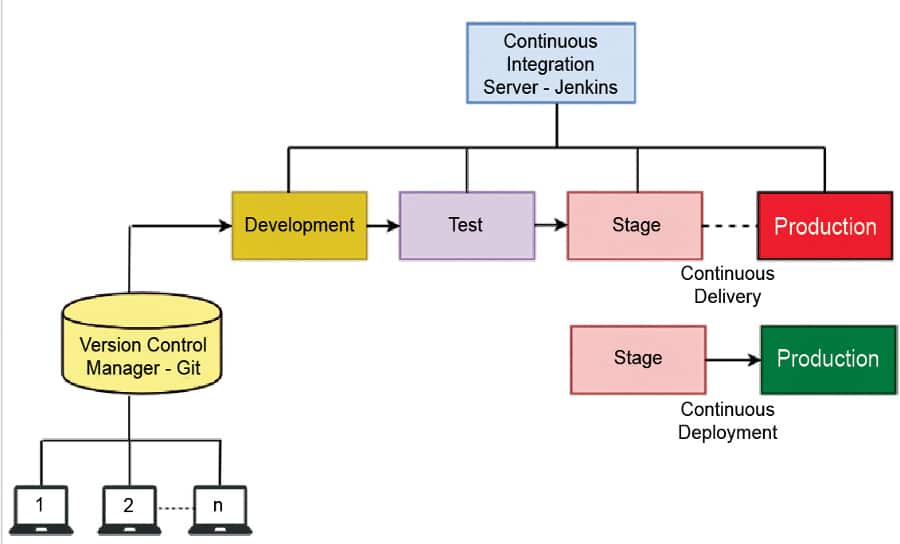
Continuous integration combines the source code from multiple developers working on the same project, and automatically builds the code. This is usually done by monitoring the version control manager for any new changes in the source code. If there are any changes or a code commit, the CI tool automatically builds the code and tests the application. CI is the first step towards continuous deployment. Some examples of CI tools are Jenkins, Travis and Cruise Control.
After CI, the next phase in the CI/CD pipeline is continuous delivery. The code/software is always made ready to go into production even after making new changes. This is continuous delivery (CDE), which makes every change production ready. Automating the process of deployment into production is called continuous deployment (CD), which cannot be achieved without having continuous delivery. CDE and CD are shown in Figure 4, where the version control manager is Git and the continuous integration tool is Jenkins.
In a competitive market that includes mobile, online banking and e-commerce applications, frequent updates to apps can give an edge to organisations in terms of customer satisfaction. For this, the companies have to adopt CDE and CD. To enable continuous deployment, we have to use automation tools to deploy the changes to production automatically, after every update. CD is employed by many leading companies such as Facebook, Netflix and GitHub.
Some of the many benefits of CD are improved efficiency and productivity of the organisation, faster time to production and reliable/stable releases of the software. CD also makes it easier to scale the systems, because the deployment processes are completely automated. It reduces the risk and the costs involved in moving the changes from the development environment to the production environment. Using CD, companies can even release thousands of stable software updates per day. For example, on an average, Amazon deployed a new software update every 11.7 seconds in 2015, which approximates to 7400 production releases per day. This is possible only by using continuous integration, continuous delivery, continuous deployment and continuous monitoring, which are collectively known as continuous practices.
Many IT companies have built their own proprietary deployment tools. Examples are Urbancode Deploy and Urbancode Release by IBM, Codar by HP, Code Stream by VMware, AWS CodeDeploy by Amazon and Visual Studio Release Management by Microsoft. Now, let us look at an open source tool called Rundeck, which enables the automation of processes and tasks on a large scale.
Rundeck
Rundeck is an orchestration tool for continuous deployment. It helps in standardising and automating complex release pipelines and deployment processes. It is an open source Web application written in Java and JavaScript. Rundeck source code is available on GitHub at https://github.com/rundeck/rundeck. Many prominent multinational companies such as Walt Disney use Rundeck to carry out their operations. It is an easy-to-use tool that can be accessed via a Web interface, APIs or the command line.
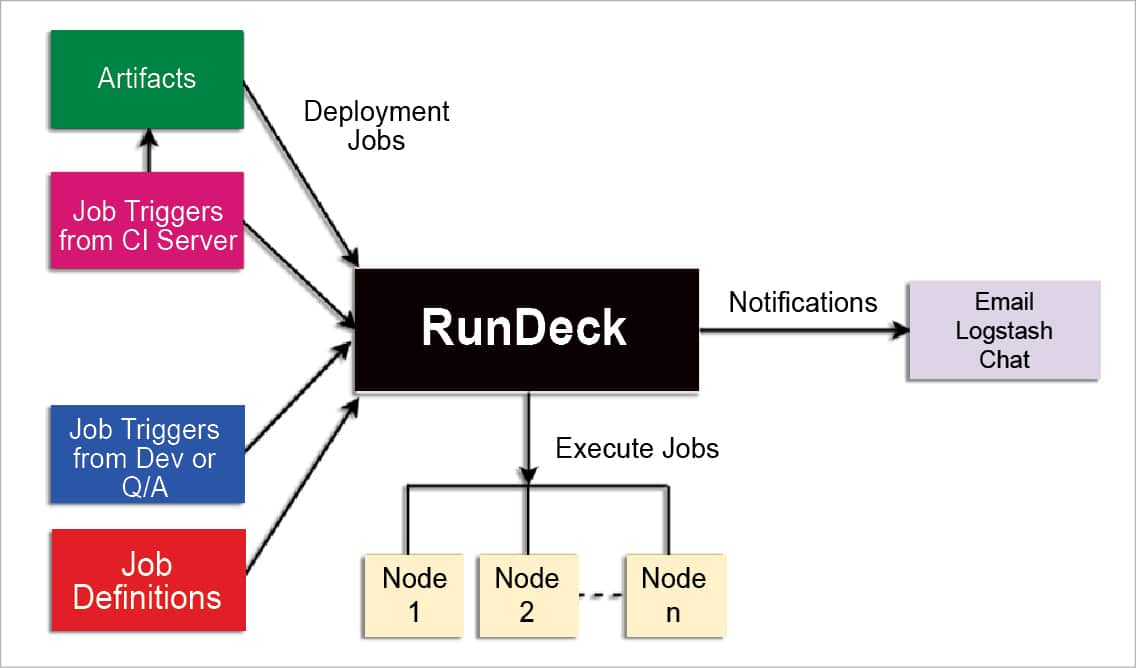
Rundeck is to be installed on a server that is interacting with multiple other hosts. In Rundeck, the nodes are the systems where the operations tasks are to be performed and jobs are the workflows or the processes that need to be carried out on the nodes. The specifics of the job and information about the nodes on which the jobs should be run can be configured through Rundeck. The Web interface of Rundeck also displays the estimated time for the jobs to complete, logs of the jobs and summarised reports of the jobs on each of the nodes. It also has role-based access control policies where only specific users can perform specific jobs.
Rundeck has many plugins to integrate with other continuous practice tools such as Jenkins, Chef, Ansible, Logstash, Puppet, etc. Using these plugins, jobs can be triggered automatically from the continuous integration tools and from the configuration management tools. Also, the jobs can be scheduled based on the application’s requirements. Rundeck can send notifications to the developers regarding the status of the jobs being executed. The workflow of this is shown in Figure 1.

Installation of Rundeck
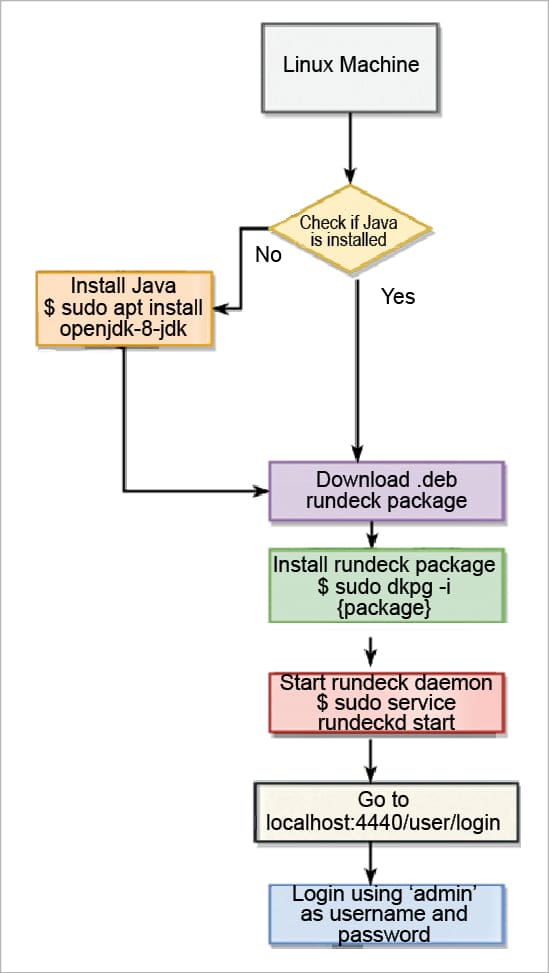
Figure 5 gives the flowchart for the installation procedure of Rundeck on Linux systems.
Now, let us go through the installation procedure in detail. A Rundeck instance can be installed on systems with a Linux OS in four easy steps as described below. Rundeck is also compatible with Windows and Mac but this article focuses only on the procedure for Linux systems.
1. Install Java, if not already installed, using the following command:
$ sudo apt install openjdk-8-jdk
2. Get the latest Rundeck package from docs.rundeck.com/download/deb/ and install it using the command below. Dpkg is a package manager for Debian based systems and it requires root access. The ‘-i’ option is to install a given package.
$ sudo dpkg -i {.deb file name}
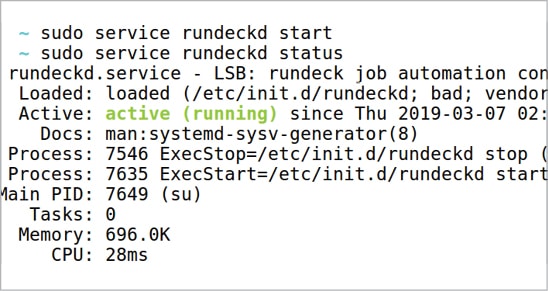
3. Rundeck is now successfully installed on the system. Rundeckd is the daemon process that manages the Rundeck server. Start the Rundeck daemon using the following command and verify that the service is running.
$ sudo service rundeckd start [6]
4. The Web UI of the Rundeck instance can be accessed from localhost:4440/user/login. The default port used by the Rundeck Web interface is 4440. We can log in using ‘admin’ for the user name as well as the password. Once we log in as the admin, we can also create other users with different permissions and authorisations.
Login page it displays already existing projects, as well as the options to configure these projects and to add a job in them. It also shows the number of jobs executed in the last one day.
Since Rundeck executes in Linux as a service, we can control the service by using the start, stop, restart and status commands, like with any other service.
$ sudo service rundeckd stop/ start/ restart/ status
Now that we have the Rundeck server running, let us go through the details of how to add a new project, create and configure jobs, how to add nodes, and how to automatically deploy a program or software onto the nodes.
Dispatching code to the nodes using Rundeck
1. Creating a new project
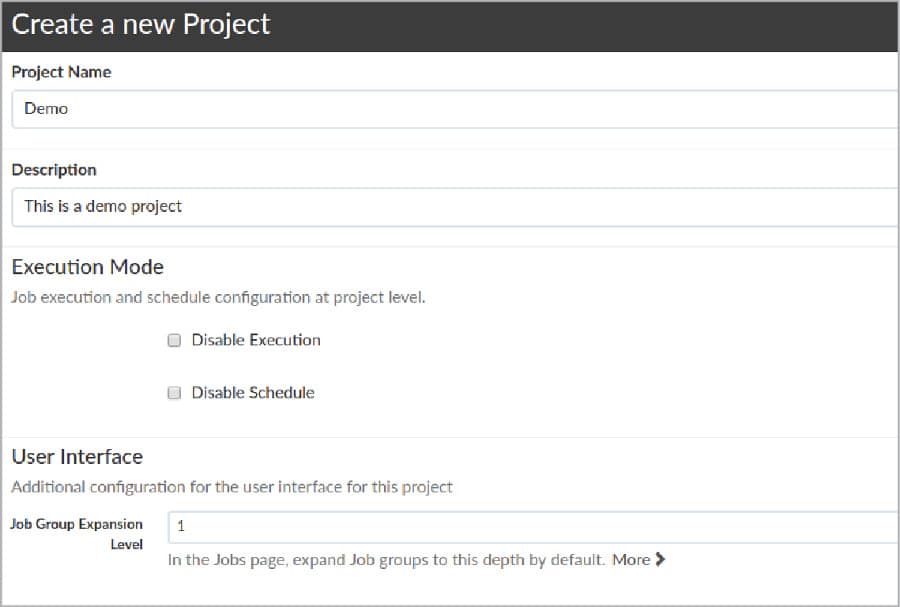
On the Rundeck Web UI, click the ‘New Project’ button that is shown in Figure 8. Enter the ‘Name’ and ‘Description’ fields of the project, and we can leave the other fields to take their default options. Then click on ‘Create’ at the bottom of the tab as shown in Figure 7.
2. Adding client nodes
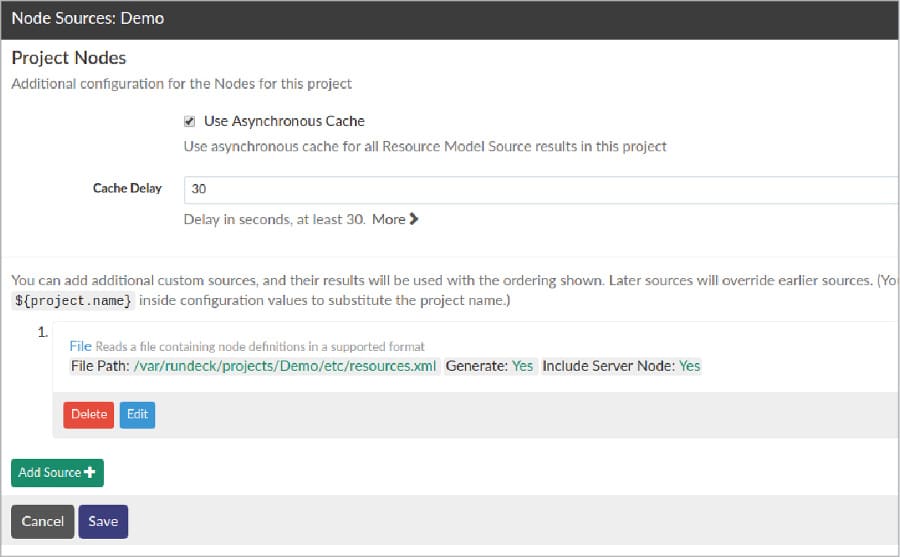
A ‘Node Sources’ tab, as shown in Figure 8, is opened as soon as we click on ‘Create’ in Step 1.
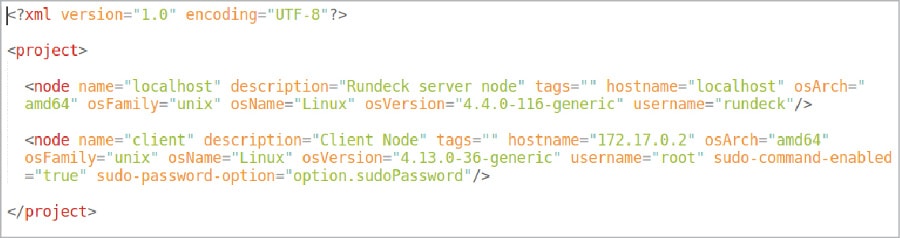
The path of the resources.xml file of this project can be seen. Click on the ‘Edit’ button and select the ‘Writeable’ option and save it. Now we will be able to edit that file. The resources.xml file contains the node definitions. The Rundeck server reads this file and recognises the nodes. By default, the localhost is added as a node and the default resources.xml is shown in Figure 9.
Here, let us take a Docker container and add it as a node. Add lines to the resources.xml file as shown in Figure 10, and save it. 172.17.0.2 is the IP address of the Docker container and it is given as the hostname. The hostname has to be unique across all the nodes. The values of ‘username’, ‘osName’ and ‘osVersion’ can vary depending on the type of the node.
On the Web UI of Rundeck, we can see that the client node has been added in the ‘Nodes’ tab.
3. Setting up SSH keys to authenticate the client nodes
For Rundeck to deploy applications or to execute jobs on the nodes, the Rundeck server has to log in into the nodes remotely. Now comes the question of security — how can we ensure that the system that is logging into the nodes is actually the server and not an attacker trying to gain unauthorised access to the node? The client nodes should be able to provide access only to the server and not to any other system. For this, we use SSH to authenticate the server, and allow it to execute commands in the nodes. SSH stands for Secure Shell, and it uses the public-private key encryption method for secure remote authentication.
Create a .ssh folder in the /var/lib/rundeck directory of the host system and generate SSH keys in the ‘id_rsa’ file. The private key is stored in the file ‘id_rsa’ and the public key is stored in the file ‘id_rsa.pub’. In the .ssh folder that we have created, run the following command to generate the keys:
$ sudo ssh-keygen
When asked for the name of the file to save the keys, type ‘id_rsa’. We can use any other file name but usually ‘id_rsa’ is preferred for SSH keys. Here, we are leaving the passphrase empty, but it can be given any value of your choice.
We have to copy the data in the ‘id_rsa.pub’ file (which contains the SSH public key) and add it in the node.
Execute the following commands in the root directory of the node to add the public key of the host system:
$ mkdir .ssh
$ cd ~/.ssh
$ cat >> authorized_keys [6]
This command asks for input from the terminal. Now, paste the data of the id_rsa.pub file that we copied from the host system. It then appends the data into the ‘authorized_keys’ file.
For this to work, SSH has to be installed on the nodes. If not already installed, install SSH and start it using the following commands. Openssh is a software that enables SSH over the systems.
$ sudo apt-get install openssh-server
$ sudo service ssh start [6]
Now, the Rundeck server can connect to the nodes securely with SSH, and execute the jobs specified for the nodes.
4. Verifying the SSH connection
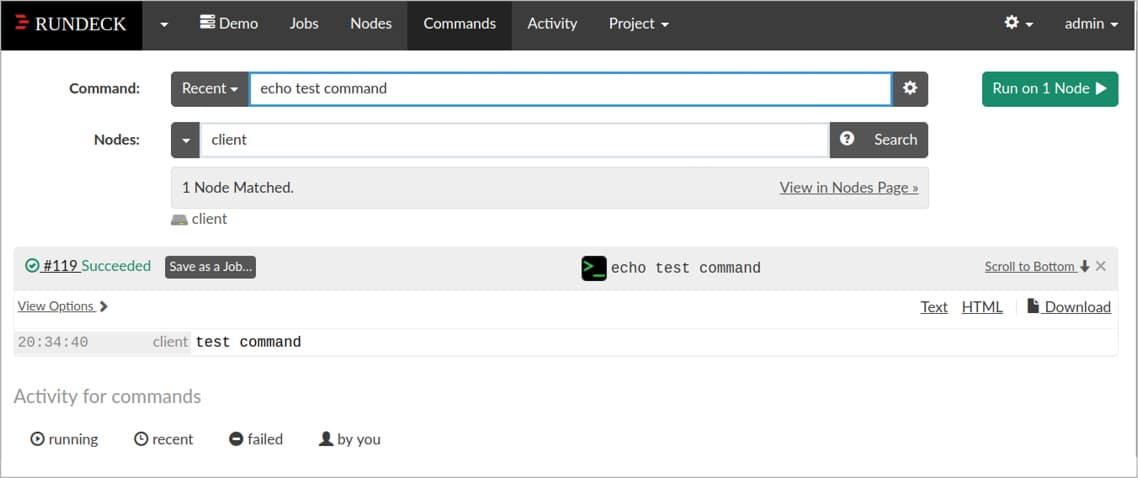
To check if the Rundeck server is able to log in to the nodes, let us give a test command to be executed on the node. Go to the ‘Commands’ tab on the Web UI of the Rundeck server, enter the node name (which is ‘client’ in this case) in the ‘Nodes’ input text entry, and press ‘Search’. Then enter the shell command ‘echo test command’ in the ‘Command’ input text entry. Press ‘Run on 1 Node’ to execute the command. The status and the output of the command execution can be seen in Figure 11.
5. Creating a job and running it
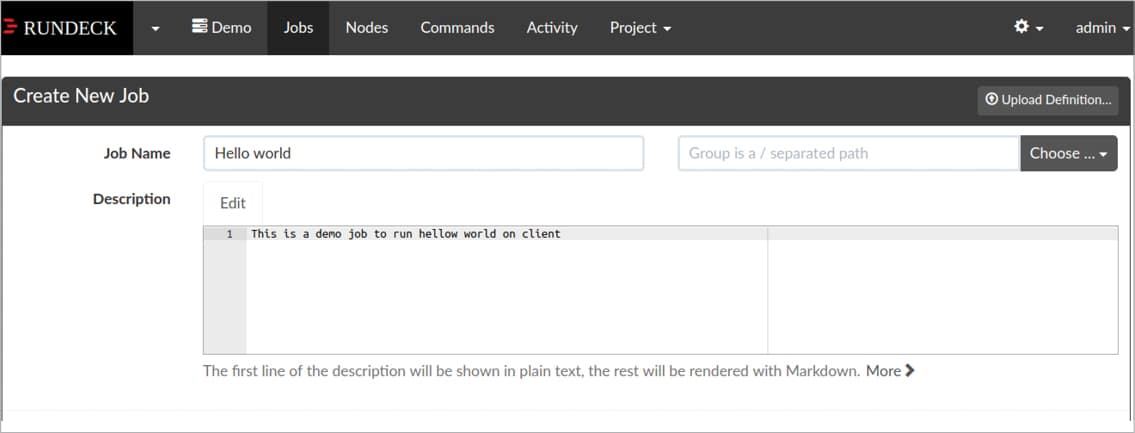
In the ‘Jobs’ tab, click on ‘Create a new Job’. We can also do this by clicking on ‘Job Actions’ and selecting the ‘New Job’ option from the drop down menu.
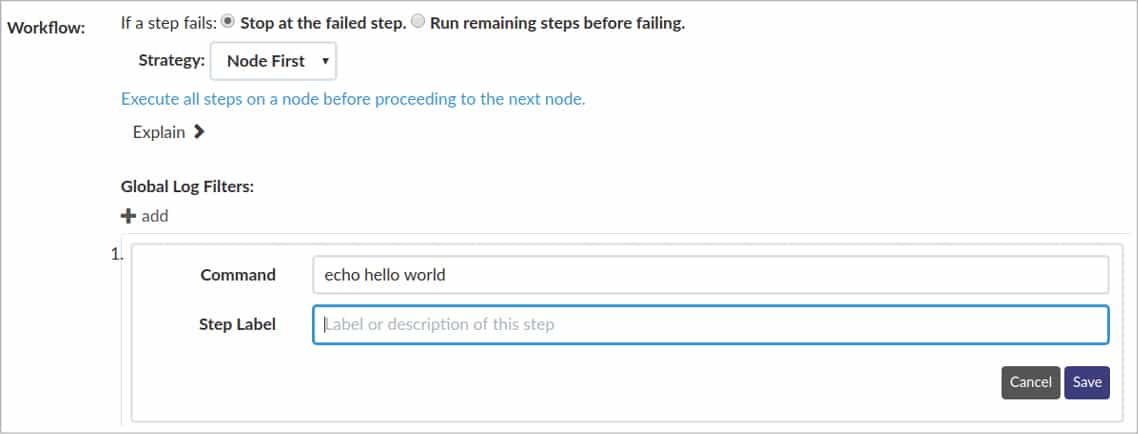
Add the job name and the description. In the workflow, we can add as many steps as required, which will be executed sequentially. Here, we will add one step which is to be executed through the command line. Add the command ‘echo hello world’, then save the workflow and also save the job. We can also define files/programs that can be run on the nodes. We can also use the ‘Node Filter’ option to select the nodes on which we want the job to run. This can be seen in Figures 12 and 13.
We can run the job manually using the ‘Run Job Now’ button, or we can schedule the jobs to run at specified time intervals using ‘Run Job Later’.
After the job is run, it gives the status of execution, the time taken to complete the job, and the logs of all the job executions till now. This can be seen in the ‘Activity’ tab, as shown in Figure 18. In this case, the ‘echo hello world’ command is executed on the node and the output ‘hello world’ is displayed.
In this way we can deploy the software onto the client nodes continuously using Rundeck.
The concept of continuous delivery and continuous deployment is attracting a lot of interest from both software developers and researchers. Further topics of discussion could be the integration process of Rundeck with Jenkins (the continuous integration tool) and Logstash (a continuous monitoring tool), scaling up the client nodes using Rundeck, and the security implications of an automated deployment pipeline.


