


This article covers various aspects of test orchestration in Docker Swarm. It explains the running of applications in Docker Swarm, and guides the reader through the process of testing while scaling containers up or tearing them down.
Monolithic applications are moving into microservices based technologies at a faster rate than ever. Many such bigger environments are using Docker Swarm or Kubernetes technologies for container orchestration and monitoring. These large environments always need testing to be carried out before going into production. Testing in such dynamic and fast growing environments is challenging, and needs extra effort and caution. This article will address such configuration challenges, scalability aspects and the handling of Docker Swarm as the environment.
Docker Swarm and the need for orchestration
As explained earlier, the most important aspect of Docker containers is to achieve scalability. Achieving scalability is a huge challenge in non-Docker environments, which is why people prefer Docker containers. When maintaining just a few containers and fewer services/applications, there are no issues, but running thousands of container images and hundreds of services would make such scenarios complicated. That is when we see the potential need for orchestration in containers.
Orchestration is needed to automate the deployment, management, scaling, networking and availability check of the containers. Again, as explained in the introductory section, especially in large and dynamic test environments, test teams or the entire operations teams can use container orchestration to control the following tasks:
- Provisioning of containers
- Deployment of containers
- Availability of containers
- Allocation of resources between containers
- Movement of containers from one host to another in case of any host/hardware failures
- Scaling up (or down) containers for equivalent application spreads
- Load balancing of services across the containers
- Movement of test data and test cases while the containers are running
- Bulk transfer of test data or configuration data for all containers
As mentioned, we have selected Docker Swarm to do the job of orchestration. This orchestrator is bundled with Docker containers, a feature inbuilt into this stream, and this technology is extremely simple to use and configure. For small tests, development teams and deployments, Docker Swarm is the preferred choice. For large tests and development teams and deployments, we can opt for Kubernetes, which is another favourite choice.
For more detailed information about Docker Swarm and its various commands, do refer to the links given below:
- https://docs.docker.com/engine/swarm/
- https://docs.docker.com/engine/reference/commandline/swarm/

 Running applications in the Docker Swarm environment
Before we explore how to run applications inside the Docker Swarm environment, we need to build the images that are stored in Docker Hub or those present in the local registry. Once we have the images identified and ready, Docker Compose needs to be built with various components.
Here we have taken the Jmeter application as an example. The images have been built using Jmeter and its required resources, which are stored with the name ‘ubuntujmeter’ in the host machine.
Jmeter is a popular open source load testing tool. Each Jmeter instance generates a certain load on to the system under test. By making it replicable, Docker enables sharing the JMeter tests between users and replicating the test environment.
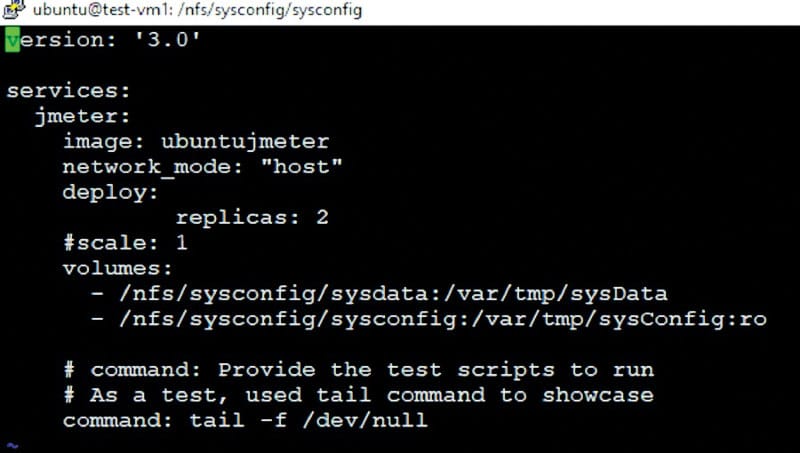
The following is the Docker Compose file that we have created for this scenario:
version: ‘3.0’

services:

jmeter:

image: ubuntujmeter

network_mode: “host”

deploy:

replicas: 2

#scale: 1

volumes:

- /nfs/sysconfig/sysdata:/var/tmp/sysData

- /nfs/sysconfig/sysconfig:/var/tmp/sysConfig:ro

# command: Provide the test scripts to run

# As a test, used tail command to showcase

command: tail -f /dev/null
In the above file, the deploy command has the parameter replicas, which defines the default value of the number of instances needed to be run while starting the services. Here we have specified two instances to be started in two different nodes. Do check out the Docker-compose file command reference for the rest of the content in the file at https://docs.docker.com/compose/overview/.
Now, execute the following command to start the services:
# sudo docker stack deploy --compose-file docker-compose.yml <servicename>
Here, the service name is stackjmeter.
In the above configuration, we can easily verify that two instances have been started. Use the following command to verify this:
# sudo docker service ls
Now that the instances have been started in both the nodes and they are ready, log in to both the nodes and check the running instances. In the screenshot in Figure 3, we have logged into both the nodes simultaneously, and the results can been seen in the figure.
Note: The one on the left hand side window is the master node running a Docker instance, and on the right hand side is the slave node running another Docker instance of the same image.
 Dynamically scaling applications up or down in a test environment (TE)
In the above section, we looked at starting applications and then taking them to the running state. This we have done using distributed nodes in a test environment. Based on the scalability requirements described earlier, we can easily scale the applications that are running, up or down, dynamically — without stopping the tests.
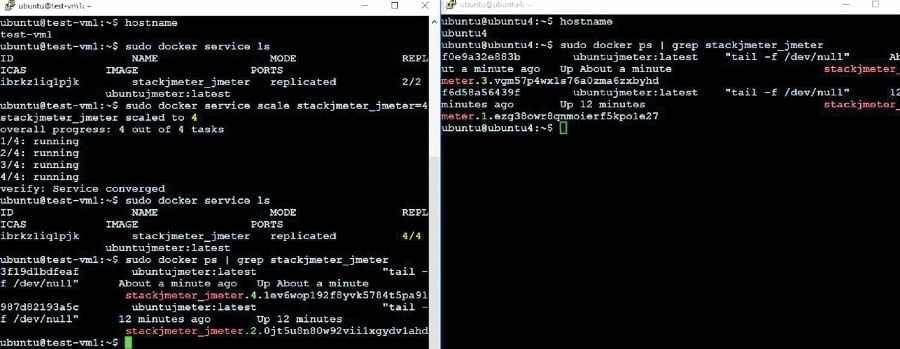
In this scenario, we will increase the number of containers to scale up to four instances of the Jmeter application image bundle. Execute the command given below to increase the count of containers to four:
# sudo docker service scale stackjmeter_jmeter=4
The screen shots in Figure 3 were taken at the same instant, on both the nodes.
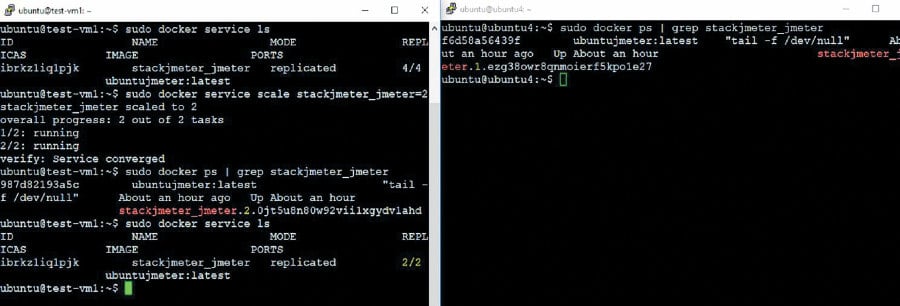
Now we can see that two instances of Jmeter are running in each of the nodes. Similar to the above steps, the scaling down of instances can be achieved dynamically without influencing the other running instances. To scale down and go back to the earlier state of only two instances of the Jmeter application bundle, execute the command given below on the master node:
# sudo docker service scale stackjmeter_jmeter=2
One instance in each node has been brought down, and we can see that only one instance is running in each of the nodes.
Note: In the sections ‘Running applications in the Docker Swarm environment’ and ‘Dynamically scaling applications up or down in a TE’, all the procedures/steps can be executed via SSH with a remote login.
Test data management in Docker
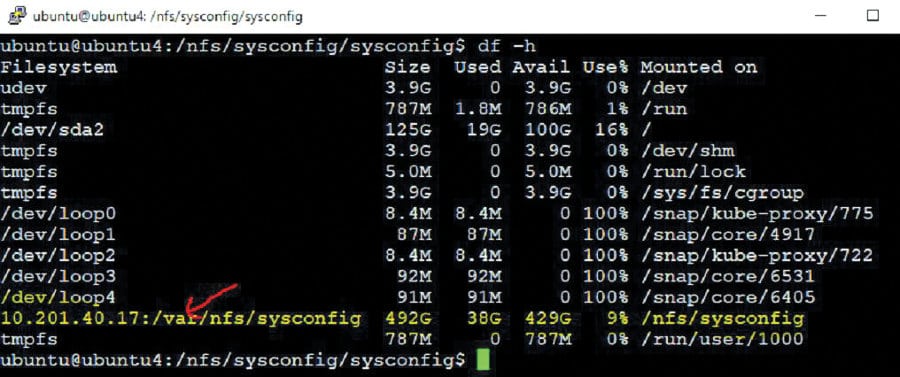
Since tests are running in a distributed and dynamic environment, maintaining the test data across the containers is very important. To avoid generating duplicate data or losing data during creation, tearing down of instances or containers is also critical. This can be achieved through NFS mount and by having a common NFS mount point across the containers. The following are the procedures that can be followed to create and share the NFS mount point.
On NFS server (master node)

#sudo apt-get update

#sudo apt-get install nfs-kernel-server

#sudo mkdir /var/nfs/sysconfig -p

#ls -la /var/nfs/sysconfig/

#sudo chown nobody:nogroup /var/nfs/sysconfig

#ls -la /var/nfs/sysconfig/

#sudo systemctl restart nfs-kernel-server

#sudo ufw allow from <IP address of NFS client> to any port nfs
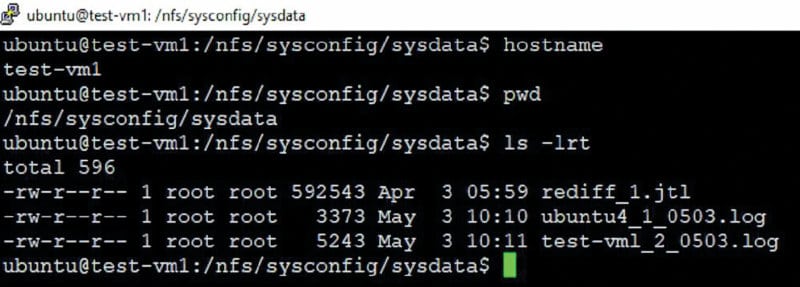
So the test data, agent scripts and images are managed in the directories under /nfs/sysconfig/, which is /nfs/sysconfig/sysconfig (refer to Figure 1 and the first code snippet in the article).
Persistence of test results and logs
Storage of test results and logs is mandatory for any test management, and we need to maintain data persistence even after tearing down the instances and the containers. To achieve this, follow the procedure explained below.
As stated earlier, similar to the above test data management, test logs and test results are stored in the NFS mount. All the test logs and the test results are stored and managed in the directories under /nfs/sysconfig/, which is /nfs/sysconfig/sysdata (refer to the first code snippet).
Here, all the data is stored in the NFS server (master node) mount point for testing purposes. We assume that this master node is always running in the test environment. Alternatively, the NFS mount point can be created using any of the storage networks or in the cloud.
Note: By doing so we can ensure the isolation of environments.

 Tearing down test environments
Once the testing is done and we do not require any of the configurations, this complete environment can be shut down or brought down. To do this, we need to bring down all the services, instances and containers. This can be achieved through a step-by-step approach or through a single command. Execute the command shown below to tear down all the instances simultaneously:
# sudo docker stack rm stackjmeter
The stack rm command brings down all services, removing them completely. However, if we need to have any references, all the logs and test results are stored on the NFS mount points, which enable us to do subsequent tests faster.
This article is a quick reference for achieving CI/CD context and a faster time to market in dynamically changing test environments. In addition, it offers a method for having test logs/results that are as persistent as possible, across environments. These steps help in achieving a reduced test cycle time, by enabling fast and flexible test life cycles.


