


Apache Kafka is a distributed streaming platform. It is incredibly fast, which is why thousands of companies like Twitter, LinkedIn, Oracle, Mozilla and Netflix use it in production environments. It is horizontally scalable and fault tolerant. This article looks at its architecture and characteristics.
Apache Kafka is a powerful asynchronous messaging technology originally developed by the LinkedIn Corporation, which open sourced it in 2011. It eventually became a part of the Apache project. Kafka, which has been named after the acclaimed German writer, Franz Kafka, is basically a publish-subscribe based fault tolerant messaging system. It can be used to feed events to complex event streaming systems and IoT style automation systems, and also be used with in-memory micro services to provide durability.
In this article, I will explore the architecture and characteristics of Apache Kafka, as well as explain how to install it. This should help readers understand why Kafka is better than a traditional message server.
Kafka often gets used in real-time streaming data architectures to provide real-time analytics. Since it is fast, stable, scalable, reliable and has higher throughput, it is used in cases where open source message brokers like JMS, RabbitMQ and AMQP may not even be considered due to reasons linked to volume and responsiveness. The main reason for Kafka’s popularity is its exceptional performance and operational simplicity. In Kafka, the communication between the clients and the servers is done by a simple, high-performance, language-agnostic TCP protocol. This protocol is versioned and maintains backward compatibility with older versions.
Kafka is a robust queue that can handle a high volume of data and enables you to pass messages from one end-point to another, which is suitable for both offline and online message consumption. Built on top of the Zookeeper synchronisation service, it integrates very well with Apache Storm and Spark for real-time streaming data analysis.
Apache Kafka – the fundamentals
To understand how Kafka works, let’s dive in and explore its capabilities from the bottom up. Before going forward, you need to be aware of the main terminology used, such as topics, brokers, producers and consumers.
1. Topics: A stream of messages belonging to a particular category or feed name is called a topic, which is a unique term for a Kafka stream. Producer applications write data to topics and consumer applications read from topics.
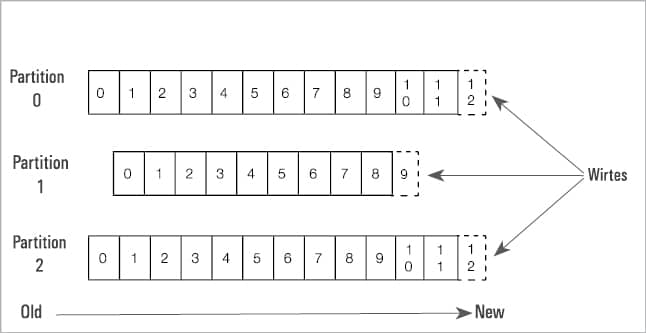
2. Partitions: Each partition is an ordered, immutable sequence of records, identified by its unique sequential ID number called an offset, which is continually appended to a structured commit log.
3. Brokers: A broker is a Kafka server. As the name suggests, the producer and consumer don’t interact directly but use the Kafka server as an agent or broker to exchange message services. Unlike other message systems, Kafka brokers are stateless.
4. Clusters: Since Kafka is a distributed system, it is simply a group of computers, each executing an instance of the Kafka broker.
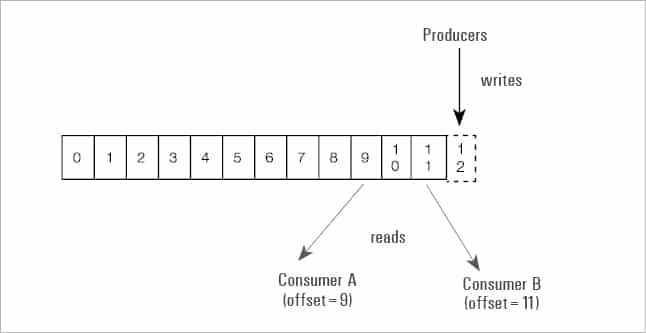
5. Producers (an application): Producers publish messages to the topics of their choice. The producer is responsible for choosing which record to assign to a particular partition within the topic.
6. Consumers: Consumers read data from brokers. They are applications that feed on data streams from topics in the Kafka cluster.
7. Zookeeper: This is used to manage and coordinate a Kafka broker. It is primarily used to notify producers and consumers about the presence of a new broker or about the failure of a broker in the Kafka system.
Zookeeper is a distributed configuration and synchronisation service, which serves as the coordination interface between the Kafka brokers and consumers. Since all the critical information is stored in Zookeeper and it normally replicates this data across its ensemble, failure of a Kafka broker or Zookeeper does not affect the state of the Kafka cluster.
The Kafka messaging workflow
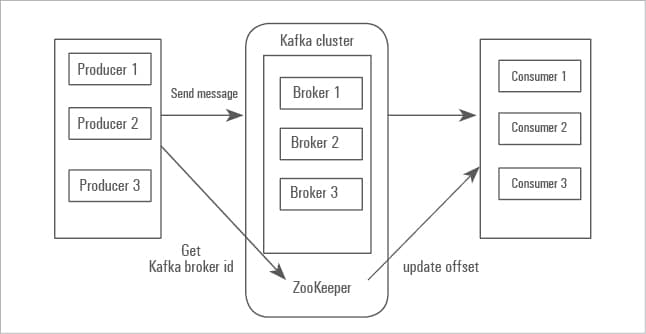
Let us now focus on how Kafka works. The producer sends messages through Kafka topics which get partitioned and distributed across the cluster by brokers. Many producers and brokers share the workload to receive data. The consumer subscribes to the topic, and Kafka provides the current offset of the topic to the consumer and also saves the offset in the Zookeeper ensemble.
The consumer sends an acknowledgement to the Kafka broker. Once the acknowledgement is received, it changes the offset to a new value and updates Zookeeper. Consumers can join the consumer group. The number of partitions impacts the maximum parallelism of consumers, as we cannot have more consumers than partitions.
Kafka doesn’t allow more than two consumers to read the same topic simultaneously. This restriction is required to avoid double reading of data. Moreover, Kafka guarantees that a message is only read by a single consumer in the group. Data/messages are never pushed out to the consumer. The consumer will ask for messages when it is ready to handle them. Consumers never overload themselves with lots of data or lose any data since all the messages are queued in Kafka.
You will need a Java Runtime Environment to install Kafka.
Step 1: Installing the Zookeeper framework
a) Downloading Zookeeper
To install the Zookeeper framework on your machine or standalone mode, download its latest version and extract the tar file using the following command:
http://zookeeper.apache.org/releases.html

tar -zxf zookeeper-3.4.6.tar.gz

cd zookeeper-3.4.6

mkdir data
b) Creating the configuration file
Open the configuration file named conf/zoo_sample.cfg and set the following parameters:
$ vi conf/zoo_sample.cfg

tickTime=2000

dataDir=/path/to/zookeeper/data

clientPort=2181

initLimit=5

syncLimit=2
Once the configuration file has been saved successfully, return to the terminal again and start the Zookeeper server.
c) Starting the Zookeeper server and getting connected
To do this, give the following command:
sudo bin/zkServer.sh start
After executing the above command, you will get the response shown below:
ZooKeeper JMX enabled by default

Using config: /home/user/Desktop/zookeeper-3.4.6/bin/../conf/zoo.cfg

Starting zookeeper... STARTED
c-1) Connecting to the Zookeeper server
Next, give the following command:
sudo bin/zkCli.sh
You will be connected to the Zookeeper server and will get the following response:
Connecting to localhost:2181

2018-05-31 16:48:40,828 [myid:] - INFO [main:Environment@100] - Client environment: zookeeper.version=3.4.10-39d3a4f269333c922ed3db283be479f9deacaa0f, built on 03/23/2017 10:13 GMT

2018-05-31 16:48:40,846 [myid:] - INFO [main:Environment@100] - Client environment:host.name=linux-neethu

2018-05-31 16:48:40,846 [myid:] - INFO [main:Environment@100] - Client environment:java.version=1.8.0_171

----------------------------

Welcome to ZooKeeper!

-----------------------------

WATCHER::

WatchedEvent state:SyncConnected type:None path:null

[zk: localhost:2181(CONNECTED) 0]
d) Stopping the Zookeeper server
After connecting the server and performing all the operations, we can stop the Zookeeper server with the following command:
$ sudo bin/zkServer.sh stop
Step 2: Apache Kafka installation
Perform the following steps to install Kafka on your machine.
a) Downloading Kafka and extracting the tar file
To install Kafka on your machine, click on https://www.apache.org/dyn/closer.cgi?path=/kafka/0.9.0.0/kafka_2.11-0.9.0.0.tgz. Extract the tar file using the following command:
tar -zxf kafka_2.11-1.1.0 tar.gz

cd kafka_2.11-1.1.0/
b) Starting the server
Start the server by using the following commands:
bin/kafka-server-start.sh config/server.properties

[2018-05-31 11:53:48,631] INFO KafkaConfig values:

alter.log.dirs.replication.quota.window.size.seconds = 1

broker.id.generation.enable = true

log.preallocate = false

log.roll.hours = 168

security.inter.broker.protocol = PLAINTEXT

request.timeout.ms = 30000

zookeeper.connect = localhost:2181

…………………………………………….
c) Stopping the server
Use the following command to stop the Kafka server:
bin/kafka-server-stop.sh config/server.properties
Single node, single broker configuration
Now that we have installed Zookeeper and Kafka on our machine, start Zookeeper before moving to the Kafka cluster.
Open a new terminal and type the following command:
bin/zookeeper-server-start.sh config/zookeeper.properties
To start Kafka broker, use the following command:
bin/kafka-server-start.sh config/server.properties
In this configuration, we have a single Zookeeper and broker ID instance. The following steps will help you configure it.
a) Creating a Kafka topic
Topics are logical groupings of messages and Kafka provides a command line utility named kafka-topics.sh to create a topic on the server. Open a new terminal and type the following example:
bin/kafka-topics.sh --create --zookeeper localhost:2181 --replication-factor 1

--partitions 1 --topic topic-name

Example

bin/kafka-topics.sh --create --zookeeper localhost:2181 --replication-factor 1

--partitions 1 --topic Hello-Kafka
We just created a topic named Hello-Kafka with a single partition and one replica factor, similar to the following output:
Output − Created topic Hello-Kafka
Once the topic has been created, we will get a notification in the Kafka broker terminal window and the log for the created topic specified in /tmp/kafka-logs/ in the config/server.properties file.
b) Starting producers to send messages
Use the command given below:
bin/kafka-console-producer.sh --broker-list localhost:9092 --topic Hello-Kafka
The producer will wait on the input from stdin and publish it to the Kafka cluster. By default, every new line is published as a new message, and the default producer’s properties are specified in the config/producer.properties file.
The output is:
$ bin/kafka-console-producer.sh --broker-list localhost:9092 --topic Hello-Kafka

[2018-05-31 16:53:30,931]

Hello

The first message
c) Starting consumers to receive messages
Similar to producer, the default consumer properties are specified in the config/consumer.properties file. Open a new terminal and type the following example for consuming messages (Hello-Kafka is the topic already created). Here is an example:
bin/kafka-console-consumer.sh --zookeeper localhost:2181 —topic Hello-Kafka

--from-beginning

Output

Hello

The first message
We are now able to enter messages from the producer’s terminal and see them appearing in the consumer’s terminal. So is the case with single node multiple brokers. Since we require multiple broker instances, copy the existing server.properties file into two new config files and rename them accordingly. Next, edit broker.id, the port of server socket and log.dirs. Start multiple brokers, create topics, start producers and consumers, and the cycle continues.
To recapitulate, Kafka supports many industrial applications such as Twitter, LinkedIn, Oracle, Mozilla, Netflix, etc. Kafka gets used for stream processing, to track website activity, for metrics collection and monitoring, log aggregation, real-time analytics, ingesting data into Spark and Hadoop, CQRS, replay messages, error recovery, and so on. Being designed as a distributed, scalable infrastructure component makes it an ideal backbone through which services exchange and buffer events. This article will be useful in creating Kafka producers and consumers using Kafka clients which are available for most programming languages.


