


This article is a tutorial on integrating the Docker workflow with Jenkins Pipeline.
In this article we will look at working with the pipeline script, Jenkinsfile, to which we will add the functionality to download a simple image from Docker Hub, build the image (identical copy), start a container off that image, run a simple test and, finally, if the test is passed, tag and publish the built image to the registry hosted in Docker Hub.
The prerequisites are:
- Jenkins v2.x standard install with the Pipeline plugin suite.
- A built agent setup capable of running Docker commands, configured as a node in the master.
- Basic knowledge of Groovy DSL to write pipeline code (either scripted or declarative syntax).
Plugins
Other than the set of plugins bundled as part of a Jenkins installation, ensure the plugins listed below are available as well, as they are essential to run the pipeline script that we will develop in this article.
- https://plugins.jenkins.io/docker-commons
- https://plugins.jenkins.io/docker-workflow
- https://plugins.jenkins.io/docker-traceability
- https://plugins.jenkins.io/credentials-binding

All the code snippets shown in the example below follow the declarative syntax as it’s easier to get started with pipeline-as-code, which is especially attractive to beginners. Following this syntax, the complete pipeline-as-code is contained within a template that follows this pattern.
pipeline {

agent, environment, options, parameters go here

various stages to execute build go here

build commands or script to perform various

tasks go here

tasks related to post-build go here

}
It’s good to explore the links given below for a quick glance at pipeline syntax, as well as for the steps and examples. They are quite handy and serve as a great reference.
- https://jenkins.io/doc/pipeline/steps
- https://jenkins.io/doc/book/pipeline/syntax/
- https://github.com/jenkinsci/pipeline-examples
Docker support
Let us begin by looking at the agent section which has the provision, amongst others, to support the Docker build in the pipeline. The documentation here provides details on the various options within this section; let’s have a brief look at the options available for Docker.
Option 1: For simple use cases that involve the pipeline (a node on which a build job runs as per the label), this suffices – a Docker image serves as the build agent (a.k.a. node, FKA or slave).
pipeline {

agent {

docker {

image ‘name-of-image’

label ‘preconfigured-node-to-download-this-image’

}

}

}


Option 2: The pipeline will execute the stage(s) using the container built from Dockerfile, located in the source of the repository. For this to work, Jenkinsfile must be loaded from either a multi-branch pipeline, or pipeline from SCM. Here, the agent is instantiated using the Dockerfile.
pipeline {

agent { dockerfile true }

}
Option 3: The pipeline will execute the stage(s) using the container built on an agent using a custom Dockerfile sourced from SCM.
pipeline {

agent {

dockerfile {

filename ‘Dockerfile.hello-world’

label ‘preconfigured-node-to-download-this-image’

}

}

}
Each option serves different purposes, and possesses advantages over others. While the first option is limited in the usage of args (it can be added before the script but can become cluttered and difficult to maintain), the second and the third options rely on the presence of Dockerfile as part of the repository that’s hosting the source code.
It should be noted that all the three options are valid usage, and the pipeline will start with the agent setup with Docker args as shown in Figure 1.
Jenksinfile, the pipeline script referred to earlier, is set up to pick any build agent that’s capable of running Docker commands. In non-production environments, this kind of resource usage is not recommended and can lead to potentially unstable builds in the long run. It’s a good practice to pin the pipeline to specific agent(s) that carry the label as given in the pipeline script.
While the dedicated build agent is capable of serving the build job request, as routed by the master, the other usage pattern is to spin-up build agent(s) (in the cloud or on-premise) on-demand as per the system configuration in the Jenkins master. The provision to create the build agent, when one is not available, greatly reduces the upfront investment on capacity planning but one should be aware that the provisioning duration, i.e., the agent creation time, will delay the actual start of the build until such an agent is online and can communicate with the master.


Hello World
Let us refer to a simple (public) image from the Docker Hub registry: https://hub.docker.com/r/tutum/hello-world/. Based on the description provided at the Docker Hub, this image is meant to test Docker deployments. It has Apache with a ‘Hello World’ page listening in on Port 80.
The rest of the article will focus on developing the pipeline script, gradually. However, the final and functional version can be accessed from the branch, the docker-build that hosts the script, in the following public GitHub repository: https://github.com/mramanathan/jenkins_pipeline_demo/blob/be129179271b1b0341727f93a399fb34d8133c6d/Jenkinsfile.
And the associated Dockerfile (two lines of code) is quite basic, as shown in Figure 5. This is stored at the root of SCM, and is available in the same public GitHub repository:
As noted earlier, the pipeline script refers to any available node, where the build will be scheduled by the Jenkins master.
Registry settings
On successful completion of validation, the pipeline script will push the image to the repository, raspamdocker/osfy which is hosted at the https://registry.hub.docker.com. The repository’s name and URL will be set in the environment section of the pipeline script as shown in Figure 2. This global setting enables all the stages that follow, and helps to access them as any other environment variable.
In contrast to the scripted syntax, each individual stage is grouped within a global and single enclosing block that is called ‘stages’, in the declarative syntax.
Pipeline script from SCM
Until the default checkout operation is disabled via skipDefaultCheckout (that should go in the options section), the pipeline will automatically clone the contents of the GitHub repository, as set up in the project configuration in Jenkins.
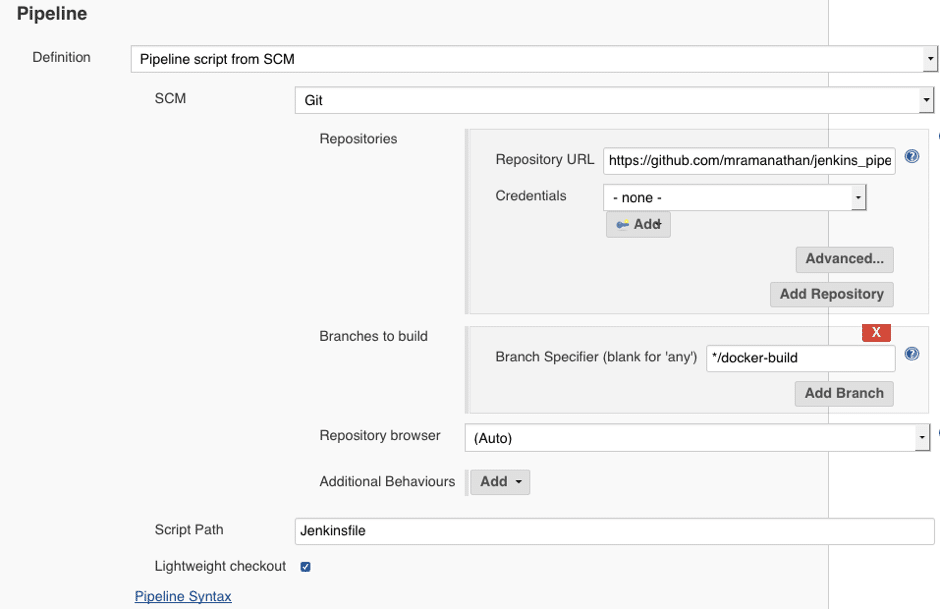
As shown in Figure 3, a project that was set up in the Jenkins instance managed by the author is configured to source the pipeline script from SCM—in this case, from a public Git repository hosted in GitHub. Jenkinsfile’s name and path is set up in the Script path field, while the name of the branch name provided in the Branches to build helps to locate the script in that branch.
The Additional behaviours section (located just below the Repository Browser field) helps to speed up the Git clone operation by setting options like minimising the refspecs to be used, timeout the operation, turn on or off the tags to download, etc. This is meant for power users and is a big time-saver if the repository to be cloned has a substantial history of refspecs (branches, tags, etc).
Git commit’s SHA1
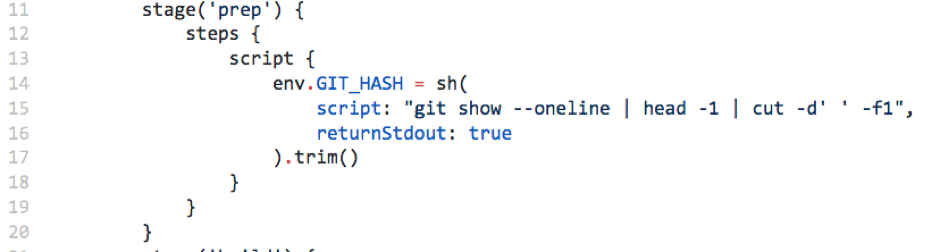
The first stage, prep (short for preparatory), runs a simple Git command, the output of which is processed further with the aid of basic UNIX commands to get the trimmed seven digit SHA1 of the Git commit. The output is stored in an environment variable as shown in Figure 4. While the Git command is comprehensible, there are a few other items in this code snippet that should be explained.
The entire Git command is contained within the sh step, and we will record the output (retrunStdout: true) that we get after executing the command. The output from the command is passed through the trim function to a strip of extra space. This (trim) functionality is courtesy of the JIRA ticket of the Jenkins project.
Note: Any operation that demands usage of the Groovy language constructs within the pipeline script (applicable to only declarative syntax) should be enclosed in the script block. But how does one know when to or when not to use this block; flow control structures, variable definitions, function calls – all of these are fit to go inside the script block. And, of course, it is only by continuous practice that one gets to comprehend the usage of this block.
Access to Docker-related functions
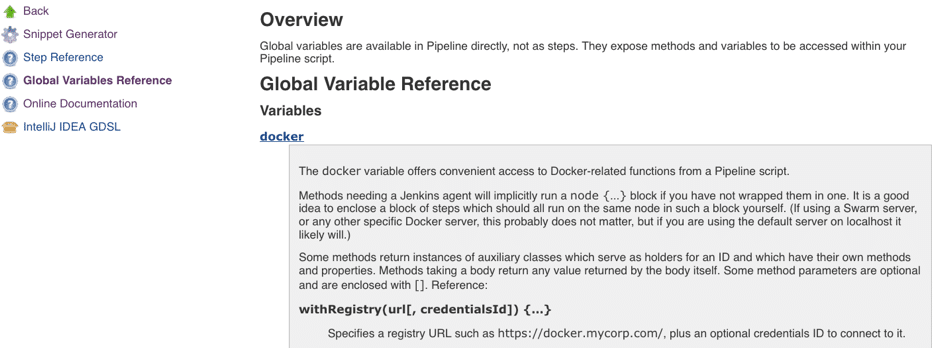
With the installation of plugins (as listed in the Plugins section), the pipeline script has access to a host of Docker-specific build commands via the Docker variable (Figure 5 shows a list of variables offered by the Docker variable). Navigate to this page by clicking on the Pipeline Syntax option in the project page and selecting the option Global Variables Reference (shown in Figures 6 and 7).
Access to Docker commands, via the Docker variable, makes it very convenient to write simple pipeline script using the different functions, like docker.build(). Otherwise, this would have to be done by wrapping the regular Docker commands inside the sh step. For extensive reading on this topic, refer to Jenkins documentation on using Docker with Pipeline, which provides documentation with code samples, which are very handy, and covers various use cases.
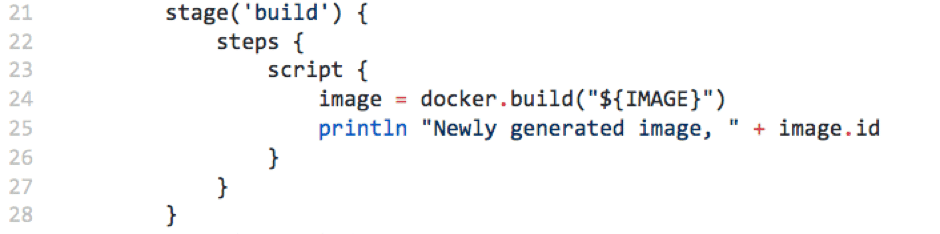
Docker build
The build image (Figure 8) shows the docker.build() running without any arguments other than ${IMAGE}; however, it can take additional arguments via —build-arg. This behaviour is identical to the Docker build, so it must end with the build context. The output is saved to a variable, which contains the image object that will be used in the following stages.
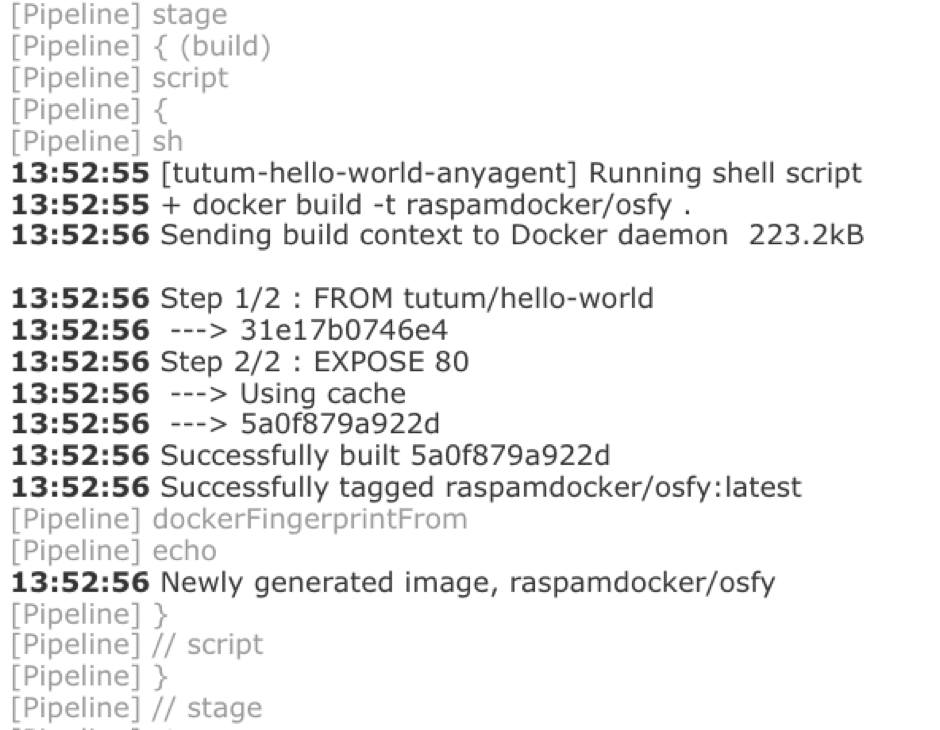
The console output (Figure 9) showing the execution of the build stage helps to trace the sequence of events in the build console log from a successful execution of the build stage, as per the code snippet shown in Figure 8. From the log, it’s clear that Docker has used the cache while executing one of the steps, because there were a few repeated runs of the build job (on the same build agent).
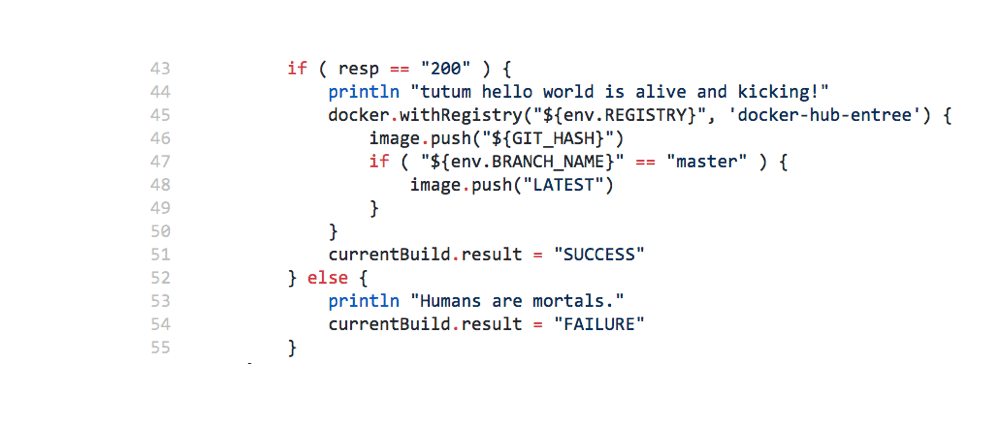
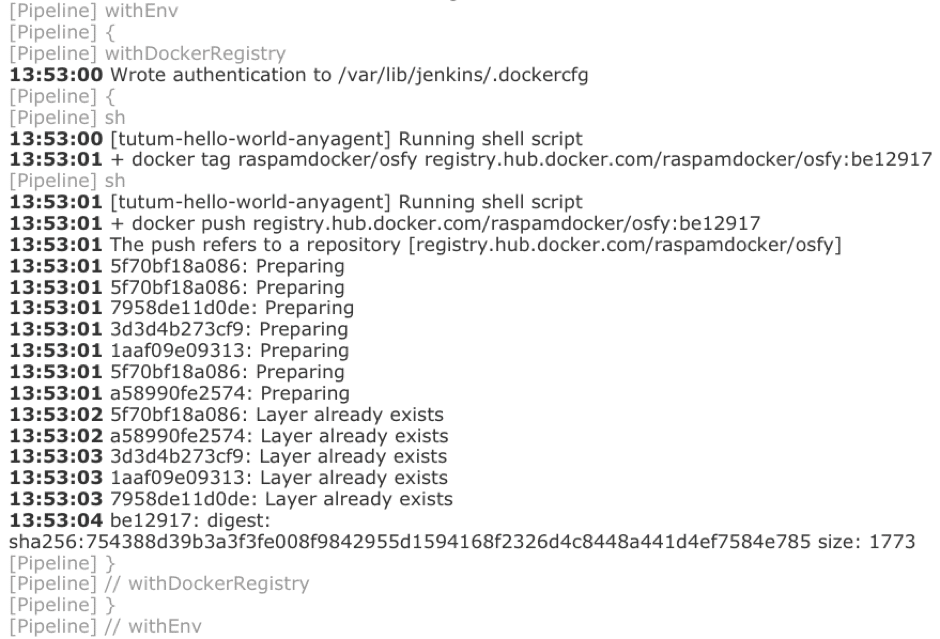
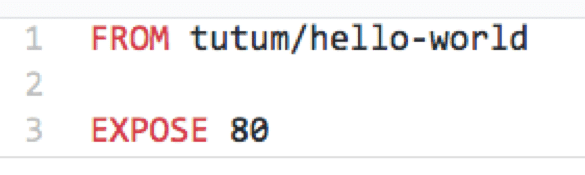
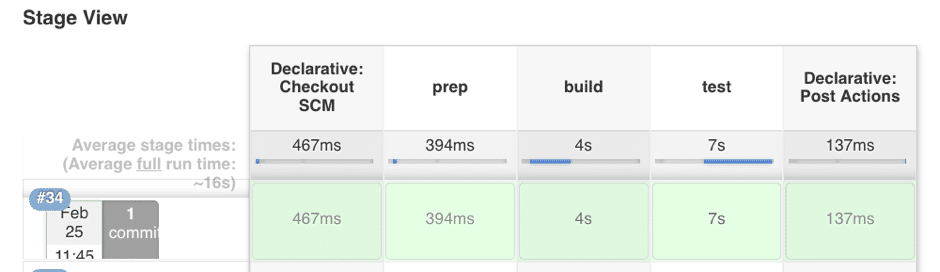
Image validation
Remember the note about ‘Hello World’ mentioned earlier while introducing this public image hosted at Docker Hub – the image runs Apache at Port 80.
If you were building the image locally in your laptop or desktop, then a new container can be started using the image. Get to know the port using the docker port command, and test it using a Web browser by pointing to the appropriate port on the local host. It is port 80 in the running container but different in the local host. The challenge lies in how to simulate this flow in a CI environment.
Starting a Docker container
Let’s start a container that’s based on the newly built image and use the curl command with a few options (which will be explained), as shown in Figure 10. Start a new container to simulate (programmatically using pipeline-as-code) what was possible in a Web browser.
Line 33 is another example to show the usage of a function from the Docker variable – this helps to start a new container at Port 80 and its output is stored in a variable container. To know the port mapping on the host, in Line 34, run the pipeline equivalent of the Docker port command.
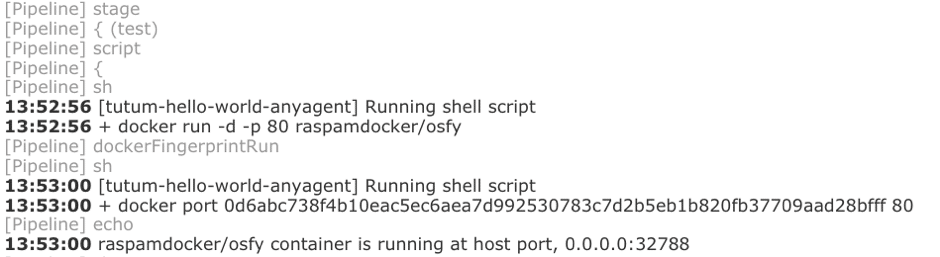
To reinforce this, let us look at Figure 11, which is an extract of the build console output generated from executing Lines 33 to 35 as part of the full run of the build job.
Note: On every start of a new container (Docker runs using the CLI or by running a new job of the project in Jenkins), using the ‘Hello World’ image, port mapping in the local host will be different.
Querying Apache’s port
From Figure 11, we know the port mapping on the local host (here it is 32788, but could be different in your setup) for this run of the build job. Now, curl can be used to hit this port in the local host, i.e., the build agent in the context of the build job being executed—we will be interested to know the HTTP response (code) as confirmation of having reached the running container successfully.
Curl’s output is muted (-s option) and is redirected to (-o /dev/null). For a full explanation of the options, see the man pages of Curl. To keep things brief, we will skip discussing the triple quoted double string – those interested can refer to the Groovy documentation.
Registry upload
Now, it is time to validate the output by running the curl command on the port in the host. The expected response is 200, to denote an OK; if not, we will mark the build as Fail.
After checking for the response from the curl command stored in the variable, resp, the pipeline script either pushes the image to the repository hosted in Docker Hub’s registry or fails the build (the image is not pushed to the registry).
Lines 45 and 46 tag and push the image to the repository, raspamdocker/osfy, hosted in the registry, https://registry.hub.docker.com. Recall these were defined in the environment block of the script, as indicated in Figure 2. Credentials to access the registry are stored in Jenkins and accessed using the ID, docker-hub-entree.
Also worth mentioning is the check on the branch name, as in Lines 47 to 49, based on which an additional tag is applied to the image and pushed. This approach, i.e., the conditional execution of pipeline code, helps to control the flow of the build.
Assuming that the host port is reachable, the pipeline will tag and push the image, which can be seen in Figure 14.
Authentication to the registry is followed by tagging the image, which is then pushed to the repository.
The final act
Declarative syntax offers a multitude of possibilities as part of the post block – various actions can be grouped and executed if certain conditions are met, i.e., always, failure, changed, and so on (as permitted by the pipeline plugin). These conditions are a reflection of the overall build status as tracked (it can be manually set too) by the pipeline.
In the pipeline script referenced for this article, the build workspace is set to be cleaned always (no matter what the build status is, as influenced by the previous stages).
Successfully running the build job (using the pipeline script) should result in a state of the project’s build job, as shown in Figure 16.


