
This tutorial will help you build a 2D platform arcade style game, using the PhaserJS framework, within a few minutes.
PhaserJS is a popular, free and open source HTML5 framework for game development on mobile and desktop browser platforms. It uses HTML5 Canvas for rendering and also WebGL if the device or browser supports it. It is one of the most popular and easy-to-learn game development frameworks and is based on pure Web technologies such as HTML, CSS and JavaScript. With over 15,000 stars and almost 5000 forks at the time of writing this article, it is also one of the most popular and actively maintained game frameworks on GitHub.
Thousands of developers all around the world use Phaser, as it has some great features which are listed below.
Supports JavaScript and TypeScript: PhaserJS supports both JavaScript and TypeScript; so either of these languages can be used to develop games.
Uses WebGL and Canvas: PhaserJS uses both WebGL and Canvas internally, and has the ability to switch between them based on browser support. This allows fast and robust rendering across various mobile and desktop platforms.
Optimised for mobile browsers: PhaserJS was built keeping the mobile Web browser as the target platform, so it is highly optimised for mobile as well as for desktop browsers.
Built-in physics engines: PhaserJS has three built-in physics engines — Arcade Physics, a lightweight engine useful for developing arcade style games; Ninja Physics for advanced tile support; and p2.js, which supports character rigging, constraints and advanced polygon support.
Assets preloader: Assets, images, sprites, sheets, sounds, tilemaps, JSON data, XML, etc, are loaded with ease, parsed and handled automatically—to be used in games and stored in the global cache.
Particles, animation and sprites: PhaserJS has a built-in particle system, which allows developers to easily create cool particle effects such as rain, fire, snow and water. It supports Flash CS6/CC JSON files to create animation for sprites.
Input support: It supports multi-touch, mouse and keyboard. It also allows the user to code custom gesture control.
Plugin system: PhaserJS allows developers to create their own plugins for their games and share them with the community.
Games created using PhaserJS depend on and require a modern browser that supports the Canvas tag, which includes Chrome, Internet Explorer 9+, Firefox, Safari and Opera. It also works on mobile Web browsers such as stock Android 2.x browsers and later, and Mobile Safari for iOS5 and later versions.
Tip: The PhaserJS framework is open source and the source code of the framework is available on GitHub. Developers/programmers are encouraged to participate and contribute to the project.
Installing the prerequisites
Before we start developing our game using PhaserJS, we need to install Node.js, as the PhaserJS framework is also distributed as an npm package and this makes it easy to set up the project structures to develop games.
Note: It is assumed that you have some basic knowledge of Web technologies like HTML, CSS and JavaScript. If you don’t, W3Schools (http://www.w3schools.com/) is a good place to start. The site has some great tutorials for Web technologies that are easy to follow.
Installing Node.js
Download and install Node.js (https://nodejs.org/). PhaserJS is also distributed as an npm package, so we will use Node and npm to install the PhaserJS framework.
Installing Phaser JS
We can install PhaserJS as a node package. Just run the following command in the terminal or at the command prompt:
npm install phaser
This command will install the PhaserJS framework.
Installing an HTTP server
To run the PhaserJS project, we need to install an HTTP server. Run the following command in a terminal or at the command prompt:
npm install -g http-server
This will install an HTTP server as a global module.
Testing if everything is installed properly
Create a folder for your project, and change directory to it. Run the following commands at the command prompt or in the terminal:
mkdir my-game

cd my-game
Initialise the folder using the following npm command:
npm init –y
This will create a package.json manifest file with vital default information about the project, and will add the necessary node modules.
Now create an index.html file and add the following code to it.
<!doctype html>

<head>

<title>My Game</title>

<script type=”text/javascript” src=”node_modules/phaser/build/phaser.min.js”></script>

</head>

<body>

<div id=”helloWorld”></div>

</body>

<script>

var game = new Phaser.Game(640, 480, Phaser.AUTO, ‘helloWorld’, {

create: create

});

function create() {

var text = “OPEN SOURCE FOR YOU”;

var style = {

font: “45px “,

fill: “#ff0000”,

align: “center”

};

var t = game.add.text(game.world.centerX, 240, text, style);

t.anchor.set(0.5);

}

</script>

</html>
Finally, start the server by running the following command at the command prompt:
hs
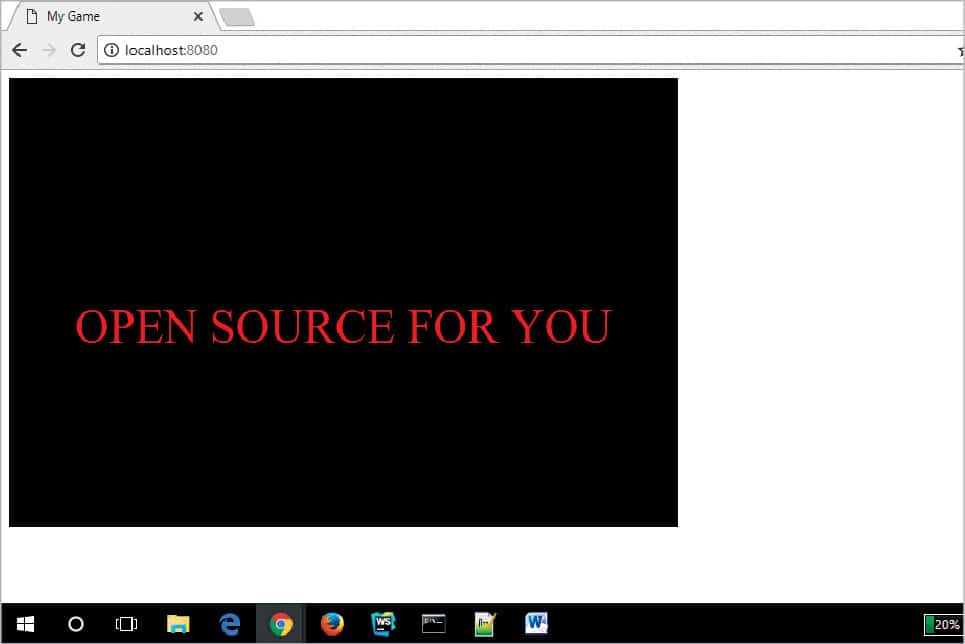
The hs command will start the HTTP server. Now, load http://localhost:8080 in your browser to run the project. If you see the output screen shown in Figure 1, then you have successfully installed all the dependencies required.
Creating a simple 2D platform game
Now we are going to create a simple 2D platform game, that has a character who collects rings and scores points. The game consists of walls, on which the character can jump in order to collect the rings and score points. The player will use the arrows on the keyboard to control the character’s movements.
I have created some assets, like the background image, game sprites, etc. You can download these from http://www.aniket.co/labs/phaser/assets.zip. We are going to use these to develop this game. This zip file consists of four asset files — the sky, the player, the platform and the ring that will be used for our game.
Create a new folder that we can call ring-collector. Move into that directory.
mkdir ring-collector

cd ring-collector
Initialise the folder using npm, and install PhaserJS again for this folder as well. It will pull all the necessary node_modules. Run the following commands in a terminal or at the command prompt:
npm init -y

npm install phaser
Create a folder called assets and extract the downloaded assets.zip into it. Create an index.html file, and add the following code into it:
<!doctype html>

<head>

<title>Ring Collector</title>

<script type=”text/javascript” src=”node_modules/phaser/build/phaser.min.js”></script>

</head>

<body>

<script type=”text/javascript” src=”game.js”>

</script>

</body>

</html>
In the index.html file, load the PhaserJS framework and our game’s logic.
Now create a file called game.js in the same folder, and add the following code. I have also added comments for each line of code to explain what it actually does and why we are using it.
let game = new Phaser.Game(800, 600, Phaser.AUTO, ‘’, { preload: preload, create: create, update: update });

function preload() {

//Loading assets such as background image, object image, game sprites.

game.load.image(‘sky’, ‘assets/sky.png’);

game.load.image(‘ground’, ‘assets/platform.png’);

game.load.image(‘ring’, ‘assets/ring.png’);

game.load.image(‘player’, ‘assets/player.png’);

}

// Variables

let player;

let platforms;

let cursors;

let rings;

let points = 0;

let pointsText;

function create() {

// Since we are building an arcade style game, we enable arcade physics system using following function

game.physics.startSystem(Phaser.Physics.ARCADE);

// This function will add ‘sky’ asset as background to our canvas.

game.add.sprite(0, 0, ‘sky’);

// The platforms group contains the ground and the 3 ledges we can jump on

platforms = game.add.group();

// Enable physics for any object that is created in this group

platforms.enableBody = true;

// Here we create the ground.

let ground = platforms.create(0, game.world.height - 64, ‘ground’);

// Scale it to fit the width of the game (the original sprite is 400x32 in size)

ground.scale.setTo(2, 2);

// This stops it from falling away when you jump on it

ground.body.immovable = true;

// Now let’s create three ledges, at 3 different locations

let ledge = platforms.create(400, 400, ‘ground’);

ledge.body.immovable = true;

ledge = platforms.create(-150, 250, ‘ground’);

ledge.body.immovable = true;

ledge = platforms.create(400, 150, ‘ground’);

ledge.body.immovable = true;

// The player and its settings, such as height and width

player = game.add.sprite(32, game.world.height - 150, ‘player’);

// Enable physics on the player

game.physics.arcade.enable(player);

// Player physics properties, such as bounce and bounding it to canvas only so it does not go off screen

player.body.bounce.y = 0.2;

player.body.gravity.y = 300;

player.body.collideWorldBounds = true;

// Adding some rings to collect

rings = game.add.group();

// We will also enable physics for any ring that is created in this group

rings.enableBody = true;

// Here we’ll create 10 of them evenly spaced apart

for (let i = 0; i < 10; i++)

{

// Create a ring inside of the ‘rings’ group

let ring = rings.create(i * 70, 0, ‘ring’);

// Add some gravity

ring.body.gravity.y = 300;

}

// The pointsText displays current score in top right corner of canvas

pointsText = game.add.text(624, 16, ‘Points: 0’, { fontSize: ‘32px’, fill: ‘#000’ });

// Using keyboard controls

cursors = game.input.keyboard.createCursorKeys();

}

function update() {

// Collide the player and the rings with the platforms

game.physics.arcade.collide(player, platforms);

game.physics.arcade.collide(rings, platforms);

// Checks if the player overlaps with any of the rings, if he does call the collectRing function

game.physics.arcade.overlap(player, rings, collectRing, null, this);

// Reset the players velocity (movement), if no key is pressed

player.body.velocity.x = 0;

// If left or right key is pressed

if (cursors.left.isDown)

{

// Move left

player.body.velocity.x = -150;

}

else if (cursors.right.isDown)

{

// Move right

player.body.velocity.x = 150;

}

else

{

// Dont move

player.animations.stop();

player.frame = 4;

}

// Allows the players to jump only if they are touching the ground.

if (cursors.up.isDown && player.body.touching.down)

{

player.body.velocity.y = -350;

}

}

function collectRing (player, ring) {

// Removes the ring from the screen, when player touches the ring

ring.kill();

// Add and update the score points

points = points + 10;

pointsText.text = ‘Points: ‘ + points;

}
Here, on the first line, we have created an instance of a Phaser.Game object and assigned it to the game variable. The first two parameters in the Phaser.Game function are the width and height of the canvas that Phaser creates. The third parameter can be Phaser.CANVAS, Phaser.WEBGL or Phaser.AUTO, which are for rendering the setting you want to use for your game. I recommend that you use Phaser.AUTO, which will automatically try to use either WebGL or Canvas, based on whichever the browser supports. The fourth parameter is an empty string. Here, you can give the ID of a DOM element where you would like to add the canvas element on the page. We have left it blank, so by default it will be appended to the body element. The last parameter is an object that consists of three references to Phaser’s essential functions.
The essential functions are preload(), create() and update().
preload(): This is used to load the assets needed for our game. PhaserJS will automatically look for this function when it starts, and load any asset defined within it.
create(): This function is used to create the game scene. Here, we add the assets loaded such as the background image, platform, player/characters and other game sprites.
update(): This function is called by the core game loop in every frame. It helps to check what is happening in every frame, like if there is a collision between the player and object, score updates, etc.
Finally, you should end up with the following directory structure:
assets/

platform.png

player.png

ring.png

sky.png

node_modules/

phaser/

game.js

index.html

package.json
Now that we have added the code, let us start a server and see the final outcome. Run the following command in the same directory:
hs
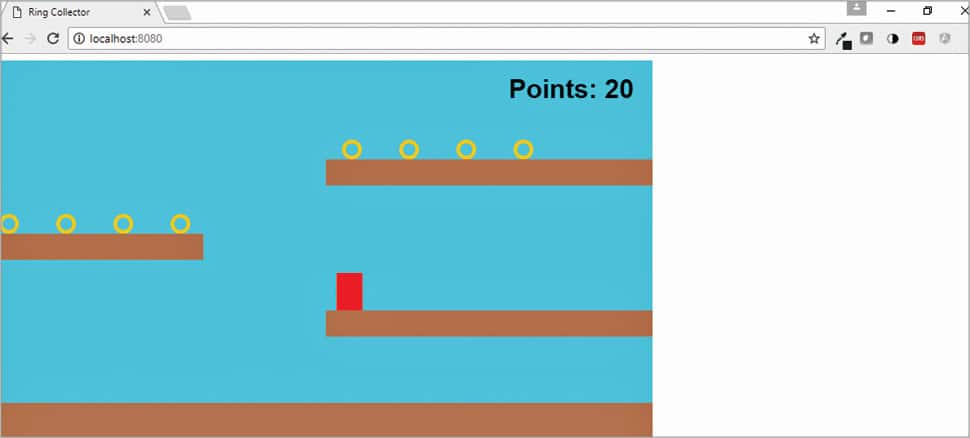
The hs command will start the HTTP server. Now, load http://localhost:8080 in your browser to run the project. If you see the output screen shown in Figure 2, then you have successfully created a simple 2D platform arcade style game. You can use the arrows on the keyboard to control the character and collect rings.
I have uploaded this sample project to my GitHub repository at https://github.com/aniketkudale/ring-collector. You can download it for reference.
You will also find various game physics examples and techniques at https://phaser.io/examples, which you can use in your game to make it more fun-filled.


PhaserJS has always been a super easy game engine for rapid web game development. Article is written to the point.