


If you are planning to kickstart your IoT development plans but aren’t comfortable with any particular programming environment, Node-RED could prove to be just right for you. You can use it to start developing applications with zero or minimal programming effort, and focus more on actual computing, interfacing and communication.
Node-RED is a visual wiring tool initially designed for IoT needs, but is more of a general-purpose tool these days. It can be used for interfacing sensor data, wired/wireless communication, cloud connectivity, data base connectivity, social media alerts, data analysis, system monitoring and, of course, any Node.js functionality. IBM Bluemix, SenseTecnic FRED, AT&T Flow and RedConnect.io are some of the options for getting an instance on the cloud with customised nodes and enterprise grade support. Node-RED forms a part of the Intel IoT gateways as a bridging solution. And it also powers IBM Watson Services.
Installation and initial steps
Node-RED can be installed on top of any Node.js runtime using the npm package manager, but certain nodes are platform-specific (say, with dependencies in Linux), and some are precisely targeted at boards like RaspberryPi for physical computing purposes. More nodes can also be added using npm. Node-RED can be easily managed using pm2, a process manager for Node.js for starting and stopping the instance. It can even run on Android using Termux support, and talk to Arduino-type of microcontrollers through the Firmata protocol. Node-RED can be deployed on any cloud environment with Node.js runtime. Node-RED can also be run in a Docker container, as documented in nodered.org/docs/platforms/docker. It pulls the image the first time and runs in a container. You can add all necessary add-ons to make a custom bundle, as mentioned in the Customising section.
Once Node-RED has started, follow the Getting Started section of the documentation and create simple flows using the UI editor available on Port No. 1880 of the host. Data flows across the nodes through input, output connectors in the form of JavaScript objects named msg, with msg.payload as the key property; function nodes can be used to provide custom logic in between with minimal JavaScript coding.
Here are some nodes of interest for prototyping IoT solutions:
- MQTT out, MQTT in for publish and subscribe.
- Http-request for invoking REST APIs.
- JSON node for stringification or parsing.
- Trigger, delay nodes to control the message flow.
- Twitter nodes for sending or receiving tweets.
- Tcp, udp, Websocket nodes for custom communication.
Here is a list of some more interesting nodes available through add-ons, for prototyping or building powerful bridging solutions:
- Dashboard nodes through the node-red-dashboard add-on for quick UI development, which can render the view well in desktop or mobile browsers for monitoring and controlling services.
- Nodes for discovering and accessing CoAP resources through coap-request node.
- Nodes for peripheral access in Raspberry Pi, BeagleBone Black, Intel Edison, Arduino, etc.
- Nodes for social media access to platforms like Hangouts, Telegram Bot, Facebook, etc.
- Nodes for BLE motes, beacons like TI Sensortag, Eddystone, the Physical Web, etc.
- Nodes for database connectivity with MySQL, MongoDB, InfluxDB, etc.
- Nodes for platform connectivity like IBM Bluemix, Thingspeak, Emoncms, ThingWorx, etc.
- Nodes for cloud services like Azure, AWS, Watson services and Kafka messaging.
- Nodes for communicating with OpenHAB, SiteWhere frameworks.
- Nodes for industrial and automotive needs like Modbus, CANBus, OPC UA, etc.
This is just a sub-set of the available nodes; so stay tuned at flows.nodered.org, which gives the catalogue of custom nodes (around 1500 nodes, at present) and example flows, contributed from time to time. Node-RED can be considered for elegant gateway designs and edge computing with this rich library support. You can identify user contributed nodes with the naming convention of node-red-contrib-xxxx and nodes developed by the Node-RED team with the naming convention of node-red-node-xxxx.
An example: Publishing sensor data to the IoT platforms
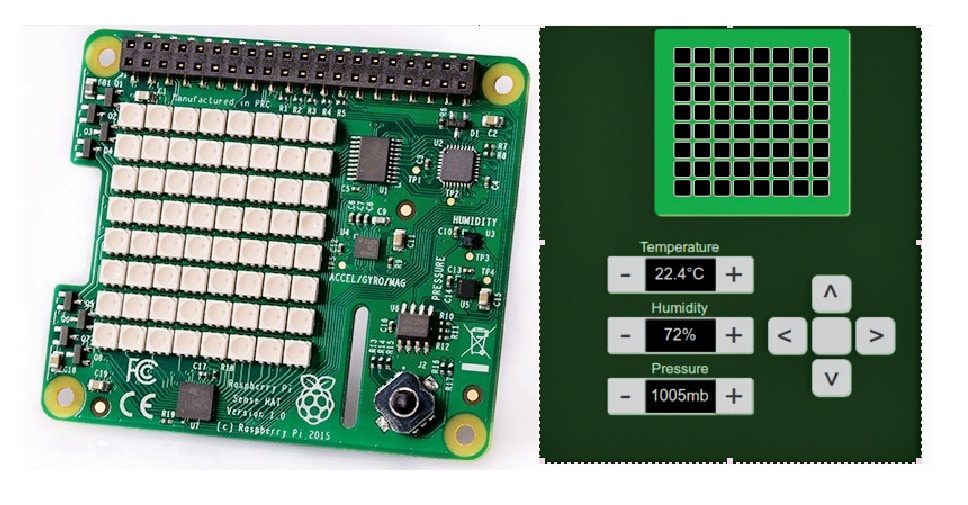
For better understanding of Node-RED capabilities, let’s look at an example of publishing sensor data from a Raspberry Pi attached with SenseHAT to OpenSensors.io with zero coding effort. SenseHAT is add-on hardware for Raspberry Pi introduced by the Astro Pi mission, which comes with the following peripherals and the Python library built on top of RTIMULib, officially maintained by the Raspberry Pi Foundation.
- Temperature, humidity and pressure sensors for environment monitoring
- Accelerometer, gyroscope, magnetometer for motion sensing with 9 degrees of freedom
- Five-button joy stick
- 8×8 LED matrix with RGB support
The recent Raspbian images come with Node.js and Node-RED pre-installed and fortunately, SenseHAT nodes are also pre-installed in Raspbian, through the add-on node-red-node-pi-sense-hat developed by the Node-RED team.
Note: You can follow these steps even if you don’t have a Raspberry Pi or SenseHAT. You can try all these steps on a desktop machine by installing the simulator nodes developed by the same team through the add-on node-red-node-pi-sense-hat-simulator, and access the UI through the link hostname:1880/sensehat-simulator, except for motion events which can’t be simulated at present.
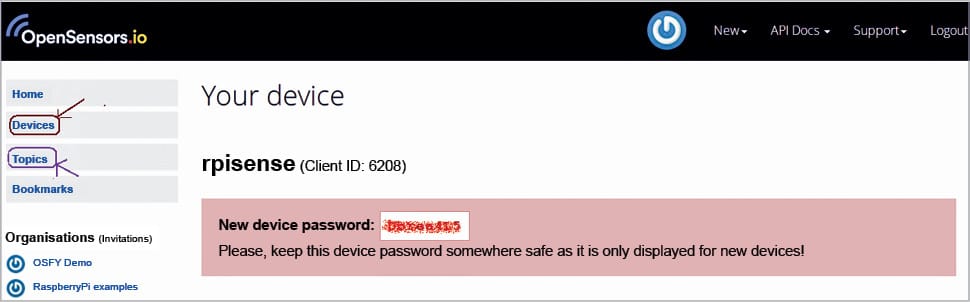
OpenSensors.io is an IoT platform through which devices can send the data using MQTT publish or HTTP post, and data can be retrieved using MQTT subscribe or Realtime REST API support. To get started, create an account under publisher.opensensors.io/login, go to the Devices section, create a new device with a suitable name (say, rpisense), the applicable tags and, optionally, geo coordinates for the device location. Note down the generated client ID and device password. Go to the user profile section and request for a new API key, and note down the generated one. You need not use a portal login password for further data management; this device password and/or generated API key are useful for authorisation.
All messages are organised according to topics as per MQTT influence. A topic can be created on-the-fly based on published messages or can be created explicitly under the Topics section. To avoid collisions, topic names start with /users/xxxx/, where xxxx is the user name in the account credentials. A topic is public, by default, as this platform comes with good support for Open Data policies, so that any one can access the data from this topic without authorisation. But only an authenticated user can update the data. Topics and devices can also be brought in under organisations for better collaborative applications, where applicable public topics can be kept under suitable organisations. Refer to the API docs once, for the available REST APIs to access real-time and historical data.
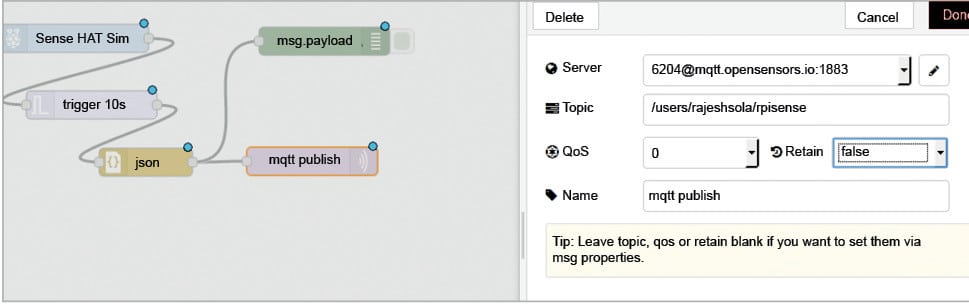
Create a new flow, drag the SenseHAT input node (or simulator node) from the Raspberry Pi category and connect it to a MQTT out node as well as to a debug node, as shown in Figure 3, via trigger and JSON nodes. Configure the SenseHAT node to generate only environment events by deselecting motion and joystick events. By default, this node emits the msg.payload for certain periodic intervals with properties like temperature, humidity and pressure; and message topics such as environment, as per the selection. Since the data rate is very high, add a trigger node in between, with the configuration of Send nothing, then wait for 10 seconds and then send the original msg.payload. You may add a JSON node from the function category after the trigger node to publish data in the JSON format instead of the JavaScript object.
Configure MQTT output node with the following parameters. Under the Connection tab, fill mqtt.opensensors.io as the server host name, 1883 as the port number, and the device ID generated earlier as the client ID. Under the Security tab, fill in the user name and the password generated on device creation, and fill the topic name as /users/xxxx/rpisense/weather by replacing xxxx with your user name.
Simulator node works well with the same steps, except that you keep changing the sensor values manually under the UI tab, i.e., localhost:1880/sensehat-simulator.
Hit the deploy option and monitor the sensor values locally under the Debug tab, as well as published messages in the Topics section of the OpenSensors portal. You can also monitor these messages with MQTT subscribe from other devices with a similar configuration and topic, as this platform supports only one MQTT connection per device.
Local dashboard
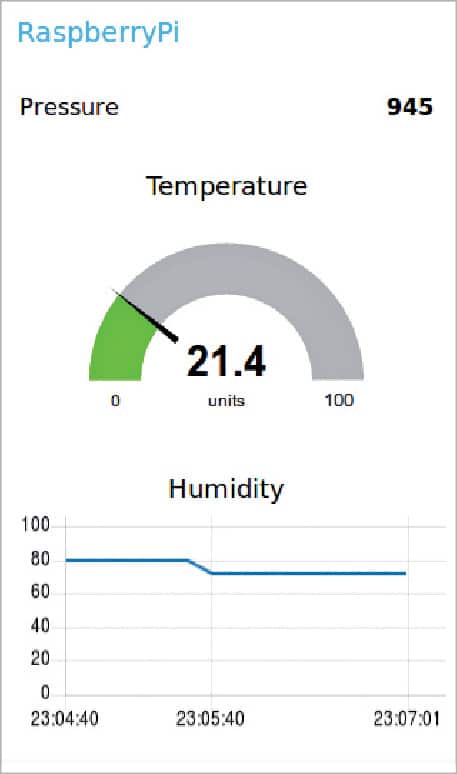
You can also build a simple dashboard for local access, apart from publishing to the cloud. For this, connect the SenseHAT node to a function node, increase the number of outputs to three and fill the following code:
var msg1={}, msg2={}, msg3={};
msg1.payload=msg.payload.temperature;
msg2.payload=msg.payload.humidity;
msg3.payload=msg.payload.pressure;
return [ msg1,msg2,msg3 ];
Now, each output connector of this node can be connected to suitable dashboard nodes like gauge, chart, text, etc. Configure the dashboard nodes with RaspberryPi as the group name, SenseHAT as the tab name and give a suitable label and value range. Hit Deploy and open the link hostname:1880/ui to see the sensor values locally, as shown in Figure 4.
Note: The trigger node added earlier can only send the oldest or latest message by skipping the remaining ones. To get some consolidation like the mean, minimum and maximum of all the payloads, install the node-red-contrib-aggregator add-on, and add an aggregator node instead of a trigger node to see the desired values with applied statistics.
Writing custom nodes
It’s time to prove that you can also contribute to Node-RED with your own additions. Any Node.js code can be easily wrapped into a custom node with a HTML frontend. For a simple example, let’s try to make a node for retrieving data published to the topic in the above section. For this, real-time APIs are offered, which open a Server Side Events (SSE) stream for a given topic, and an API key is needed (if the topic is not public), which is generated in the Profile section. Given below is the console based Node.js code to watch a public topic with SSE client support.
var EventSource = require(‘eventsource’);
var url=require(‘url’);
var topic=”/users/xxxx/rpisense/weather”;
var urlopts=url.parse(“https://realtime.opensensors.io/v1/ public/events/topics/”+topic);
var eventUrl = new EventSource(urlopts);
eventUrl.onmessage = function(event) {
console.log(event.data);
}
Let’s follow the steps given below to wrap the above code into a Node-RED node.
1. Create a new directory node-red-contrib-osfydemo under NODE_PATH, i.e., <topdir-of-nodejs>/lib/node_modules.
2. From NODE_PATH/node-red/nodes, copy 99-sample.js.demo, 99-sample.html.demo as opensensors.js, opensensors.html in a sub-directory with name opensensors under node-red-contrib-osfydemo
3. Create the manifest file based on the package.json as per the guidelines in nodered.org/docs/creating-nodes/packaging.html. Then add eventsource as a dependency and replace “sample”: “sample/sample.js” with “opensensors” : “opensensors/opensensors.js”.
4. Edit opensensors.html as follows. Under RED.nodes.registerType, make zero inputs and one output, as this node doesn’t receive any inputs and only generates payloads whenever server side events are triggered.
inputs: 0, output:1
We’ll consider the pre-existing topic field as the opensensors topic, and the name is the default field kept for all nodes.
5. Edit opensensors.js as follows. Add the following lines in the beginning, in place of the foo entry:
var EventSource = require(“eventsource”);
var myurl=require(‘url’);
After respond to inputs….remove the this.on (‘input’, …..); and add the following code:
var url=myurl.parse(“https://realtime.opensensors.io/
v1/public/events/topics/”+this.topic);
var eventUrl = new EventSource(url);
var msg={};
eventUrl.on(‘message’,function(event) {
msg.payload=event.data;
node.send(msg);
}); //or use any callback style of node.js
Rename SampleNode as OpenSensorsNode and replace all occurrences of sample with opensensors in both JavaScript and HTML files.
That’s it—the custom node is ready to use now. Restart Node-RED and refresh the browser page. You can find the new node under the input category, drag it and connect it to the debug node. Fill a suitable topic name in the Edit panel and deploy the flow. You will observe that all the published messages on this topic are captured by this node. If you are not planning to create an account initially, try the same with /orgs/osfydemo/rpisense/weather, a public topic created for this example.
Note: If you want to modify this node for private topics, add another text box for the API key with the entry node-input-apikey (similar coding of topic, name fields), and a checkbox with the entry node-input-ispublic along with the following code:
<div class=”form-row”>
<label for=”node-input-ispublic”>
<input id=”node-input-ispublic” type=”checkbox”>
public topic </label> </div>
Add suitable initial values under defaults section in html file
apikey: { value:”xxxx”},
ispublic : {value:true, required:true}
Note that a comma must be added at the end of the first line of the above code. Now, in js, type the following code in the local copy section:
this.apikey = n.apikey;
this.ispublic = n.ispublic;
Next, form the url as follows:
if(this.ispublic)
url=myurl.parse(“https://realtime.opensensors.io
/v1/public/events/topics/”+this.topic);
else
url=myurl.parse(“https://realtime.opensensors.io/v1/events
/topics/”+this.topic+”?api-key=”+this.apikey);
You can compare your code with the example code node-red-contrib-osfydemo under github.com/rajeshsola/node-red-addons. I am planning to add a few more nodes for the historical data of opensensors.io, which can be found in the above repository.
A few tips before you start to write custom nodes
1. Do a simple search in flows.nodered.org to avoid overlapping or duplication. You can merge your changes into existing nodes instead of adding new ones, unless your node has some distinguishing features or coding compared to the existing ones.
2. If not many configuration changes are required compared to available nodes, you can create example flows or sub-flows, e.g., most of the REST APIs and MQTT operations are possible with existing http-request and MQTT nodes (instead of adding new ones), or a simple function node may be good enough in between.
3. Once the new node is published to npm, new nodes will be pulled periodically and will be visible in the above library. Announce your contribution in the Node-RED mailing list for suggestions and feedback from the community.


