


Presenting here a project that turns your open source Arduino into a remote control. Infrared (IR) remotes have been very prominent since 1980’s. And even in today’s world, almost everything is controlled by a remote. This project allows you to control the master volume of a Windows PC, a television set, set-top box, home theatre system and the like.
Standard data formats
There are two common data formats for IR control: RC5 coding and NEC coding.
RC5 code
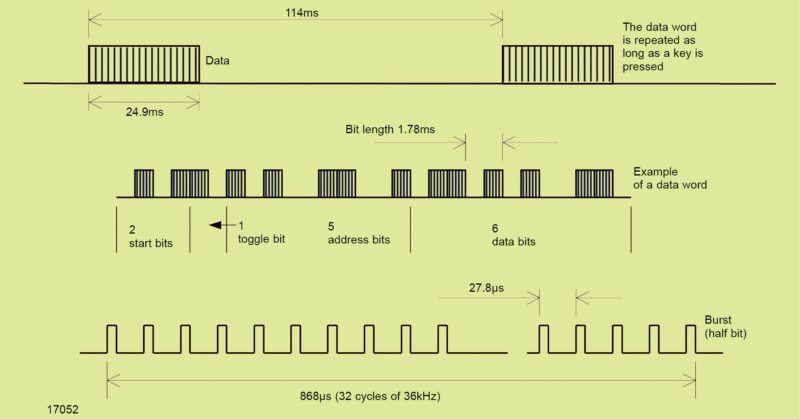
RC5 code uses a bi-phase coding, and the carrier frequency is fixed at 36kHz. Transmission of the data begins with two start bits followed by a toggle bit (Fig. 1). Toggle bit changes its value at each new key press. Five address bits represent the address of the device to be controlled. Six command bits contain the information to be transmitted.
NEC code
NEC code uses bursts at a carrier frequency of 38kHz. It starts transmission using a leader code, a burst with a length of 9ms, followed by a pause of 4.5ms and then the data (Fig. 2). The original purpose of this leader code was to let the internal control loops in the receiver modules to settle.

Address and data bits are transmitted twice, first as a normal byte, followed by an inverted byte. The half period burst portion of each bit contains 22 pulses, each with a width of 8.77µs and a period of 26.3µs. 0 is represented by a pulse distance of 1.125ms, and 1 by a pulse distance of 2.25ms.
Eight address bits are used to identify the device to be controlled. Further eight bits are used for transmission of command data. As mentioned above, the words are always followed, without a pause, by inverted words. For example, transmission of address 00110111 and command data 00011010 is performed by sending bits as:
“00110111’11001000’00011010’11100101”
In a special version of NEC code, the pre-burst, including all address and data bits, is repeated in each 108ms time slot for as long as the key is pressed.
IR receiver modules
The most suitable IR receivers for receiving NEC code are those with AGC4 setting as these have the best noise suppression while still supporting this data format. Some examples are TSOP4438, TSOP58438 and TSOP75438. Receiver modules for different carrier frequencies are given in the Table above.
Circuit and working
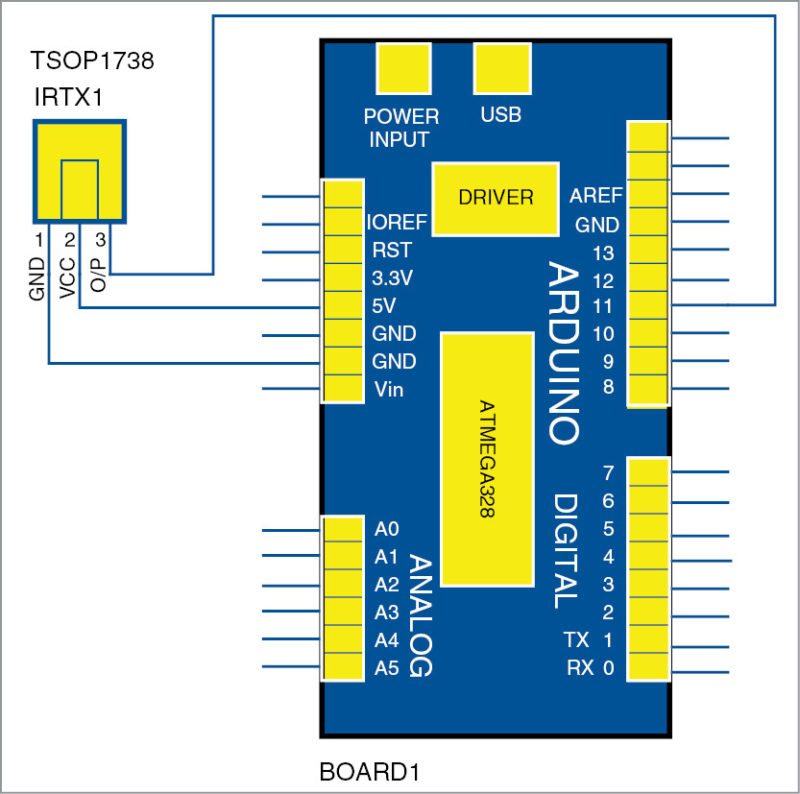
Circuit diagram of Arduino PC volume control is shown in Fig. 3. Hardware components required are Arduino Uno, TSOP1738 IR receiver, breadboard and some jumper wires.
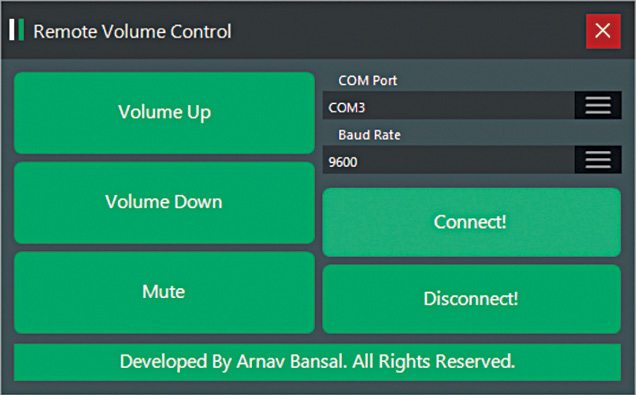
Working of the project is fairly simple. Arduino Uno decodes the key of the remote and then compares it with predefined variables to figure out which key is pressed. If it finds a match, it sends the signal to the PC, which is interpreted by Remote Volume Control software (designed by author), which further performs the required task. Screenshot of Remote Volume Control software is shown in Fig. 4. The most important step is to configure the desired remote control device with Arduino Uno.
Software
The source codes (IR_Key_Test.ino and IR_Final.ino) are written in Arduino programming language. The software used to program Arduino Uno is Arduino IDE, which can be downloaded free of cost from the official Arduino site.
Arduino uses an open source firmware that makes it easy to write and upload the code to the board. It runs on Windows, Mac OS X and Linux. The environment is written in Java and based on Processing and other open source software.
The library used in this project is IRremote library. It allows Arduino Uno to decode IR signals coming from the remote. To install the library, copy IRremote folder and paste it in the following location:
Documents>Arduino>libraries folder
All Arduino boards are available for purchase on kitsNspares.com.
This article was first published in electronicsforu.com.


