


Puppet is used to configure UNIX-like computer systems as well as Windows systems. It uses its own declarative language or a domain specific language. Let’s get to know this tool a bit better.
Puppet is an IT configuration management tool and key software in the IT automation arena. In Puppet, you can define your infrastructure configurations and application configurations. It gives you good visibility of what has gone wrong and, by reporting all tasks, will help you to record all the changes. By using Puppet, systems administrators can reduce the time spent on repetitive tasks, ensuring consistent configuration across their infrastructure.
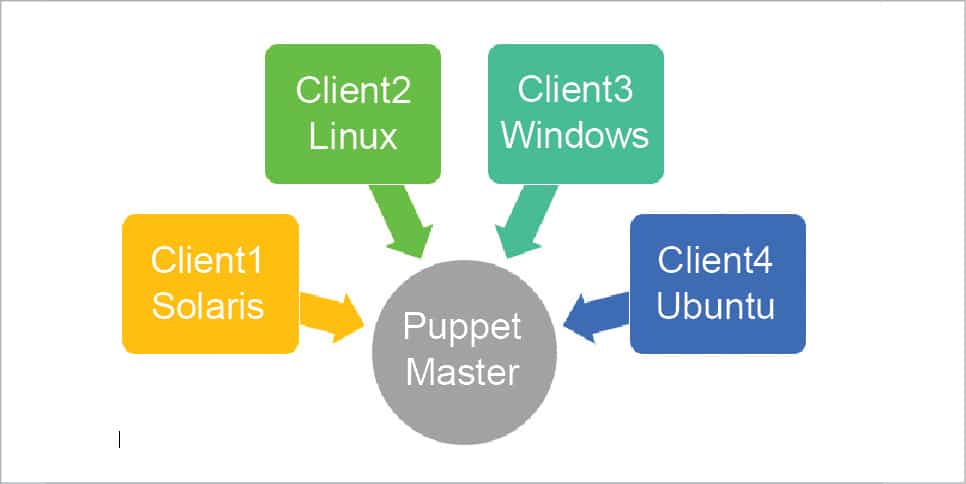
Puppet is an open source tool developed by Puppet Labs. It can be used on Linux (most flavours), Solaris, AIX and Windows platforms.
Puppet comes in two versions—the open source community version and the enterprise paid-for version. Even on a paid version, you get a one-month trial with a learning VM from Puppet Labs.
Before installing Puppet, let’s compare it with another similar tool called Chef on the affordability parameter.
1. Chef uses Ruby, which is a difficult language to learn for beginners, while Puppet uses DSL (domain specific language), which is optimised for the task of describing resources.
2. Puppet has a larger installed base, as compared to Chef.
3. Puppet has a large developer community.
4. It supports more platforms than Chef.
5. Puppet is declarative while Chef is not.
Puppet being a declarative language means that you are writing the code, and you decide what the status of your machine should be after running the code and what not to do. The program will decide what to do to achieve the target state of the server.
We will now discover how to install Puppet and use it. For testing purposes, you can either download the learning VM from the Puppet Labs site, or you can download Puppet and install it on a machine.
Prerequisites for installing Puppet
1. Ensure the server and client names are fully resolvable.
2. Configure the NTP service and ensure that it is running.
3. Download the Puppet package (wget https://github.com/puppetlabs/puppet).
4. Install the Puppet package (create a repo with the folder and run yum install puppet).
5. Install Apache (yum install httpd) using the following command:
#Install puppetmaster-passenger
6. Install the package passenger (yum install puppetmaster-passenger).
7. Start Puppet (service puppetserver start).
8. Make Puppet start when the server boots (chkconfig on puppetserver), or download the learning VM from Puppet Labs.
9. Install the Puppet agent on all client servers.
Puppet uses SSL certificates to authenticate communication between master and agent nodes. The Puppet master acts as a certificate authority, and must generate its own certificates which are used to sign agent certificate requests for authentication.
When you run the Puppet agent the first time, it will generate an SSL certificate and send a signing request to the Puppet master. The client can communicate and be controlled by the Puppet master server only after the agent’s certificate is signed. All the agent certificates must be signed by the master server.
Before creating a certificate, we have to edit the /etc/puppet/puppet.conf file and append the following lines in the [main] section:
certname = puppet
dns_alt_names = puppet.master.com
To generate a certificate on the master, use the command shown below:
#puppet master --no-daemonize
To list all unsigned certificate requests, use the following command:
#puppet cert list
Now the master is ready. Let’s now install agents on client servers. After you download the Puppet agent, install it as follows:
#yum install puppet
To install the Puppet agent, use the following command:
#vi /etc/default/puppet
modify START=yes
To add the master server entry in the client, use the command given below:
#vi /etc/puppet/puppet.conf
Delete the [master] section. Add the following line in the [agent] section:
Server = puppet.master.com
Start the Puppet agent, as follows:
#service puppet start
Once you start the agent, it will create and send the certificate to the master server. Once the certificate is authenticated, the client can communicate with the master. So log in to the master server to authenticate the client certification.
To list the certificates received, run the following commands from the master server:
#puppet cert list This will list the Agent FQDN name
#puppet cert sign <FQDN>
In case you have many certificates from multiple clients, you can use ‘all’ instead of <FQDN> to certify all clients. After signing, the client can be controlled by the master server. In any case, if you want to remove the controls from the master, you can delete the certificate by using the following code:
#puppet cert clean <FQDN>
Repeat the above steps to set up the agent for all client servers and once done, we are good to go—to test Puppet.
How Puppet works
Once you have installed the agent, Puppet collects information about each client by using Facter.
If you run the facter command in an agent, you will get an output similar to the one shown below.
#facter
<output>
login as: root
root@192.168.0.102’s password:
Last login: Wed Sep 7 14:25:50 2016
aio_agent_version => 1.5.2
augeas => {
version => “1.4.0”
}
disks => {
sda => {
model => “VBOX HARDDISK”,
size => “20.00 GiB”,
size_bytes => 21474836480,
vendor => “ATA”
}
}
dmi => {
bios => {
release_date => “12/01/2006”,
<Truncated>
By default, the Puppet agent connects with the master server every 30 minutes and shares the status information with the master. In parallel, it will pull the data about the desired status of defined services from the master and take appropriate action to meet the desired status.
If you want to run it manually, you can run the command given below from the client server.
#puppet agent –test
So now, we have confirmed that Puppet is running fine and the master server is able to communicate with the client. Next, we will consider a few important files and folders.
The configuration file for open source Puppet is /etc/puppet/puppet.conf.
This puppet.conf file is divided into three parts, which are:
Main: Global configuration settings should be placed here.
Agent/user: This is to apply configurations to client servers.
Master: These are configurations of the master server.
To list all the configurations by the command line, use the following code:
#puppet config print all
/var/log/puppet ==> contains puppet logs on both master and client servers
/var/lib/puppet ==> contains Puppet operational data
/var/lib/puppet/ssl ==> contains SSL certificate
/etc/puppet/modules and /usr/share/puppet/modules ==> The default directories where modules are searched in master server
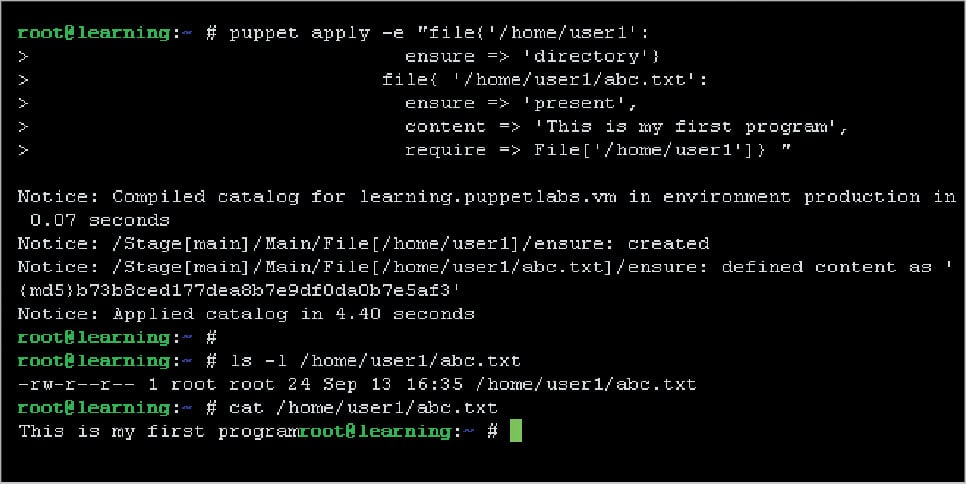
Let us create a simple file in /home/user1/abc.txt which contains “this is my first program” using Puppet.
In the screenshot shown in Figure 2, the ensure command checks the availability of the file/folder and, in case it is absent, it will create the respective file or folder. So it makes your job easy, because some apps may fail due to the absence of log files.
The directory attribute ensures /home/user1 is a folder and is available. The ensure file attribute ensures the availability of a file; otherwise, it will create a file with the mentioned content.
By default, Puppet has many resource types like files, packages, services, file systems, etc. With reference to Figure 2, the file is the resource type and /home/user1/abc.txt is the attribute. The power of Puppet is that we can create our own resource types.
To view the resource types available, use the following code:
#puppet resource –types
computer
cron
docker_compose
docker_network
exec
file
file_line
group
host
interface
maillist
mount
nagios_command
<Truncated>
Puppet also has modules like pluggable libraries in applications. These modules are groups of manifests and data such as facts, files and templates. Modules are designed with different components per system. Readymade manifests are available in different scopes such as run instance, image management, repository management and service management.
As an example, the directory base for the Apache
module is:
<MODULE_PATH>httpd/
A directory in this Apache module that serves static
files is:
<MODULE_PATH>/httpd/files
A static configuration file for httpd is shown below:
<MODULE_PATH>/httpd/files/myhttpd.conf
AccessFileName .acl
A directory to hold your manifests in the module is
shown below:
<MODULE_PATH>/httpd/manifests/
A complete solution manifest is:
<MODULE_PATH>/httpd/manifests/init.pp
class httpd{
include httpd::install
include httpd::config
include httpd::service
}
A manifest that just installs httpd is given below:
<MODULE_PATH>/httpd/manifests/install.pp
class httpd::install { package {‘httpd’: ensure => ‘installed’}
}
A manifest that just configures httpd is given below:
<MODULE_PATH>/httpd/manifests/config.pp
class httpd::config{ file {‘/etc/httpd/conf.d/httpd.conf’:
ensure => ‘present’,
source => ‘puppet:///modules/httpd/myhttpd.conf’
}
}
A manifest that just handles httpd service is as follows:
<MODULE_PATH>/httpd/manifests/service.pp
class httpd::service{
service{‘httpd’: ensure => ‘running’ }
}
Now, using it, we give the following command:
$ puppet apply --modulepath=<MODULE_PATH> -e “include httpd”
This will custom-configure, install and start the httpd service.
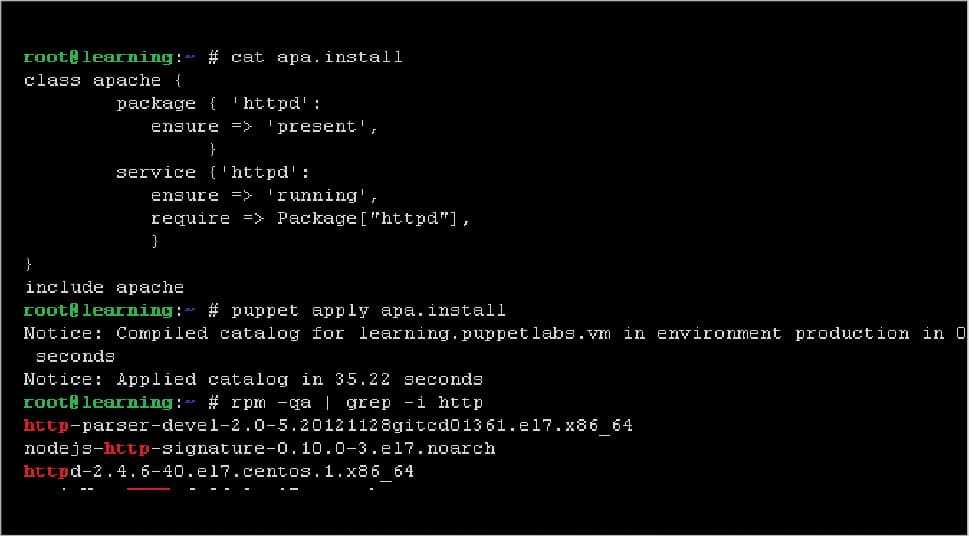
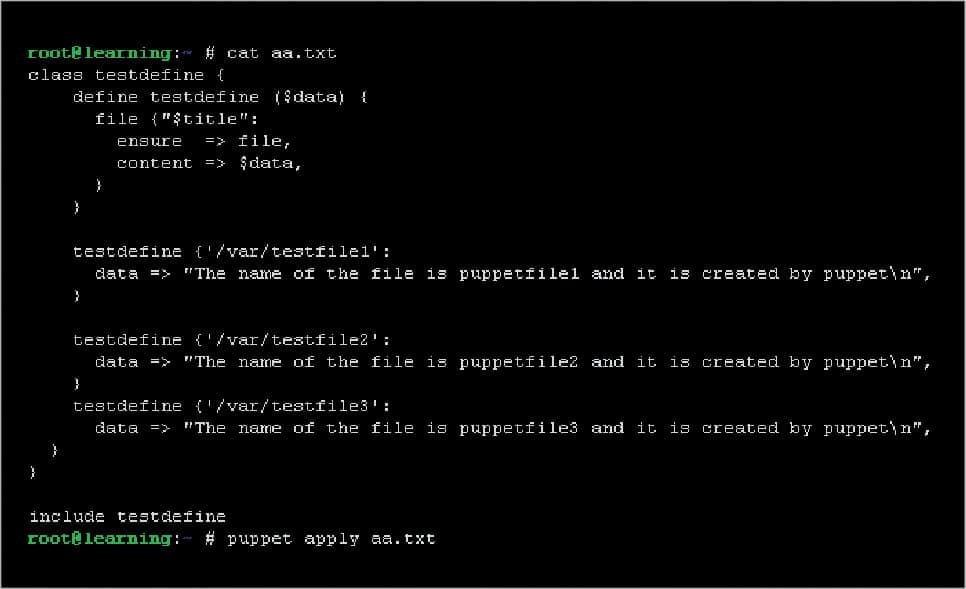
Apart from modules, we can also use classes and definitions in Puppet. Please refer to Figure 3 for the example for classes. Figure 4 gives the example of a definition with class.
Now, let’s look at how to assign the resources and collections to client servers.
Puppet uses this file as a configuration file to determine which action should go to which client server. On client1 we can run the class httpd which contains the httpd service and package. On client2, it will run the Samba package and smb service.
The file clients.pp will look like what’s shown below:
node 'client1.test.com' {
include httpd_class
}
node 'client2.test.com' {
include samba_class
}
node default {
package { "perl":
ensure => present }
}
In this article I have taken examples from many sites, especially Puppet Labs. There are many URLs from which we can get more examples of Puppet automation. Puppet is, indeed, a great tool to automate IT tasks.


