


![]()
OpenNebula is a simple, feature-rich and flexible solution for the management of virtualised data centres. It enables private, public and hybrid clouds. Here are a few facts about this solution.
OpenNebula is an open source cloud middleware solution that manages heterogeneous distributed data centre infrastructures. It is designed to be a simple but feature-rich, production-ready, customisable solution to build and manage enterprise clouds—simple to install, update and operate by the administrators; and simple to use by end users. OpenNebula combines existing virtualisation technologies with advanced features for multi-tenancy, automated provisioning and elasticity. A built-in virtual network manager maps virtual networks to physical networks. Distributions such as Ubuntu and Red Hat Enterprise Linux have already integrated OpenNebula. As you’ll learn in this article, you can set up OpenNebula by installing a few packages and performing some cursory configurations. OpenNebula supports Xen, KVM and VMware hypervisors.
The OpenNebula deployment model
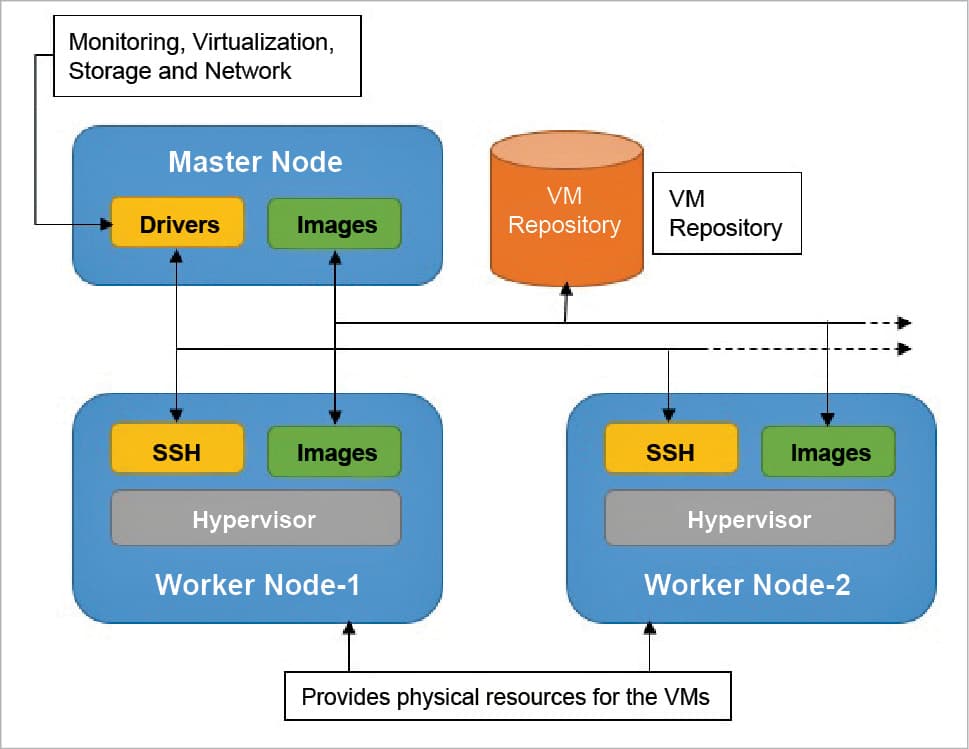
An OpenNebula deployment is modelled after the classic cluster architecture. Figure 1 shows the layout of the OpenNebula deployment model.
Master node: A single gateway or front-end machine, sometimes also called the master node, is responsible for queuing, scheduling and submitting jobs to the machines in the cluster. It runs several other OpenNebula services mentioned below:
- Provides an interface to the user to submit virtual machines and monitor their status.
- Manages and monitors all virtual machines running on different nodes in the cluster.
- It hosts the virtual machine repository and also runs a transfer service to manage the transfer of virtual machine images to the concerned worker nodes.
- Provides an easy-to-use mechanism to set up virtual networks in the cloud.
- Finally, the front-end allows you to add new machines to your cluster.
Worker node: The other machines in the cluster, known as ‘worker nodes’, provide raw computing power for processing the jobs submitted to the cluster. The worker nodes in an OpenNebula cluster are machines that deploy a virtualisation hypervisor, such as VMware, Xen or KVM.
OpenNebula installation
OpenNebula is one of the easiest cloud systems to install and configure. Binary packages exist for several distributions, including Red Hat Enterprise Linux, Ubuntu, Fedora and openSUSE. Distributions like Ubuntu also include packages in their standard repositories, which makes it simple to install OpenNebula.
We will build a private cloud with three Ubuntu 10.04 machines. One machine will serve as the front-end, called the nebula-cloud-server. Two machines will be worker nodes deploying KVM. The worker nodes are open-nebula-wn and open-nebula-wn2.
To install the front-end, you need to install a single package by typing the following command:
sudo apt-get install opennebula
This package installs the daemon oned that manages all OpenNebula services. The installation also creates a new user called oneadmin, which OpenNebula retains for its own use. The installation of this package also produces a new pair of SSH RSA keys. OpenNebula uses SSH to communicate with other machines in the cluster, so a public key is used to identify the front-end. All worker nodes need to authorise the front-end SSH key.
After the opennebula package has been installed, the next step is to add the worker nodes, but before doing that, you need to install the worker node OpenNebula package on the worker node machines. At both worker nodes, you need to install the opennebula-node package by typing the following command:
sudo apt-get install opennebula-node
This package installs the necessary worker node packages and creates the oneadmin user. The following command is used to perform any operation related to the hosts:
onehost [options] command [parameters]
The command argument specifies the operation you want to carry out. You can add new machines to your cluster, retrieve monitoring information, enable or disable scheduling of virtual machines to the host, and list the currently active machines.
The onehost create command assists with adding new worker nodes to a cluster, as shown below:
onehost create hostname im_mad vmm_mad tm_mad
The hostname argument is the hostname or the IP of the machine; the next three parameters relate to the hypervisor and the transfer manager service. OpenNebula uses different drivers to access different hypervisors. These three parameters essentially tell the front-end that the machine you are adding deploys this specific hypervisor, and this mechanism should be used to transfer data to this machine. In this example, I add a host deploying KVM:
onehost add open-nebula-wn im_kvm vmm_kvm tm_ssh
The final arguments relate to the way virtual machines will be transferred to the node. In this example, SSH is used to transfer virtual machines. Note that the oneadmin user on this host needs to be able to SSH to oneadmin@open-nebula-wn; so, on this host, run the following command:
sudo -u oneadmin ssh open-nebula-wn
Then, verify the host’s authenticity. On open-nebula-wn, run the following code:
sudo apt-get install opennebula-node
sudo tee /var/lib/one/.ssh/authorized_keys << EOT
onehost add open-nebula-wn2 im_kvm vmm_kvm tm_ssh
On open-nebula-wn2, run:
sudo apt-get install opennebula-node
sudo tee /var/lib/one/.ssh/authorized_keys << EOT
The onehost create command will prompt for the front-end’s key to the authorised key file, which OpenNebula uses internally. So, you have to go back to the worker nodes and add the SSH key to these nodes.
If everything goes well, you can check the status of the nodes by typing the onehost list command, as follows:
01 nebula-user@nebula-cloud-server:~$ onehost list
02 HID NAME RVM TCPU FCPU ACPU TMEM FMEM STAT
03 0 open-nebula-wn 0 100 99 100 1068948 921356 on
04 1 open-nebula-wn2 0 100 12 100 1173072 1027776 on
OpenNebula configuration file
You can specify the configuration for your OpenNebula set-up in the oned.conf file. This file is critical to your OpenNebula deployment. The folks at OpenNebula provide all the possible configurations for existing drivers that ship with the standard OpenNebula distribution. You can comment and uncomment as required for your environment. If, for example, you are interested in using Xen, just uncomment the relevant section in the oned.conf file as shown below:
01 #IM_MAD = [
02 # name = “im_xen”,
03 # executable = “one_im_ssh”,
04 # arguments = “im_xen/im_xen.conf”,
05 # default = “im_xen/im_xen.conf” ]
06
07 #VM_MAD = [
08 # name = “vmm_xen”,
09 # executable = “one_vmm_xen”,
10 # default = “vmm_xen/vmm_xen.conf”,
11 # type = “xen” ]
The IM_MAD section relates to the information monitoring driver for status monitoring. The VM_MAD section deals with the hypervisor driver.
After you have added the worker nodes, your private three-node cloud is ready. However, before you can start launching virtual machines, you need to define a virtual network, and then create and launch a virtual machine.
Virtual networks
You can define custom private networks in OpenNebula, and virtual machines can be associated with several of these virtual networks. Different networks can link specific sets of virtual machines together. You could also permit some machines access to the Internet by connecting them to a specific virtual network.
To define your own virtual network, you need to write a template file. Fortunately, the syntax of a virtual network template file is pretty simple. In OpenNebula, you can define a ‘fixed’ virtual network or a ‘ranged’ network. A fixed network specifies certain IP addresses against specific virtual machines identified by their MAC addresses. On the other hand, a ranged network is more like a DHCP configuration, where a base network address is specified and all addresses follow that same pattern. A sample fixed network configuration template is shown below.
01 NAME = "Private Cloud"
02 TYPE = FIXED
03 BRIDGE = vbr0
04 LEASES = [IP=192.168.0.1, MAC=50:20:20:20:20:20]
Ranged Network Template
01 NAME = “wanNetwork”
02 TYPE = RANGED
03 BRIDGE = vbr0
04 NETWORK_SIZE = C
05 NETWORK_ADDRESS = 192.168.0.0
In creating a virtual network, I will use the fixed network template file as specified above.
01 nebula-user@nebula-cloud-server:~$ onevnet create nebula.template
02 nebula-user@nebula-cloud-server:~$ onevnet list
03 NID NAME TYPE BRIDGE
04 0 Private Cloud Fixed eth0
Creating a KVM virtual machine
To create a KVM virtual machine, you would start by creating the disk file, as follows:
dd if=/dev/zero of= ubuntu_server.img bs=1M count=4096
Use the kvm command to start the installation from the Ubuntu ISO file:
kvm -m 512 -cdrom /isos/ubuntu.iso -boot d ubuntu_server.img
After you run this command, a QEMU window should pop up and launch the Ubuntu CD boot screen. Select Install Ubuntu and follow the instructions.
Submitting the VM to OpenNebula
After the virtual machine is created, the next step is to submit the VM to OpenNebula. Before doing that, you need to carry out a few tasks. To begin with, you must copy the ubuntu_server.img created in the last section to the virtual machine repository location. This location is specified in the oned.conf file. The variable is called VM_DIR and it is commented by default. You’ll need to store all images in /opt/vmImages/ on the front-end and update the configuration file accordingly, keeping in mind that you must restart the daemon after every configuration change.
After you’ve saved the image to the appropriate directory, you can write a VM description for OpenNebula. VM descriptions are mostly hypervisor-specific; however, some general fields are required as shown below:
01 NAME = kvmVM #specify the name
02 CPU = 1 # How many CPUs required?
03 MEMORY = 512 # RAM in MB
04 OS = [
05 KERNAL = “/boot/vmlinuz-2.6.32-24-generic”, # Kernel to use
06 INITRD = “/boot/initrd.img-2.6.32-24-generic”, # initrd to use
07 ROOT = “sda1”, #Root partition
08 BOOT = hd #boot form harddisk
09 ]
10 DISK = [
11 SOURCE = “/opt/vmImages/ubuntu_server.img”, #location of source image
12 TARGET = “sda1”, # mount as partition ]
13 DISK = [
14 TYPE = “swap”, #swap drive
15 SIZE = 1024, # size of swap drive
16 TARGET = “sdb” #mount to partition
17 ]
18 NIC = [ NETWORK = “Private Cloud” ] #connect to specified virtual network, several NIC can be specified, is you want to connect to several VNs
Save the VM description file to the kvmVM.template. Note that if you forget to remove the comments, which have been inserted to explain the contents of the template, it will produce parsing errors.
To submit this virtual machine, use the openvm command, as shown below:
onevm [options] subcommand [parameters]
The sub-command arguments associated with openvm can be any of the following: create, deploy, shutdown, livemigrate, migrate, hold, release, stop, cancel, suspend, resume, delete, list, show, top and history. See the OpenNebula documentation for more on these commands.
The create command allows you to submit a new VM to the OpenNebula cluster. This command requires the user to pass the VM template file. Once you submit a VM, you can view its status with show. You will also know the ID assigned to the VM. To apply commands like shutdown, stop, cancel, suspend and resume to a VM, just specify the VM ID.
OpenNebula allows a user to migrate a VM from one host in the cluster to another. With migrate, the VM is first stopped before it is redeployed on another machine, whereas livemigrate migrates the VM without stopping and redeploying it. To specify a migration, you need to specify both the host ID and the VM ID.
Launching a virtual machine
To launch the virtual machine, type the following commands:
01 nebula-user@nebula-cloud-server:~$ onevm create kvmVM.template
02 nebula-user@nebula-cloud-server:~$ onevm list
03 ID NAME STAT CPU MEM HOSTNAME TIME
04 0 kvmVM pend 0 0 00 00:00:07
The private cloud set-up is complete.
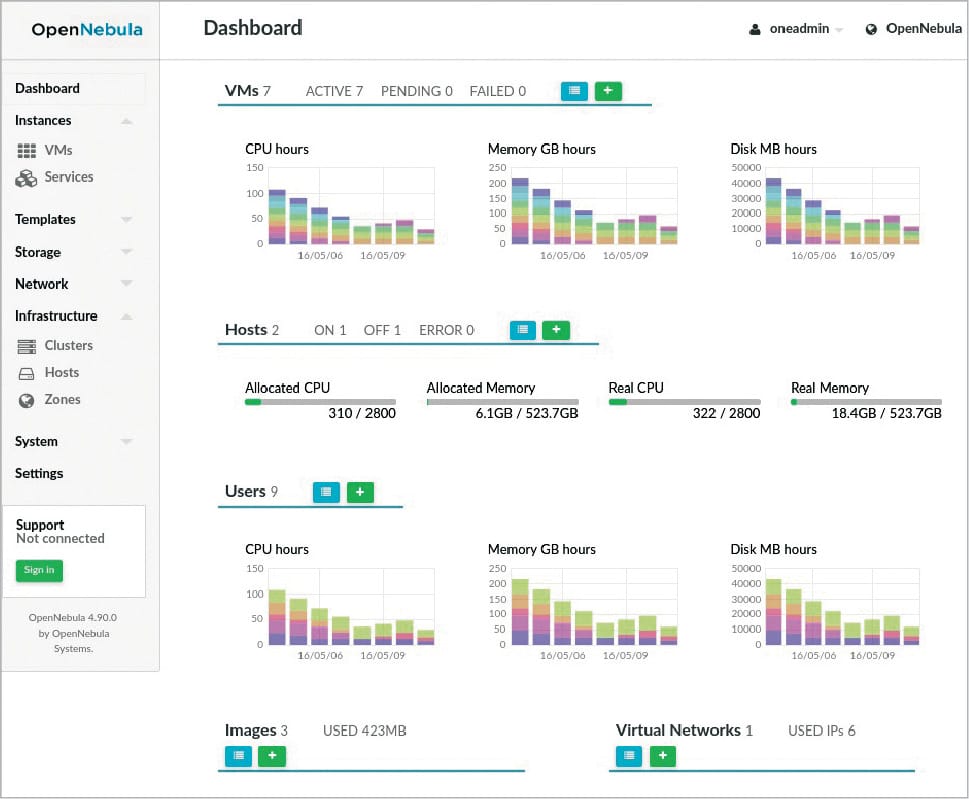
OpenNebula Sunstone
OpenNebula Sunstone is a graphical user interface (GUI), intended for both end users and administrators, which simplifies the typical management operations in private and hybrid cloud infrastructures. OpenNebula Sunstone allows one to easily manage all OpenNebula resources and perform typical operations on them. You will be able to manage the virtual and physical resources just as we did with the CLI.


[…] Introductory post in English (of course) […]