


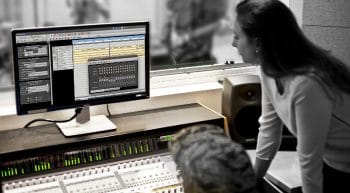
The production of music brings out some of the deepest levels of creativity in people. Each of us can explore our musical talents with the help of open source software. This article is a comprehensive guide to creating music with free software.
When a symphony created by a large-scale orchestra gets compressed into bits and bytes, can the free software world stand by, idle? Definitely not! Thanks to creative developers and energetic communities, we now have a set of applications to perform the entire music production workflow that can support even professional studios.
Let’s get acquainted with some of these packages and learn how to set up a home studio using free software.
Installation
You have two options to make your PC a music studio with GNU/Linux. The first one is to install the necessary packages on the distro you are using now. The second one is to install a distro that focuses on multimedia production. If you don’t take music production seriously, just go with the first choice. Otherwise, you can try the live CD of a multimedia distro, and install it alongside or by replacing the current operating system.
Let us first explore some of the necessary packages and learn how to install and use them.
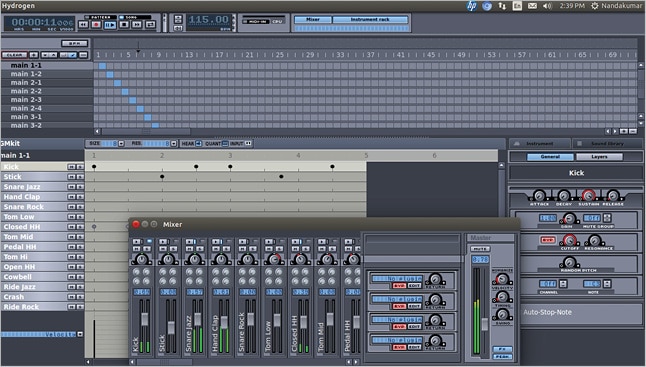
Hydrogen: Starting with the drums!
If you are new to music production, it would be a good idea to start with the drums. This is because you can create interesting percussion patterns without knowing anything about music theory and the twelve notes. You’ll perhaps be familiar with some smartphone drum machines also. Starting with such apps will get you quick outputs, which will make you confident. Later, you can move on to score writers and learn music theory, gradually.
I have chosen Hydrogen as our digital drum machine. It is really rich, but never compromises on simplicity. You can install Hydrogen by giving the following command (in Debian-like systems), or by using a package manager.
sudo apt-get install hydrogen
Hydrogen’s interface is simple – just like the apps you may have in your smartphone. Drum patterns are made by clicking on the screen. The sound library contains a large set of instruments including the Indian ones like the tabla. You can save the project for further editing, and export it as a MIDI or audio file.
Synthesisers, soundfonts and connection programs
Before you get into MIDI applications, make sure that your system has the following basic requirements: soundfonts, synthesisers and connectors. However, if you find this section difficult or boring, simply skip it, and start practical composing with MuseScore. Be sure to come back to this part when you feel you are ready.
A MIDI file has no pre-recorded sound in it (this is why it can’t hold a vocal song). The file only contains some notations for different instruments used in that particular piece of music (and this is why it is so lightweight). The information in a MIDI file can be converted to sound using mathematical formulae. But the most realistic method is to use soundfonts or patches that have pre-recorded samples.
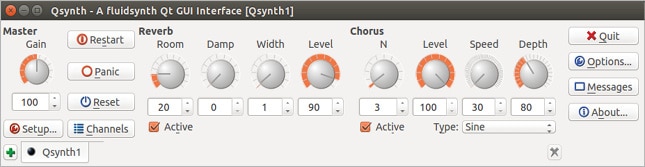
Distros like Ubuntu come with TiMidity++ as the default synthesiser. You can install another popular synthesiser called FluidSynth and its graphical front-end, Qsynth. Whenever you want your program to use FluidSynth to produce sound, start Qsynth and make appropriate connections using the facilities provided by your MIDI program or by using a connector like QjackCtl.
In order to get FluidSynth working, you need a soundfont like Fluid R3 GM. You can install the package fluid-soundfont-gm to get it on your computer. To configure Qsynth with this soundfont, start Qsynth, press the Setup button, and then open the soundfont file (/usr/share/sounds/sf2/FluidR3_GM.sf2) under the Soundfonts tab.
From the main window of QJackCtl, you can start the JACK server (if not started already), and take the connections window (‘Connect’). The connection is made by selecting the input port, the output port and pressing the Connect button.
VMPK: The virtual piano
Homes of the rich were once decorated with a grand piano. The digital counterpart to this massive instrument is a virtual piano on our smartphones! In both cases, most of the owners don’t know how to use their keyboards properly. But having them is still a pleasure, and playing on them is fun.
Your search for a perfect virtual piano in GNU/Linux ends with VMPK (Virtual MIDI Piano Keyboard). The cross-platform virtual keyboard is not as silly as it seems. You can use it as a sophisticated MIDI controller, and even connect it to your physical music keyboard.
Simply run the following command to install VMPK on Debian-based systems. You may search for the package ‘vmpk’ using your preferred package manager on other distros.
sudo apt-get install vmpk
If it doesn’t produce sound, you’ll have to check the MIDI connections at Edit->Connections. From the Output MIDI Connection drop-down list, choose the preferred output. It can be a TiMidity port or a port provided by another synthesiser like FluidSynth. There will be no usable ports listed if you haven’t started any synthesiser yet. Please refer to the ‘Troubleshooting MIDI’ section to learn how to do that.
MIDI connectivity
Composers who’re just starting off always dream of connecting a physical keyboard to their PCs to create music. But it remains a dream for most people since the options are confusing and unlike software, experimenting with hardware can be an expensive game. Let’s get the doubts cleared and start experimenting.
The first question is about the device. You can choose a MIDI controller or a synthesiser (‘Musical keyboard’) with MIDI support. MIDI controllers don’t produce sound of their own, but provide a lot of pitch control/modulation facilities to instruct the software on your PC. The synthesiser can be used alone or as a controller for your software (if the device supports MIDI). But most models lack controlling features.
The second question is about the port. No normal computer has a built-in MIDI port. Then how does one connect his device with the PC? The answer is via the USB. Most MIDI controllers and synthesisers support a USB interface. It seems to be plug-and-play also. If there is no native USB support, you can get an adapter.
That’s enough for a start. Now let’s use VMPK to learn about MIDI connectivity. This knowledge is useful while connecting your device with giants like Rosegarden. Also, it is a better idea to check the connectivity with simple software like VMPK when you get stuck with Rosegarden or something like that.
Learning physical MIDI connectivity using VMPK
Connecting an external device can be simpler than making connections between software applications! You simply connect the external device to yours and to the computer using a USB cable or MIDI-to-USB adapter, load the MIDI program and your device should be listed in the set of available ports.
In the case of VMPK, the ports are listed in Edit->Connections. Select your device from the Input MIDI Connection list and your software synthesiser (TiMidity++, FluidSynth, etc) from the Output MIDI Connection list. This enables the computer to render the music that you play on your keyboard. The same method can be used to enter notes into a scorewriter program (in which case, you have to set up the scorewriter, not VMPK).
Swapping the MIDI’s in and out connections will enable VMPK to control your device. This means that what you play on VMPK will be rendered by your external MIDI device (if it is a synthesiser and not just a MIDI controller).
Also, refer to the manual of your device before making connections.
MuseScore to write and render sheet music
If you like the traditional pencil-and-paper way to write music, but still want an easy-to-use app to engrave and render your work, install MuseScore.
MuseScore is a full-fledged scorewriter and rendering app that is free software and cross-platform. You can prepare music sheets to print or to render as an audio file. Yes, this is the app to get a digital orchestra on your computer!
You can install it by using the command sudo apt-get install musescore (or ‘mscore’, sometimes) or via your preferred graphical package manager like Ubuntu Software Centre. It is also available in many other forms including the portable Appimage format, which you can get from musescore.org.
What makes MuseScore attractive
Being free software and cross-platform is enough for an application to be attractive. But MuseScore goes beyond this.
1. Full-fledged score writing: With unlimited staves and almost all symbols that you use in a score, MuseScore is capable of assisting you in the production of any type of music sheet. It seems to have a little bit of intelligence too. You will be thrilled when it automatically repositions staves, measures, lyrics and signatures as you make changes to the score. MuseScore 2 has a feature called ‘linked part facility’, which automatically gets the changes you make to a part applied to the other parts linked to it.
2. Live and realistic playback: People don’t consider typesetting the score as the main objective of a score writer application. Rather, they focus on live playback which helps to verify and give a ‘feel’ of the work.
Like many music production applications, MuseScore supports JACK MIDI. But it doesn’t stop there. It has its own built-in synthesiser, which provides audio controls like reverb and chorus, and even tries to support multiple soundfonts. Instrument-level control is also available.
MuseScore 2 goes a step further to interpret music symbols like a crescendo and tremolo.
3. Support for multiple file formats: Being cross-platform alone doesn’t make an application universal. It should support different file formats also.
Formats that MuseScore can import and export include MusicXML and MIDI, which makes it interoperable with most mainstream music production applications. Audio can be exported to WAV, FLAC, MP3 and OGG. The engraved score can be printed directly or exported to PDF, PS, SVG or PNG.
4. Accessibility: One important feature that attracts keyboard lovers to MuseScore is the accessibility support it provides. It recognises a lot of keyboard short cuts and supports direct keyboard note input. This enables even those who’re visually challenged to produce scores. Also, it has built-in support for multiple screen readers.
5. Portability and the Appimage version: MuseScore is available as a portable application—it can be stored on a removable device and run on any system. This is made possible in GNU/Linux with the Appimage format, which enables cross-distro software distribution, so you can avoid installing the software and using root/sudo privileges.
6. Online community: MuseScore.com is a website where people can share the sheets created using MuseScore. It has a built-in player that resembles the MuseScore interface. The site also features the ‘VideoScore’ facility that enables the score to be linked and synchronised with a YouTube video. But you need a pro account to upload more than five scores. MuseScore.org provides the software download, and hosts documentation and forums which are really helpful to learn about new features and share your thoughts on music.
Getting started with MuseScore
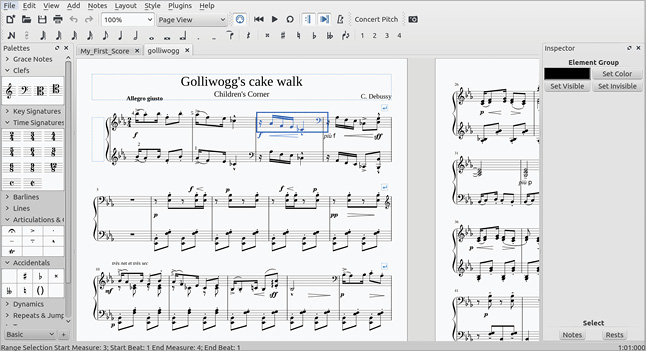
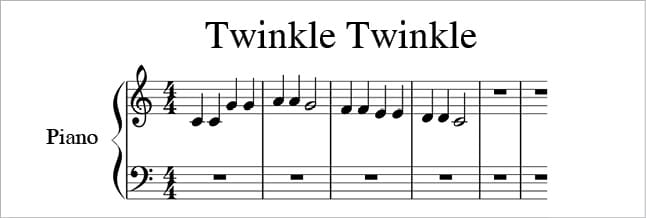
In order to use MuseScore efficiently, you have to learn the notation system, which is a time-consuming process. However, let’s just introduce ourselves to MuseScore by engraving the first two measures of ‘Twinkle Twinkle Little Star’.
1. Start MuseScore Choose File->New. Give the title-like details, press the Next button, add Piano from the keyboards section and press the Finish button.
2. Now you have to enter the score shown in Figure 4. Press N on the keyboard to initiate note input. Choose the quarter note from the toolbar (or simply press 5 on your keyboard). Now you can enter the notes by clicking on the staff at the required positions (see the figure). For the last note of the second and fourth measures, you need to choose the half note from the toolbar (or press 6 on your keyboard).This is the same phase during which you use a physical MIDI keyboard for note entry rather than the mouse.
3. Press N again to switch off the note-entry mode. Now you can reposition (drag) or delete the notes to edit.
4. You can then press the Play button to play the score, or use File->Save to save or export it.
Tip: Save it as a MuseScore file for further editing. MIDI is best for a lightweight output, WAV for quality mixing/conversion and MP3/Ogg for distribution.
Troubleshooting
If MuseScore freezes when you hit the Play button, you can try changing the output settings from Edit->Preferences. The following configuration has been useful in Ubuntu.
Keep ‘Use internal synthesiser’ and PortAudio turned on (all others off). Under PortAudio, Api=ALSA. Change Device from the default setting to the actual hardware (an entry with codes like ‘hw:0’). Press OK and restart MuseScore.
DAW applications
Digital Audio Workstation (DAW) is a facility that features the entire digital audio workflow — from recording to editing, mixing and mastering. It can be an electronic device or a computer. Needless to say, the second variant— software DAW — is the popular choice now. Let’s have a quick look at some free DAW programs.
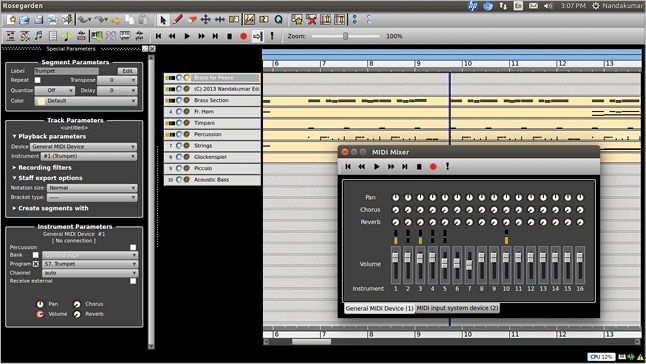
Rosegarden: Rosegarden is considered to be a leader in the GNU/Linux MIDI world. According to the Rosegarden website (rosegardenmusic.com), “Rosegarden is a music composition and editing environment based around a MIDI sequencer that features a rich understanding of music notations, and includes basic support for digital audio.”
Rosegarden provides the classical score method, matrix editor and MIDI input for note entry (audio input is also available, but is not so popular). Recording the output of your MIDI device can easily be done using Rosegarden, and it seems to preserve the originality by considering even the velocity of a keypress.
Ardour: Ardour is a popular audio editor just like Audacity. It looks very professional, and it really is. While Audacity focuses on audio editing, Ardour aims to support the complete workflow from recording through mixing, editing and finally, mastering. Another key advantage of Ardour over Audacity is the enhanced support for MIDI. Audacity cannot even play MIDI while Ardour can treat it almost like an audio track.
LMMS: LMMS seems to be a ‘new generation’ music app that gives a lot of support to electronic music rather than to traditional instruments. There is a built-in wave synthesiser which can work out-of-the-box without any soundfont. However, it can work with soundfonts and sampled audio also. Samples can be loaded into a virtual keyboard and played as a given note with the help of automatic pitch shift.
LMMS means Linux MultiMedia Studio, though it is cross-platform now.
Other popular DAWs include Qtractor and MusE.

Audacity for further editing
Audacity could be the subject for a separate article. The free software project has become very powerful and has gained immense popularity.
The program can perform the A to Z of multi-track hard disk recording and features a large set of effects/plug-ins. We will not go deep into Audacity, but merely have a ‘get started’ session.
Basic track management: You can import your audio clips using File->Import->Audio after starting a new project. Do not use File->Import->MIDI to import MIDI, but convert it first and import it as regular audio.
The track can be managed using the controls near each one. The selection tool from the toolbar can be used for cut-and-paste activities while the Time Shift tool helps us to shift the audio.
Recording: Anybody can record when there is a red button on the screen. However, make sure that you choose the right input device and the volume level is low (unamplified).
Amplification: Simply select the portion you need (or Ctrl+A to select all), and then choose Effects->Amplify. Sometimes you may want to turn on ‘Allow clipping’. But keep in mind that it is not recommended.
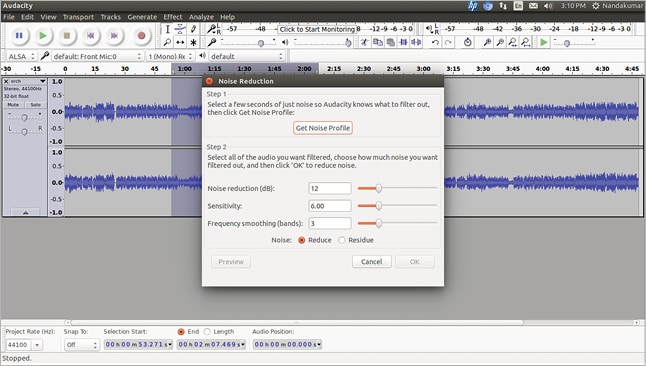
Noise removal: Perhaps this is the most wanted feature. Thanks to Audacity, it is really simple.
The process involves two steps: First, you select a portion of your audio with noise only. Choose Effects->Noise Removal (noise reduction) and press ‘Get Noise Profile’. In the second stage, you select the whole audio (or the portion from which the noise should be removed), select the Noise Reduction dialogue box again and click OK. The magic happens!
Exporting: A project saved using Audacity will be a .aup file which can be edited later. However, in order to distribute your work, you have to export it. This facility is available from the File menu, and it supports formats like MP3 and Ogg. However, it is highly recommended that you produce an uncompressed WAV file also so that you can use it as a high quality input for further work.
Finalising and publishing the work
It is time for the world to listen to you! You can upload the compressed version like an MP3 file to SoundCloud.com or some other free service. These files can be used to produce an audio disc also.
There are sites where MIDI files and PDF scores can be uploaded. Free-scores.com is such a site. MuseScore.com lets you upload the MuseScore source files also. However, the most attractive platform would be YouTube. But it doesn’t allow plain audio files. There should be visuals.
There are numerous ways you can ‘visualise’ your audio file. Here is a list:
1. Create a picture slideshow with your music in the background.
2. Shoot your own video and mix it — it can be a ‘making of’ video also.
3. Let the score appear on the screen as the music plays in the background.
4. Present the computer graphics visualisation of the music.
Of course, the first option is boring. The second one is okay if you have good shooting equipment. The third and fourth options are easy to produce, besides being interesting and novel.
This is the point to start the video editor. Kdenlive would be the right choice. It is really professional. However, if you find it difficult (which you shouldn’t), you can try some lightweight editor like Pitivi.
Always try to use the uncompressed WAV file as the input to your video. This ensures good quality and doesn’t increase the size of your project since it will be compressed later. Never use MP3.
Let’s get back to the third and fourth methods we’ve proposed to visualise our music. In order to get an animated score, you can capture the portion of your screen using a screen capture software like Kazam or RecordMyDesktop, while MuseScore plays the score. The same screen capture technique can be used to get graphic visualisation also. Audio players like Totem and Audacious have visualisation capabilities. You can turn on the suitable visualisation, play your file using the player, and record the screen.
Once you have the recorded animation, you can use the video editor to mix it with the audio and the titles.
Setting up TiMidity++ to use Fluid soundfont
You might have installed the Fluid soundfont packages (as we have discussed in one of the earlier sections). But that won’t make any changes to TiMidity++. It will continue playing MIDI with Freepats. In order to force TiMidity++ to play Fluid soundfont, we have to edit its configuration file. First ensure that you have Fluid’s configuration file in /etc/timidity.
For this, try the following commands in a terminal:
ls /etc/timidity

fluidr3_gm.cfg freepats.cfg timidity_a.cfg
fluidr3_gs.cfg timgm6mb.cfg timidity.cfg
The output shows we have fluid3_gm.cfg, which is the configuration file of Fluid GM soundfont. Now we have to add this into timidity.cfg, which is the configuration file of TiMidity++. Before doing that, keep a backup copy of it in your home folder:
sudo cp /etc/timidity/timidity.cfg ~/timidity.cfg
Try the command given below to open the file.
sudo gedit /etc/timidity/timidity.cfg
You can use other text editors like nano or gvim instead of Gedit.
We have to add this line at the end of the file:
source /etc/timidity/fluidr3_gm.cfg
But the file probably contains that line already, in a commented state. All you have to do is uncomment it [by removing the hash (#) in front of it]. After that, you may comment the line of the current soundfont by adding a ‘#’ before it. Now TiMidity++ starts using the new soundfont.
When you use multiple soundfonts and when they contain the same instrument, the last soundfont is used. For advanced mixing of soundfonts, you can edit their configuration files (e.g., /etc/timidity/fluidr3_gm.cfg) or create a new soundfont using programs like Swami.
When MIDI blocks everything else
Some MIDI programs may suspend all other audio playbacks. The suspension usually ends once the program is closed. If it doesn’t, you may try killing the jackd process.
You can stop jackd using QJackCtl or the facilities provided by System Monitor under the Processes tab. However, if you prefer the command line way, use the following command to get the process ID (PID) of jackd (the second column of the output shows the PID):
lsof|grep /usr/bin/jackd
Now you can run the following command (replacing PID with the actual value) to kill jackd:
kill PID
Other packages worth trying
Here is a list of some useful packages that you should try.
GNU Denemo: Denemo is a score writer that acts as a GUI for LilyPond, a format and program for music engraving. Multiple input methods including vocal note entry are supported.
ZynAddSubFX: This is a synthesiser that produces sound for MIDI input using mathematical calculations rather than depending on a soundfont. Although this sounds unrealistic, it can give an electronic touch to your music.
FMIT: This is a free software tuning program that can be used to tune your instrument or your voice itself.
GNU Solfege: Solfege is a wonderful program that provides many types of training exercises to tune your ears to music. It also tracks your performance and produces live statistics.
Libre music online
There are a lot of websites that host music under free licences. But in order to learn the process, you have to visit each application’s website.
If you’d like to get everything related to free music production under a single site, just visit libremusicproduction.com. This is an exclusive website that hosts articles and news related to free music production software, which will be really useful for a composer.
Music distros
Thanks to applications like Synaptic and Ubuntu Software Centre, package installation has been made a simple task in most GNU/Linux distros. But installing all the packages we have discussed here would be a time-consuming process. Also, their configuration may get a little bit technical. However, there are some GNU/Linux distros focusing on multimedia production that are of help here. They include Ubuntu Studio, Musix and dyne:bolic.
Whether you choose to go the distro way or the manual way, I’m pretty sure that with free software, you’ll get the thrill of setting up a music studio and creating your own magical beats!


Excellent article about the requirements to start writing music, thank you Nandakumar.
One additional thing that may be worth noting is that Denemo works great in conjunction with Frescobaldi. One reason for doing this is to see and get to know the Lilypond syntax behind the Denemo front-end. Another reason is that Denemo’s built-in synth doesn’t play the articulations (from my experience anyways), but Frescobaldi will do that.
Build a score in Denemo. Then view the lilypond text and copy it, next paste it into Frescobaldi and perform any additional editing. I use Coolsoft VirtualMidiSynth for the Frescobaldi midi output, but as you have stated there are other viable options for that.
Thanks for the comment, Rain Wilber! To be honest, this is the first time I ever hear about Frescobaldi. I understand that it is both useful and free software. I’m sure people will consider your comment as an appendix to this article.
Wow. It’s a great article. That is really fascinating. It’s nice to see it. Nice written and come with almost all important information for music. I love this. I would like to see more posts like this . Thanks for sharing this information.