


This is the second article in series on pfSense. While the introductory article covered pfSense basics, here, readers are taken a step further in their journey of mastering the tool.
The first article in this series included the basic pfSense set-up, installing/configuring the Squid Proxy server and the SquidGuard proxy filter. This article takes off from the stage after pfSense has been configured. It continues further to set up dual WAN failover. Please refer to the earlier article that was carried in the June 2016 issue of OSFY to learn more on how to establish a basic firewall.
The new pfSense minor release
Between writing the first and second articles, two pfSense releases have been made available.
a. 2.3 update 1 provides security patches to mitigate risks from NTP CVEs for FreeBSD. Details of this CVE are available at https://www.freebsd.org/security/advisories/FreeBSD-SA-16:16.ntp.asc. Apply this update before continuing further. Being a minor release, there will be no change in the pfSense version number. Once the update is complete, do not forget to restart the NTP service from the Status – Services menu. A reboot is not required.
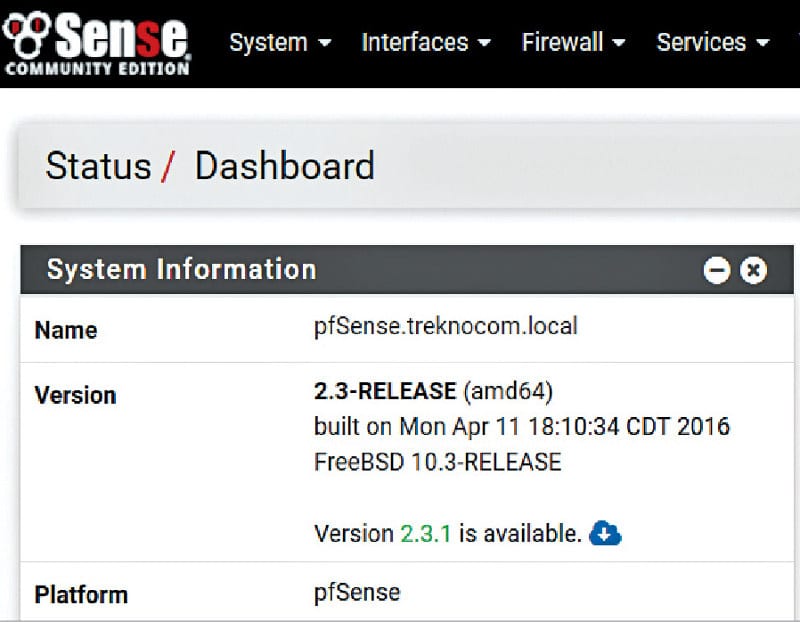
b. Important changes in version 2.3.1 include bug fixes from the earlier release, fixing of issues released in FreeBSD security advisories related to OpenSSL, atkbd and sendmsg, and the upgradation of OpenVPN version from 2.3.10 to 2.3.11. To apply this update, click on the icon under Status–Dashboard–System Information – Version and select Confirm. An auto installation process will complete the update and reboot pfSense. Time required for this update will primarily depend upon the speed of your internet connection.
| As mentioned on cve.mitre.org, common vulnerabilities and exposure (CVE) is a list of information security vulnerabilities and exposures that aims to provide common names for publicly known cyber security issues. The goal of CVE is to make it easier to share data across separate vulnerability capabilities (tools, repositories and services) with this ‘common enumeration’. In laymen’s terms, CVEs provide information about vulnerabilities in operating systems, application software and services. These vulnerabilities need to be fixed by their respective vendors to mitigate the risks to users and to improve security. |
A background to pfSense dual WAN failover
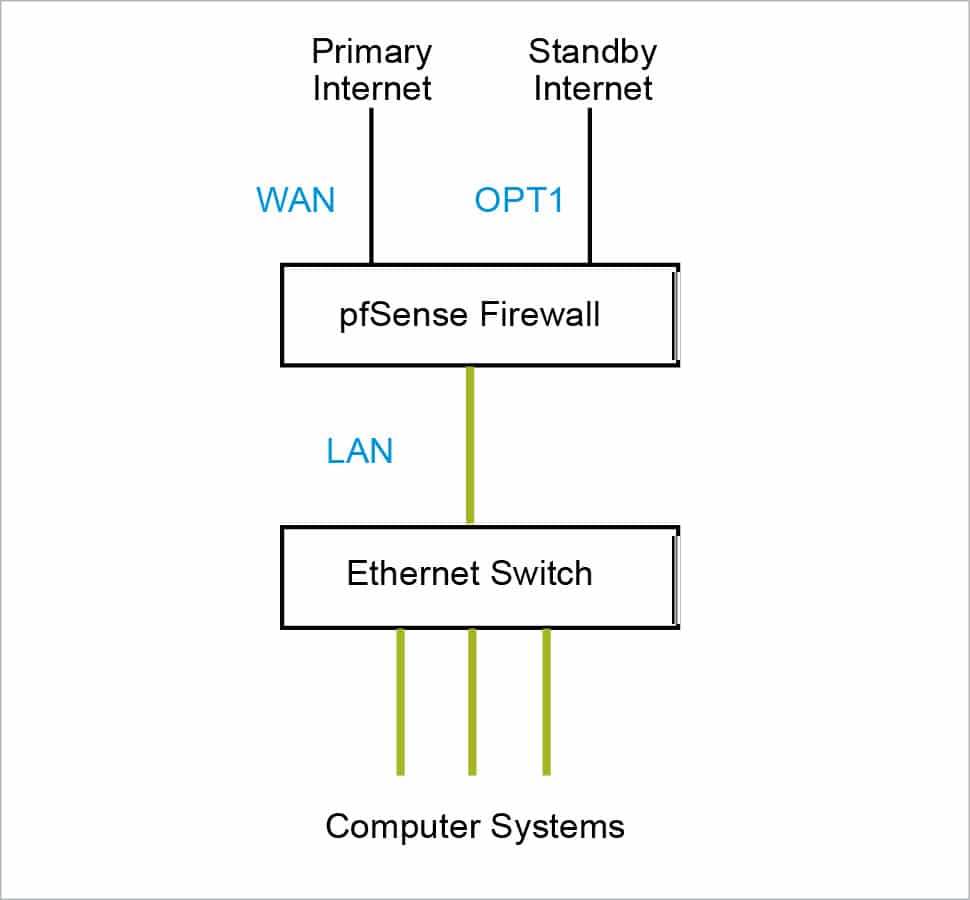
Many organisations have a primary high speed Internet connection, and a low speed standby connection. Typically, the latter is used if the primary connection fails. The Internet connectivity via the primary connection resumes once it is online again. Configuring pfSense in multi-WAN failover mode automates this task.
Many articles on the Web and pfSense forums have described the installation of pfSense dual WAN failover. Different versions of pfSense may require different set-up instructions. If the steps are not followed meticulously, failover does not work, thus frustrating the administrator/installer.
For the latest pfSense 2.3 release, dual WAN failover configuration is the simple five-step process described below. A few best practices are listed after that.
| 1. Configure two WAN interfaces 2. Establish dual WAN group 3. Add firewall rules required for the dual WAN set-up 4. Reconfigure Squid Proxy service 5. Configure default gateway auto failover 6. Best practice: Configure DNS servers |
Configuring pfSense 2.3 dual WAN failover
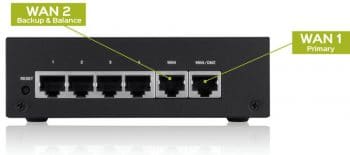
1. Configure two WAN interfaces: In Figure 2, labels in blue indicate names of pfSense interfaces.
Verify that LAN and primary internet connections are connected to corresponding pfSense LAN and WAN interfaces. Now, connect standby internet connection to OPT1 interface.
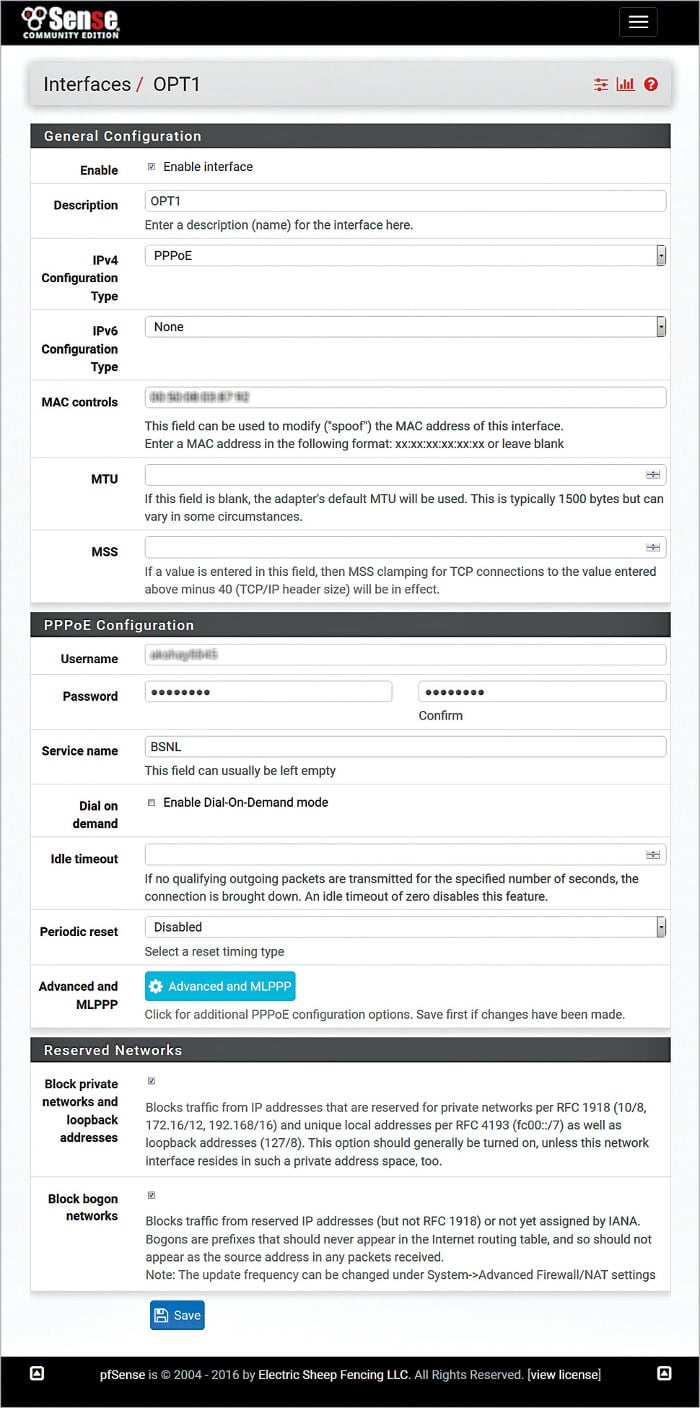
Configure OPT1 interface’s ISP settings. pfSense supports various types of Internet connections such as PPPoE, static, DHCP, etc. The PPPoE connection is used in this test set-up.
As you may be aware, many ISPs allow Internet connections to be terminated on only one device by binding the device’s MAC address. Thus, the user is required to call ISP and reset MAC address before configuring the internet with different device.
Here, an interesting feature of pfSense –- ‘MAC control’ comes handy. This field can be used to configure (spoof) MAC address to the one registered with ISP and configure the internet connection without unnecessary hassle of coordinating with ISP.
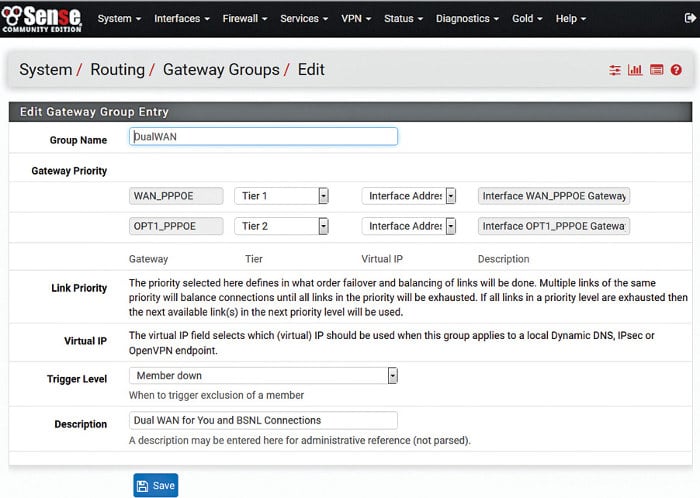
2. Establish a dual WAN group: Once the firewall is configured with two Internet connections, one each on the WAN and OPT1, go ahead and create a dual WAN group by going to System – Routing – Gateway Groups. Then configure a DualWAN group for WAN with Tier1 (highest priority) and OPT1 with Tier2 (second highest priority).
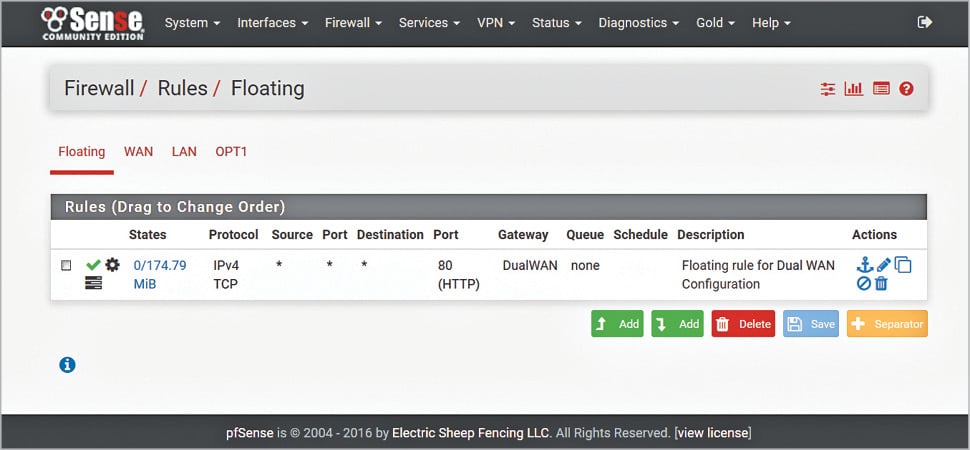
3. Add/configure the firewall rules required for a dual WAN set-up: Use the DualWAN group created in Step 2 to create new floating rules.
a. Go to the floating rule creation screen menu: Firewall – Rules – Floating. Add new floating rule as per the screenshot shown in Figure 5. Modify the existing firewall rules by using DualWAN in place of WAN.
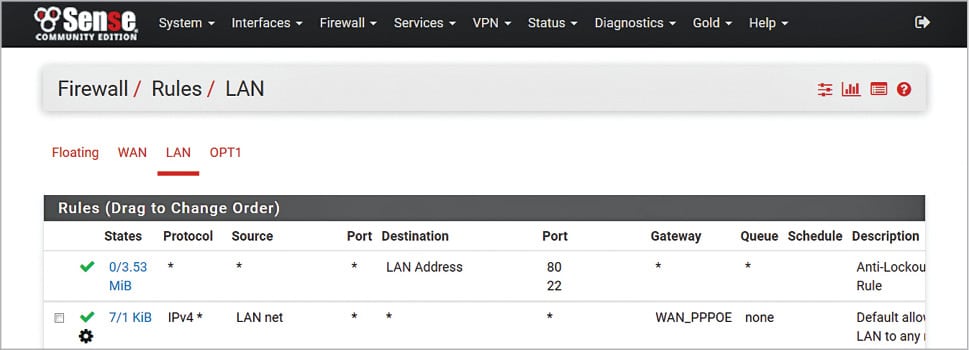
b. Modify existing LAN to any rule – which is created by pfSense automatically at the time of installation. This rule allowed all traffic originating from LAN towards all destinations on all services (ports) using WAN as the gateway.
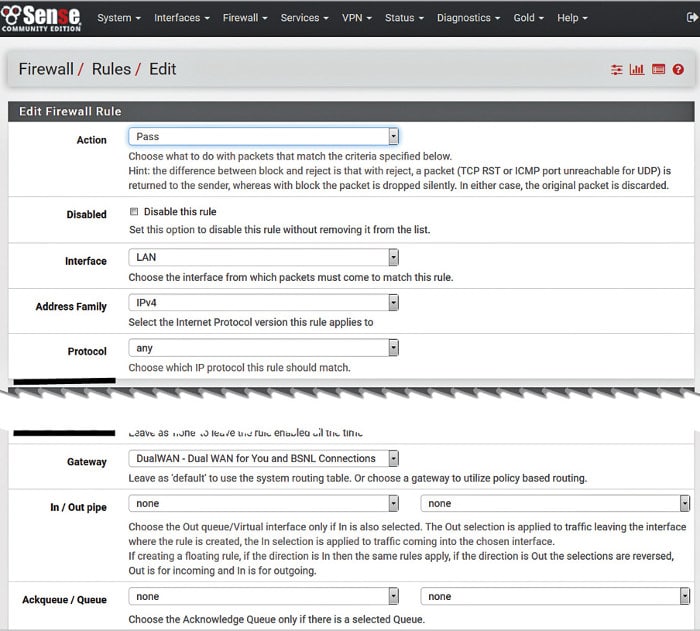
Then, open Open Firewall – Rules – LAN – Gateway box, click the Display Advanced button and change existing WAN gateway to DualWAN gateway created earlier in Step 2.
For creating additional firewall rules, use the DualWAN gateway instead of WAN.
4. Reconfigure the Squid Proxy service: Two changes are required in Squid Proxy configuration.
a. Select ‘LAN’ and ‘loopback’ proxy interfaces under Squid General Settings.
b. Click Show Advanced Options and add ‘tcp_outgoing_address 127.0.0.1;’ string at start of the ‘Integration’ box.
5. Configure the default gateway auto failover: The pfSense website mentions that, by default, traffic using a proxy such as Squid will bypass policy routing and use the default route for traffic at all times. It also bypasses the expected outbound NAT and leaves via the WAN IP address, directly.
Further, policy routing traffic from the firewall itself is not currently possible. Failover can be achieved in many cases by using the default gateway switching under System > Advanced on the Miscellaneous tab.
Proceed to System – Advanced – Miscellaneous tab and select the ‘Default Gateway Switching’ box.
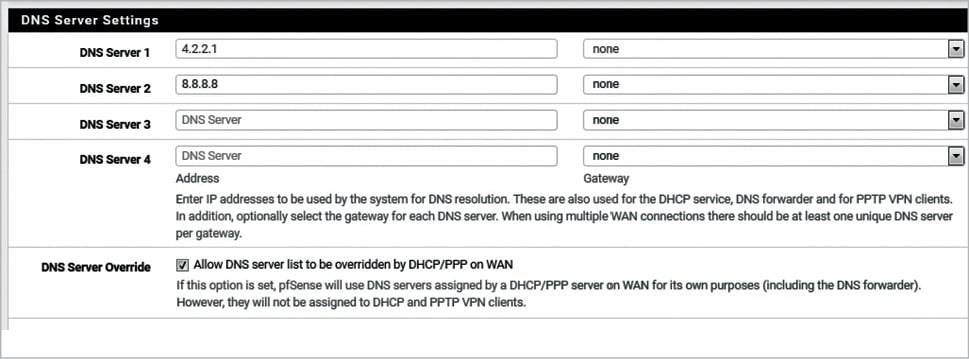
6. Best practices when configuring DNS servers: Typically, WAN and OPT1 connections will be from different ISPs. Thus, these connections will have different DNS settings belonging to corresponding ISPs. To ensure the correct DNS resolution after failover, configure publicly accessible DNS servers under System – General Setup.
a. Configure public DNS servers such as Level 3 communications DNS 4.2.2.1 or Google DNS 8.8.8.8.
b. In addition, select the following checkbox: ‘Allow DNS server list to be overridden by DHCP/PPP on WAN’.
Verify DNS configuration under Status – Interfaces to confirm that DNS settings have entries corresponding to ISP DNS servers and to the two additional servers configured earlier.
Following these six steps correctly will configure pfSense 2.3 in dual WAN failover mode.
Verifying dual WAN functionality
Simple verification: Remove cables from WAN/OPT1 interfaces alternately and verify that you can browse the Internet. Here, you may check the IP address of your WAN connection by using the whatismyip.com website or by keying in ‘What is my IP’ in Google .
Detailed verification: From the Status – Gateway menu, identify and note down the ‘Gateway’ corresponding to the WAN and OPT1 interfaces.
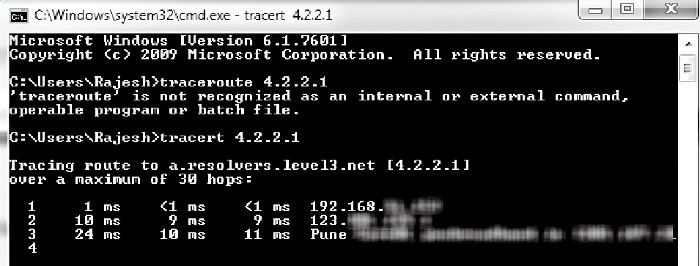
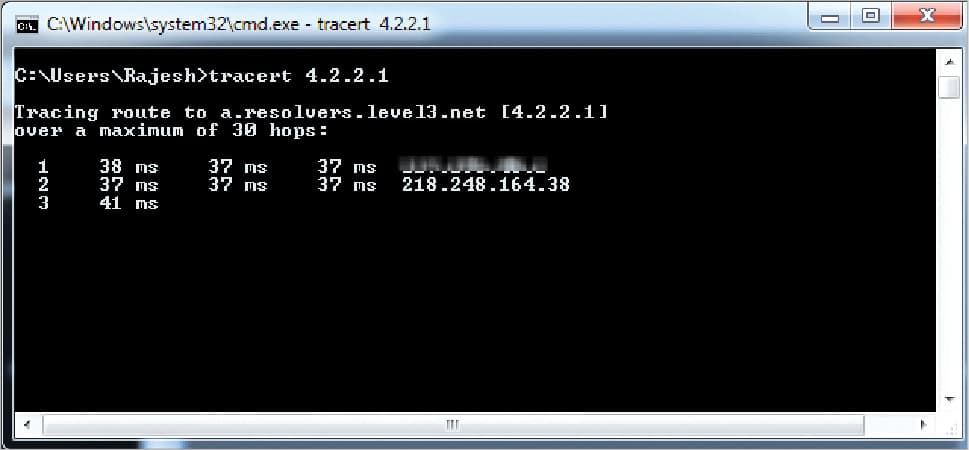
Use the tracert (Windows) or tracepath (Linux) commands towards any external IP address such as 4.2.2.1 or 8.8.8.8, or even your website IP address. The first hop in the output of this command will be the pfSense IP address, and the second hop will be the gateway of the ISP, indicating whether the traffic is going out from the WAN or OPT1.
Also observe that whenever WAN and OPT1 are both online, traffic is going out via the WAN interface – which is defined as the Tier1 interface. Try different scenarios by changing the tiers of internet connectivity interfaces and observe the results.
Important pfSense menus for diagnostics and troubleshooting
- Status – Interfaces details the current status of all interfaces (LAN, WAN and OPT1) in this configuration
- Status – Gateways provides the current status of both WAN gateways
- Status – Gateways – Gateway Groups gives the current status of the Gateway Groups. Here, if both the WAN connections are up and running, status of both gateways will show online.
- Status – Services shows the status of running services. This menu will also enable stopping/restarting of services.
Security best practices
- pfSense uses ‘admin’ as the default user name. As a security best practice, configure an additional user name from the System–User manager menu with admin privileges. Further, disable the admin user name by selecting ‘This user cannot login’.
- pfSense has four hours default time to expire idle management sessions. From the System – User manager–Settings menu, consider reducing this to five to ten minutes.
- It is also possible to use Microsoft Windows AD authentication for pfSense login from the System – User manager–Authentication Servers menu. An excellent article for this is available at https://forum.pfsense.org/index.php?topic=44689.0
Keep a watch on this column for more information on the pfSense firewall.


setup and tested as described, dual wan fail over working, but I can’t seem to get port forwarding to work, any ideas?