


In this article, we present Docker Swarm, a native clustering tool that turns a pool of Docker hosts into a single virtual Docker host.
Docker Swarm is just one year and four months old and it has already been accepted as production-ready software. Docker Inc. announced Docker Swarm during DockerConEU in December 2014. Docker Swarm is a clustering manager for Docker, and Docker Machine is a CLI tool for provisioning Docker hosts. Docker Inc. intended to provide a complete and integrated solution for running containers, not allowing itself to be restricted to only providing the Docker engine.
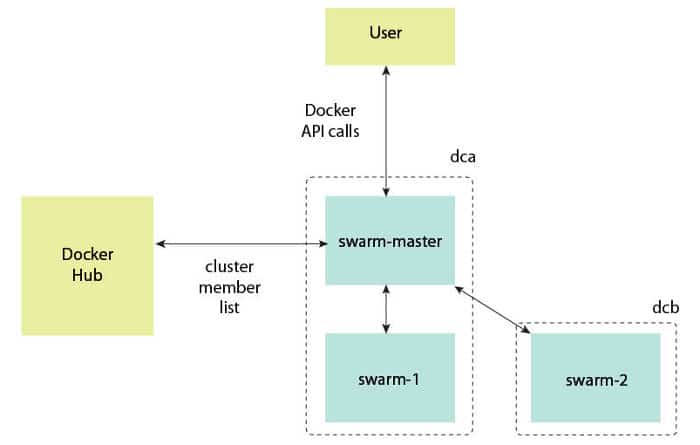
Docker Swarm is the native clustering tool for Docker. It uses the standard Docker API, i.e., containers which can be launched using normal Docker run commands. Swarm takes care of selecting an appropriate host to run the container on. What this actually means is that the other tools that use the Docker API, such as Compose and bespoke scripts, can use Swarm without any changes and take advantage of running on a cluster rather than a single host.
The basic architecture of Swarm is fairly straightforward:
1. Each host runs a Swarm agent and one host runs a Swarm manager (on small test clusters, this host may also run an agent).
2. The manager is responsible for the orchestration and scheduling of containers on the hosts.
3. Swarm can be run in a high-availability mode where etcd, Consul, or ZooKeeper are used to handle failover to a back-up manager.
There are several different methods for how hosts are found and added to a cluster, which is known as ‘discovery’ in Swarm. By default, token-based discovery is used to keep the addresses of hosts in a list stored in the Docker Hub.
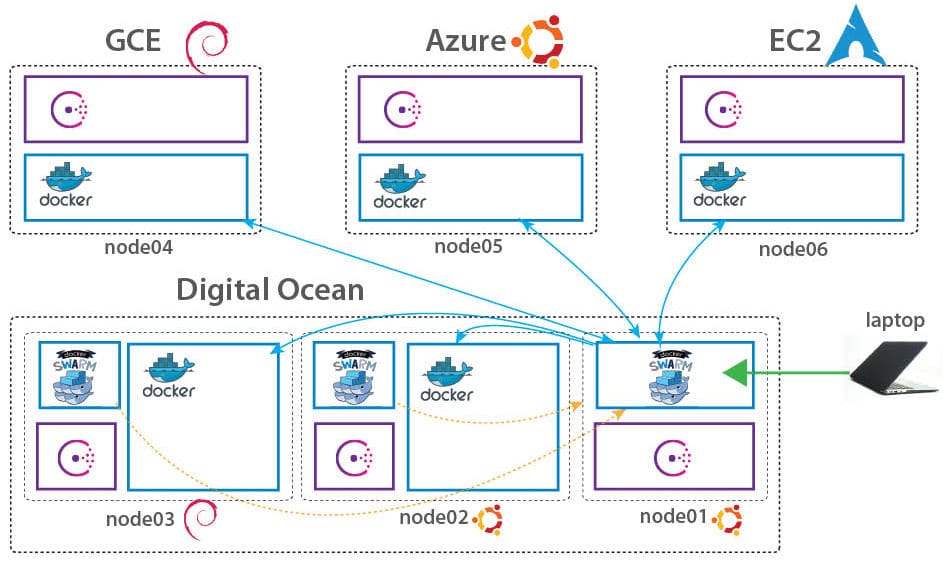
Let’s start with the practical implementation of Docker Swarm. I quickly turned on a 4-node cluster on my Google Cloud Engine, one Swarm master node, two agent nodes and one Swarm manager node to manage the overall cluster. The details of my environment are given in Table 1.
Setting up a Swarm master node
Ensure that Docker 1.9.1 is installed on all the nodes of the Docker Swarm cluster. You can use the following command to update all the Docker hosts to the latest version:
wget -qO- https://get.docker.com/ | sh
Note: It is upper case O and not zero.
The output will look something like what’s shown below:
Processing triggers for systemd (225-1ubuntu9) Processing triggers for man-db (2.7.4-1) Setting up docker-engine (1.9.1-0~wily) Installing new version of config file /etc/bash_completion.d/docker Installing new version of config file /etc/init.d/docker Installing new version of config file /etc/init/docker.conf Processing triggers for ureadahead (0.100.0-19) Processing triggers for systemd (225-1ubuntu9) + sh -c docker version Client: Version: 1.9.1 API version: 1.21 Go version: go1.4.2 Git commit: a34a1d5 Built: Fri Nov 20 13:20:08 UTC 2015 OS/Arch: linux/amd64 Server: Version: 1.9.1 API version: 1.21 Go version: go1.4.2 Git commit: a34a1d5 Built: Fri Nov 20 13:20:08 UTC 2015 OS/Arch: linux/amd64
If you would like to use Docker as a non-root user, you should now consider adding your user to the docker group with something like what follows:
sudo usermod -aG docker your-user
Note: You will have to log out and log in again for this to take effect.
Starting the Docker daemon
The Docker daemon is a self-sufficient runtime for Docker containers. Lets configure and start Docker Engine so that it listens on port 2375, as shown below:
root@dockerhost-1 ~]# docker daemon -H tcp://0.0.0.0:2375 -d &
[1] 11516
Setting up Docker Swarm
Run the following command to install Docker Swarm on the master node and create a Swarm token, which is the heart of the Docker Swarm cluster configuration, as follows:
root@docker-1:~# docker run rm swarm create 7733f838d176809cb2f2d24eb34ce78c
As shown in the output above, it created a token ID starting with 7733f838.
Setting up the Swarm agent node 1: [10.240.0.3]
Ensure that Docker 1.9.x is installed on Agent Node 1. Also, the Docker daemon needs to be running, following steps similar to those followed during the master node set-up.
#docker run -d swarm join addr=10.240.0.3:2375 token://7733f838d176809cb2f2d24eb34ce78c 560e58a76ef235c8d74f ffb2c680149111b8bbe687f 1e0e164cd7c05dad59f33
Setting up Swarm manager node: [10.240.0.5]
Swarm manager helps you to start managing your Swarm cluster. Let’s set up a Swarm manager on a separate node (though it can be set up on a master node too).
root@docker-3:~# docker run -d -p 7000:2375 swarm manage token://7733f838d176809cb2f2d24eb34ce78cb26a2bbb336e26e0cd6ac5d61b90d7a9d9f74a2d072f573b6890bd9b0f6e470f
Please remember that 7000 is the Swarm manager port which is being set.
Now you can see the Swarm cluster details:
root@docker-3:~# docker -H tcp://10.240.0.5:7000 info
Containers: 0
Images: 2
Storage Driver:
Role: primary
Strategy: spread
Filters: health, port, dependency, affinity, constraint
Nodes: 1
docker-1: 10.240.0.2:2375
+ Status: Healthy
+ Containers: 0
+ Reserved CPUs: 0 / 1
+ Reserved Memory: 0 B / 3.794 GiB
+ Labels: executiondriver=native-0.2, kernelversion=4.2.0-18-generic, operatingsystem=Ubuntu 15.10, storagedriver
=devicemapper
Execution Driver:
Kernel Version:
Operating System:
CPUs: 1
Total Memory: 3.794 GiB
Name: b26a2bbb336e
ID:
Http Proxy:
Https Proxy:
No Proxy:
As just one node has been added to the cluster node, it shows just Node-1 added to the Swarm cluster.
Setting up Swarm Agent Node 2: [10.240.0.4]
Let’s add one more agent node to see how Swarm manager actually manages multi-container nodes.
root@docker-2:~# docker run -d swarm join addr=10.240.0.4:2375 token://7733f838d176809cb2f2d24eb34ce78cfe5b81d57f6394db655d15ce097f8ca537d6c74c2de6a477ac38544a7db0a5d8 root@docker-2:~#
Finally, you can list out all the nodes added to the Swarm cluster by running the following command on the Swarm manager node as shown below:
#docker run rm swarm list token://7733f838d176809cb2f2d24eb34ce78c 10.240.0.4:2375 10.240.0.2:2375
So there you are your multi-node Swarm cluster is ready to rock!
Let’s create a container and run it through the Swarm manager, as follows:
sudo docker -H tcp://10.0.1.61:5001 run -dt name swarm-test nginx /bin/sh root@docker-1:~# docker images INFO[0999] GET /v1.18/images/json INFO[0999] +job images() INFO[0999] -job images() = OK (0) REPOSITORY TAG IMAGE ID CREATED VIRTU AL SIZE nginx latest 813e3731b203 4 days ago 133.8 MB centos latest 14dab3d40372 5 days ago 194.7 MB swarm latest e9ff33e7e5b9 11 days ago 17.15 MB ajeetraina/dell-syscfg v1.0 d121b6e6dba4 12 weeks ago 1.449 GB tduzan/docker-omsa latest ffcbdafb4aa6 16 months ago 806.4 MB root@docker-1:~#
Let’s see what containers are running on each Swarm agent machine, as follows:
root@docker-3:~# docker -H tcp://10.240.0.5:7100 ps CONTAINER ID IMAGE COMMAND CREATED STATUS PORTS NAMES d0ee6dad4b39 nginx:latest /bin/sh 58 minutes ago Up 58 minutes 80/tcp, 443/tcp docker-1/swarm-test cd9bc8c96e45 ajeetraina/dell-syscfg:v1.0 /bin/bash About an hour ago Up About an hour docker-1/jolly_curie d0bcc8da090e bad926a6fb50:latest /bin/bash About an hour ago Up About an hour docker-2/hopeful_tesla root@docker-3:~#
This means that you can easily create containers form the Swarm manager node and, interestingly, you don’t need to worry about what node this container will sit on. Your Swarm cluster is intelligent enough to take care of the right resource for your container.
Happy Swarming!


is docker swarm “cloud computing” instanace?