

For those who love getting their hands dirty tinkering with software, we offer a great opportunity!
This article presents a way to create a privacy based search extension for the Opera Web browser in 10 minutes. Like Mozilla Firefox and Google Chrome, it is a freeware Web browser developed by Opera Software. It is available for Microsoft Windows, OSX and Linux operating systems and also for mobile devices running on Android, iOS, Windows Phone, Symbian, Maemo, Bada, BlackBerry and Java ME compatible mobile devices.
The Opera Web browser has some great features, which are listed below.
Usability and accessibility: Opera provides keyboard shortcuts to control various aspects of the browser. As an example, page zooming allows text and media content such as Adobe Flash Player, scalable vector graphics and images to be increased and decreased in size to help users with vision impairment to see them better. Also, Opera has the Turbo mode which, when enabled, compresses Web pages by up to 70-80 per cent, based on content, before sending them to the user. This is done to make Web pages load faster for users with slower Internet connections. This technique is specially used in Opera Mini for mobile devices.
Standard support: Opera is based on the V8 and Blink layout engine, so Web standards support of Opera is similar to Google Chrome. Also, Opera was one of the first browsers to support CSS (Cascading Style Sheets).
Native ad blocker: This blocks ads with a built-in ad blocker when enabled. Currently, this feature is only available on the Opera Beta 37 version and above.
Privacy and security: One of the key security features of Opera is the option to delete private data, such as cookies, browsing history and cache with a click of a button. Another great security feature is that Opera displays a security badge in the address bar, which specifies important security details about websites you visit, such as security certificates. It checks whether the visited website is blacklisted for phishing or malware and displays a warning message if its on the blacklist.
On April 20, 2016, Opera became the first major browser maker to integrate an unlimited and free VPN (Virtual Private Network). Now, if you use Opera browser, you dont have to download the VPN extension/add-on or pay for any VPN subscription to secure your online browsing activity on public Wi-Fi.
With a free, unlimited, native VPN that doesnt require any subscription fee, Opera wants to make VPNs available to everyone, and provide privacy and security.
What are Opera extensions?
Opera extensions are code packages that you can add to your Opera Web browser to extend its functionality. The Opera extension API provides functions to explore different features of the Web browser by giving you a variety of options for the extension functionality. If you have already developed extensions for Google Chrome, then you will encounter some similar steps and procedures while developing extensions for Opera. Since Opera is based on Chromium, a majority of core internal functionalities are similar to the Google Chrome Web browser, which means it is possible to run some of the Chrome extensions on Opera.
Now, let us create a privacy based search extension for the Opera Web browser.
Why do we require privacy on search?
When we perform a search on search engines and click on our search results, our search terms or key words are sent to the website we clicked on (via an HTTP referrer header). This concept of sharing personal information is called search leakage. In simple words, when we search for something private, we are sharing that private search information with our search engine as well as with the websites that we clicked on for that search. Also, when we visit any website after that, our computer automatically sends important information about the websites we visited along with our IP address and user agent, to that clicked website. So, basically, when we perform a search, other websites know our search terms and they also know that we searched for them.
Some search engines save our history, along with the date and time of the search, as well as some important computer information such as our user agent, IP address or our account information (name and login information, if we are logged in).
This availability of information about us does raise some privacy concerns. Thankfully, there are some search engines that avoid these privacy and security problems. The three most popular ones are listed here.
DuckDuckGo: This is one of the most popular Internet search engines, with its main motto being to protect searchers privacy and to avoid the creation of personalised search results for users. DuckDuckGo puts privacy first and does not log user information such as IP addresses, etc. It also provides full protection from search leakage.
Encrypted Google: This uses SSL (Secured Socket Layer), which encrypts the connection between your computer and Google. This basically prevents and protects it from others, like Internet service providers and public Wi-Fi hotspots, from seeing your search results page and other vital information.
Ixquick: This lets you search privately using your favourite search engines. It gathers results from all major search engines. It adds an extra security layer between you and your search engines, which means search engines will see search requests coming from Ixquick and not the end user. This makes the user’s search requests practically anonymous to the main search engine. Ixquick does not log search terms, IP addresses or any other personal information about users.
So now, let us develop an extension, which will allow a user to search any highlighted text or word, on the DuckDuckGo, Encrypted Google and Ixquick search engines.
Developing an extension
“We are now going to develop a user-friendly and useful privacy-based search extension. Let’s call it the ‘Privacy Search’ extension, which will allow users to search any highlighted word on one of these privacy-based search engines – duckduckgo.com, encrypted.google.com, and ixquick.com. Users will highlight the word they wish to search in the web browser, then right-click the highlighted word and select the ‘Privacy Search’ option from the context menu. Following this, three submenu options will be displayed: ‘Search on DuckDuckGo for…’, ‘Search on Encrypted Google for…’, and ‘Search on Ixquick for…’. Users will select and click on any one of these submenu options, depending on which search engine they want to use. After doing this, users will be redirected to the highlighted word’s search results page, opened in a new tab.”
We are going to use the following Web technologies:
- JSON to create a manifest file
- JavaScript for the logic
Setting up the development environment
Let us set up a file structure for our extension, and create a new folder with any name on the computer. In our case, C:\privacysearch is the extensions folder. Now, inside that new folder, create a folder called ‘images’. In the root directory of our extension folder, create an empty text file using Notepad and save it with the .json extension called manifest.json and also create an empty JavaScript file called background.js.
You should end up with the following directory structure:
- images\
- manifest.json
- background.js
Description
The directory containing icons or images is called images, which we will be using in our extension.
manifest.json is a metadata file in JSON format that contains basic properties like the extension’s name, description, version number, etc.
background.js is a JavaScript file containing the search logic for the extension.
Adding icons or images to our extension
In this step, we are going to add an icon to our option in the context menu. Visit http://www.flaticon.com/search/magnifier and download any one icon, preferably in .png format, and of size 16×16 pixels. Copy it to the images folder located in our extensions folder and rename that image to ‘search.png’.
Creating the manifest file
Open the manifest.json file with your favourite code editor or Notepad and copy the following JSON code:
{
manifest_version: 2,
name: Privacy Search,
description: This addon searches highlighted text, on selected top three privacy search websites.,
version: 1.0,
background: {scripts: [background.js]},
icons: { 16: images/search.png},
permissions: [contextMenus, tabs]
}
The code is written in JSON format (Key: Value pair). It consists of all basic information about the extension such as its name, description, version, images, icons used, permissions required and so on.
Parameter description
– `manifest_version` specifies the version of the manifest; the value must be 2.
– `name` specifies the name of the extension.
– `description` specifies a short description of the extension.
– `version` specifies the version of the extension.
– `background` specifies that the script `background.js` loads as soon as the user starts the Opera browser.
– `icons` specifies the location of the icons or images used in our extension.
– `permissions` specifies which Opera extension APIs are to be used. We are using `contextMenus` and `tabs`.
Adding JavaScript
Now, open the background.js file in your favourite code editor or Notepad and copy the following JavaScript code:
var parent = chrome.contextMenus.create({
title: Privacy Search on..,
contexts: [selection]
});
chrome.contextMenus.create({
title: Search on DuckDuckGo for: \%s\,
parentId: parent,
contexts: [selection],
onclick: searchTextDuckDuckGo
});
chrome.contextMenus.create({
title: Search on Encrypted Google for: \%s\,
parentId: parent,
contexts: [selection],
onclick: searchTextGoogle
});
chrome.contextMenus.create({
title: Search on Ixquick for: \%s\,
parentId: parent,
contexts: [selection],
onclick: searchTextIxquick
});
function searchTextDuckDuckGo(info){
var myQuery = encodeURI(https://duckduckgo.com/?q=+info.selectionText);
chrome.tabs.create({url: myQuery});
}
function searchTextGoogle(info){
var myQuery = encodeURI(https://encrypted.google.com/#q=+info.selectionText);
chrome.tabs.create({url: myQuery});
}
function searchTextIxquick(info){
var myQuery = encodeURI(https://ixquick.com/do/search?q=+info.selectionText);
chrome.tabs.create({url: myQuery});
}
“The first four functions are for creating a UI for our extension. Since we are providing options in the context menu, we will use the `contextMenus.create()` function to create a customized context menu. This function has key-value parameters such as `title` and `contexts`; the most important one is the `event`, which specifies what must be done when certain browser-based events occur, i.e., calling some function. In our case, we are creating a parent menu called ‘Privacy Search on…’ using the first function, and sub-menu options called ‘Search on DuckDuckGo for:’, ‘Search on Encrypted Google for:’, and ‘Search on Ixquick for:’ using the next three functions.”
“When users click or select one of these sub-menu options, a specified function is called. For example, when users click the ‘Search on DuckDuckGo for:’ option, the `searchTextDuckDuckGo()` function is called. The `searchTextDuckDuckGo` function retrieves the value of the element `info.selectionText`; it is then appended with the URL of the DuckDuckGo search engine and stored in a variable named `myQuery`. Subsequently, this variable loads in a new tab with the search results.”
That’s it with the coding part; now let us load and test the extension.
Loading and installing the extension
In the Opera Web browser, extensions are packaged as .nex files. You can do this by going through the following steps.
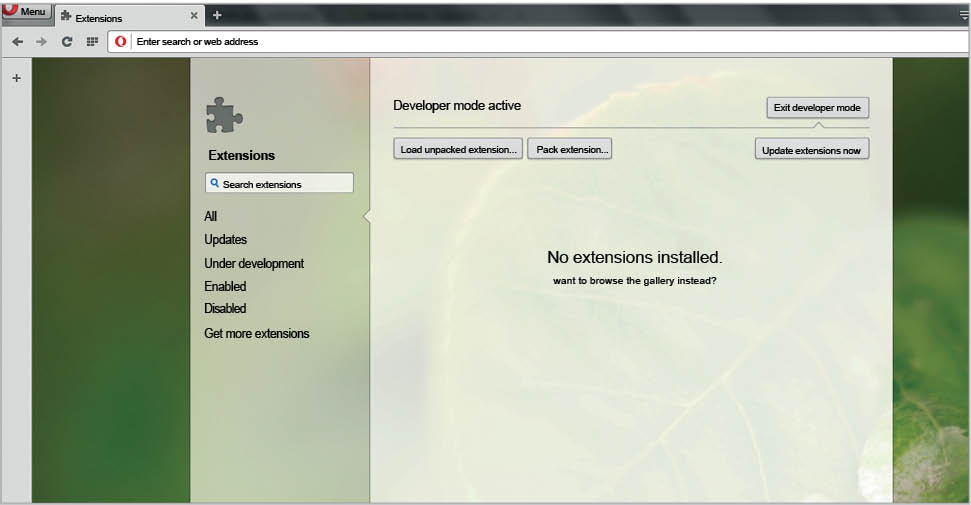
Type ‘opera:extensions’ in the address bar of an Opera browser and press Enter or the Ctrl+Shift+e keys.
“Click the ‘Developer Mode’ option located on the top right to enable it. By doing this, you gain the ability to inspect various parts of the extension using the browser’s developer tools. Additionally, you can make changes to your extension’s code and preview the effects by using the reload button.
You will see two options: ‘Load unpacked extension’ and ‘Pack Extension’, as shown in Figure 1.
With the ‘Load unpacked extension’ option, you can navigate to the directory where your extension files are located and select that extension folder. This loads the extension.
With the ‘Pack extension’ option, you can select your extension folder and package it into a .nex file.”
After creating the .nex file, just drag and drop it in the Opera browser to install it.
Running the extension in the Opera Web browser
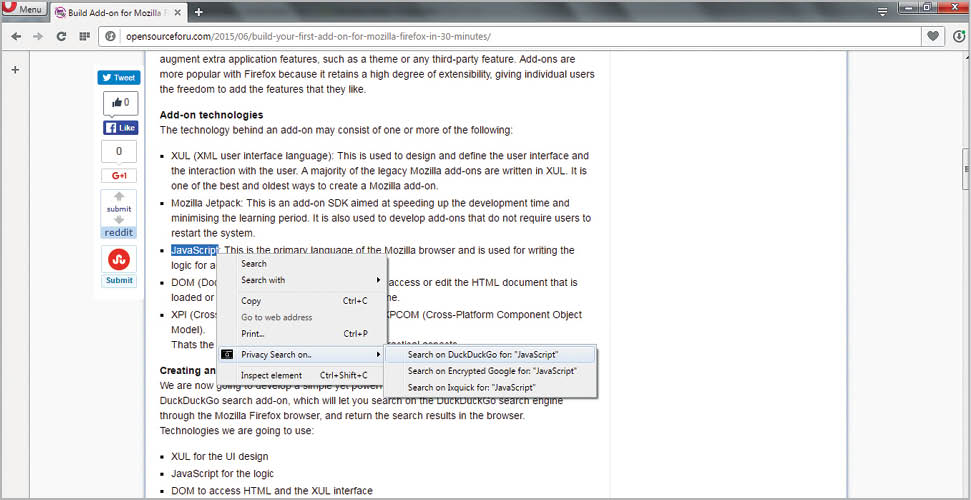
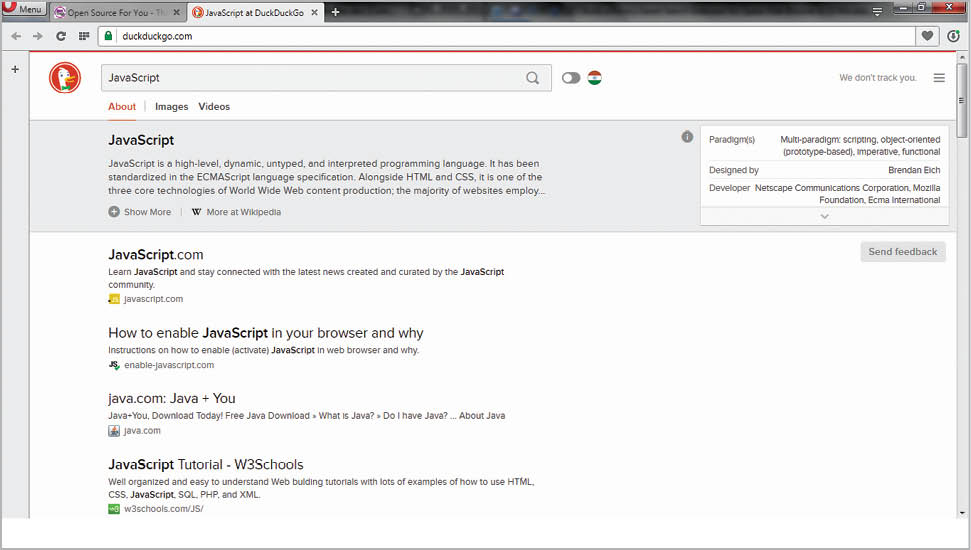
“After installing/loading the extension, you can test it by highlighting some text and then selecting the ‘Privacy Search on…’ option and any one of the sub-menu options from the right-click context menu. For example, we tested the extension by highlighting the word ‘JavaScript’ on http://opensourceforu.efytimes.com/ and then selecting the ‘Search on DuckDuckGo for:’ sub-menu option from the ‘Privacy Search on…’ option in the right-click context menu, as shown in Figure 2. This action opened the DuckDuckGo search results for ‘JavaScript’ in a new tab in the Opera browser, as shown in Figure 3.”


Nice & simple instructions to build an opera addon.