


Add-ins have been an important part of the Microsoft Office suite as they allow users and third party developers to extend the capabilities and functionalities of Office, and with more than 1.2 billion users worldwide (https://news.microsoft.com/bythenumbers/ms_numbers.pdf), there is quite a large market for apps on this platform.
Previously, one had to use things like VBA, Com add-ins, VSTO, etc, to write add-ins for Office, but now all that you need is the Open Web Platform.
A high level overview of the platform
The Office Add-ins platform allows us to build apps using existing Web standards like HTML 5, CSS, JavaScript and RESTful Service that can interact with office documents, mails, calendars, meeting requests and appointments.
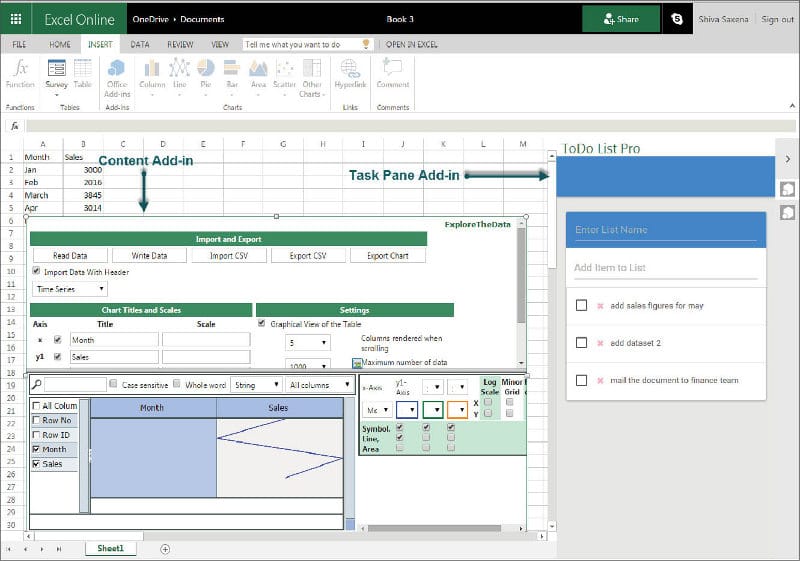
Office currently has three types of add-ins that you can build:
- Task pane add-in: This appears at the side of the document and allows you to provide contextual and functional features in it.
- Content add-ins: These appear in the body of the document.
- Outlook add-ins: These appear next to an Outlook item when its being viewed or edited. They require Exchange 2013 or Exchange Online to host the users mailbox.
Anatomy of an Office add-in
An Office project consists of a mainifest.xml file bundled with a Web application. The Manifest file can be submitted to the Office app store or SharePoint app catalogue, and contains metadata about the application like the developers name, target platform, etc. The Web application can be hosted on any Web server.
Prerequisites for developing add-ins for Office
The recommended IDE for add-ins development is Visual Studio 2015. There is a free version for individual developers and open source contributors (Visual Studio Community Edition) that can be downloaded from https://www.visualstudio.com/en-us/products/visual-studio-community-vs.aspx
Download and install the Office Developer Tools extension for Visual Studio from https://www.visualstudio.com/en-us/features/office-tools-vs.aspx
Last of all, but most important, you will need Microsoft Office 2013, 2016 or Office 365. If you dont already have one of these, you can download a trial version from the Office website or sign up for the Office 365 Dev program (http://dev.office.com/devprogram).
Tip: Alternatively, Napa Development Tools can also be used for Office development. Napa is a free, quick, in-browser tool for developing Office add-ins. Napa tools can be accessed from the website https://www.napacloudapp.com
Building a word cloud generator add-in
In this section, we will build a simple word cloud generator task pane add-in for Microsoft Word, which allows users to select a bunch of words from which it generates a word cloud image. It also allows users to insert that word cloud into the document. For the actual word cloud generation, we will take the help of a JavaScript library called wordcloud2.js (https://github.com/timdream/wordcloud2.js). So, lets get started with the interesting parts.
1. Fire up Visual Studio and go to File > New > Project.
2. Although almost all of the development is done in HTML 5, CSS and JavaScript, for some reason, the template for the project is located under the Visual C# section. So navigate through the drop down hierarchy to Visual C# > Office/SharePoint> Office Add-in.
3. Select Office Add-in Project, name it Word Cloud Generator, click OK and in the next screen, select Task Pane Add-in as the type.
Now, if you navigate to the Solution Explorer, you will see two projects Word Cloud Generator and Word Cloud Generator Web. The former contains the Manifest.xml file and the latter contains all our HTML 5, CSS and JavaScript files.
4. Navigate to the Word Cloud Generator Project and open the Manifest file in the editor. Select the Activation tab, and in the Application section, choose Word as the only option as we are targeting only Word. Now, in the Required API sets section, add the ImageCoercion API set. It is required to insert images into the document.
5. Now navigate to the Word Cloud Generator Web Project. In this article, we will only work with the standard project structure, except for downloading the wordcloud2.js file from Github.com and adding it to the Scripts folder.
6. Open the Home.html file located in the Addin> Home directory and remove all the contents from inside the <body> tag. Then add wordcloud2.js inside the <head> tag as follows:
<scriptsrc="../../Scripts/wordcloud2.js"></script>
7. After this, we will create a header in the page with the application name, a <canvas> element to contain the word cloud, with two buttons to generate a new word cloud from the selected text and to add the word cloud into the document. It can be achieved by adding the following code in the markup inside the <body> tag.
<div id="content-header"> <h1 style="text-align:center;font-weight:bold;padding-top:10px";>Word Cloud Generator</h1> </div> <div id="content-main"> <div id="word-cloud-container"> <canvas id="word-cloud-placeholder" width="250" height="250" class="canvas"></canvas> </div> <div id="word-cloud-btn-container"> <button id="cloud-from-selection">Generate Cloud From Selected Text</button> <button id="insert-cloud-to-document">Insert Word Cloud To Document</button> </div> </div>
8. Open the home.js file in the same directory. Here, we will define a draw() function that will take a string as parameter, split it into words and generate a word cloud out of it.
function draw(words) {
var list = [['This', 20],['is' , 18],['the', 16],['default', 15],['Word', 22],['Cloud', 20]];
if (words) {
var newList = [];
var regex = /[^\s\.,!?]+/g;
var individualWords = words.match(regex); // Split individual words from sentences
if (individualWords) {
individualWords.forEach(function(word) {
var wordEntry = [];
wordEntry.push(word);
wordEntry.push(Math.floor(Math.random() * 15) + 1);
newList.push(wordEntry);
});
list = newList;
} else {
app.showNotification('No data was selected. Please select some data in document');
}
}
WordCloud(document.getElementById('word-cloud-placeholder'), {
list: list,
fontFamily:'Finger Paint, cursive, sans-serif',
gridSize: 16,
weightFactor: 2,
color:'#f0f0c0',
backgroundColor:'#001f00',
shuffle: false,
rotateRatio: 0
});
}
9. Now, we will use the Office.js function to get the selected text from the document and pass it to the draw() method, on clicking the button (with the ID cloud-from-selection).
$("#cloud-from-selection").on('click', function () { Office.context.document.getSelectedDataAsync(Office.CoercionType.Text,
function (result) {
if (result.status === Office.AsyncResultStatus.Succeeded) {
if (result.value == "") {
app.showNotification('No data was selected. Please select some data in document');
} else {
draw(result.value);
}
} else {
app.showNotification('Error:', result.error.message);
}
}
);
});
10. Then, we will need a function to insert the word cloud image into the document. There are two ways of achieving this. We will have to check if the running version of Word supports the insertion of base64 encoded images, in which case we will directly insert it in the document, or else we will send the image to a server side script, save the image on the server and then insert an <img> tag with the URL of the saved image. The functions to do this will be as shown below:
function setHTMLImage(imageHTML) {
Office.context.document.setSelectedDataAsync(
imageHTML, { coercionType: Office.CoercionType.Html },
function (asyncResult) {
if (asyncResult.status == "failed") {
app.showNotification('Error:' + asyncResult.error.message);
}
});
}
function setBase64Image(imageBase64Data) {
Office.context.document.setSelectedDataAsync(imageBase64Data, {
coercionType: Office.CoercionType.Image,
},
function (asyncResult) {
if (asyncResult.status === Office.AsyncResultStatus.Failed) {
app.showNotification ("Action failed with error: " + asyncResult.error.message);
}
});
}
Finally, we will call these functions on clicking the button (with the ID insert-cloud-to-document).We will use some feature detection to call the appropriate function, as follows:
if (Office.context.requirements.isSetSupported('ImageCoercion', '1.1')) {
var $canvas = $('#word-cloud-placeholder');
var imageData = $canvas[0].toDataURL();
imageBase64Data = imageBase64Data.replace(/^data:image\/(png|jpg);base64,/, ""); setBase64Image(imageData);
} else {
// get the imageURL from a server side script that saves the image on a server and return the //URL.
var imageHTML = "<img "+"src'"= + imageURL + "' img/>";
setHTMLImage(imageHTML)
}
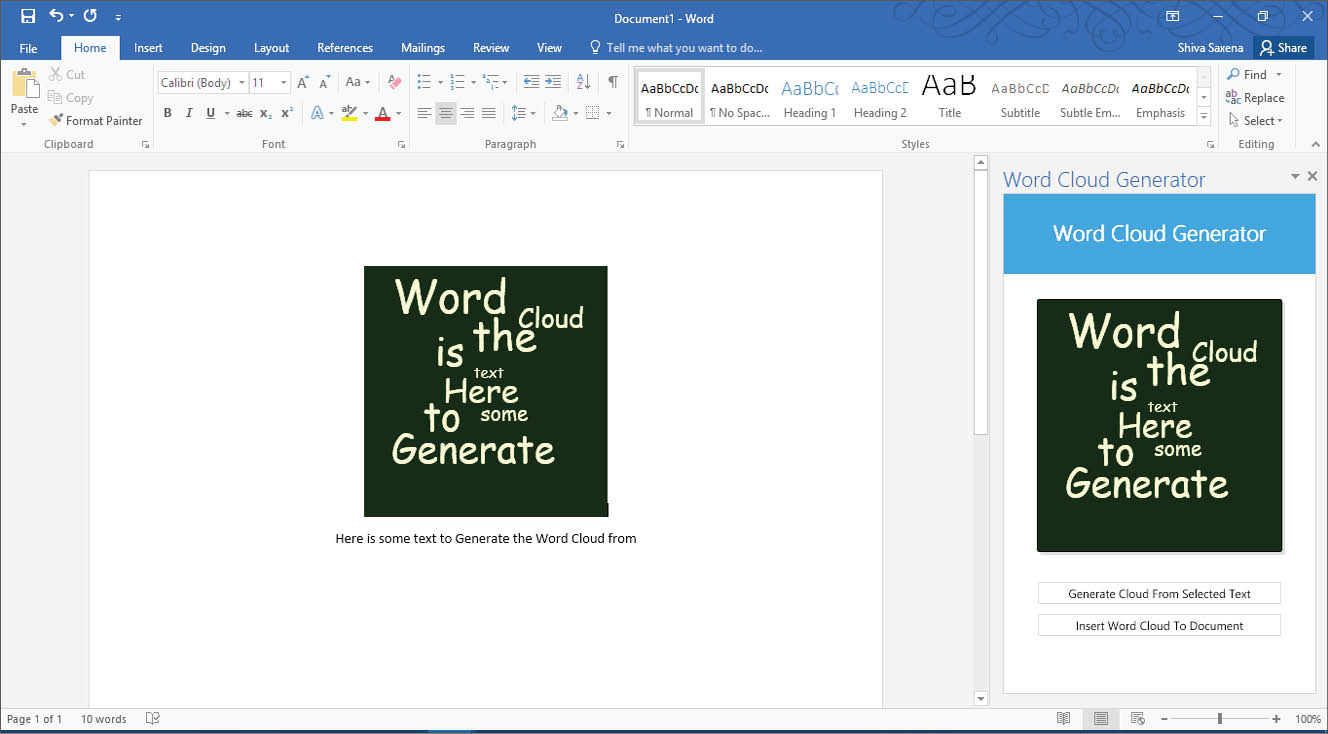
11. Thats pretty much it. Now you can hit the Start button in Visual Studio and see the application running, and if you want to download the complete source code, it is available on GitHub (https://github.com/shivasaxena/Word-Cloud-Generator). The final add-in looks like whats shown in Figure 2.


I am developing an outlook add-in which should allow user to save the outlook email which is in compose mode as a .eml file and save it to Google Drive/Dropbox before sending. I was able to get the message body, cc, to, subject etc but unable to get the attachment. Is there a way I can get all the details of the Item including attachment using ItemId and save it as .elm file?
In compose mode on clicking send button I managed to get ItemId and using it the rest of the message data.
Office.context.mailbox.item.saveAsync(function (result) {
itemId = result.value;
var soapToGetItemData = getItemDataRequest(result.value);
Office.context.mailbox.makeEwsRequestAsync(soapToGetItemData, function (asyncResult) {
if (asyncResult.error != null) {
updateAndComplete(“EWS Status: ” + asyncResult.error.message);
return;
}
var parser = new DOMParser();
var doc = parser.parseFromString(asyncResult.value, “text/xml”);
var values = doc.childNodes[0].getElementsByTagName(“t:ItemId”);
var ItemId = values[0].attributes[‘Id’].value;
var changeKey = values[0].attributes[‘ChangeKey’].value;
var soapToSendItem = getItemRequest(ItemId, changeKey);
Office.context.mailbox.makeEwsRequestAsync(soapToSendItem, function (asyncResult) {
if (asyncResult.error != null) {
statusUpdate(“EWS Status: ” + asyncResult.error.message);
return;
}
console.log(‘fulldata’);
console.log(asyncResult);
});
});
});
asyncResult has the full data of composed message.
using makeEwsRequestAsync how can I save this mail as .eml in hard disk?