


As we proceed further in making Android apps using the open source App Inventor tool, lets now introduce a little of mathematics into the application. The next project will be a manual counter, before we go on to building an automatic counter run by the internal clock of the phone, which will be handier.
Manual counter
Though mathematics is not liked by some of us, its role in our daily lives cant be ignored. Every single thing that requires keeping track of has to go through a counting process where the use of the most basic mathematics is required. We start learning mathematics via numbers and counting, so here as well, we will begin with a number game to count things. We are going to create a manual counter application, which, on the press of a button, enables you to increase the count and on the press of another button enables you to decrease the count.
GUI requirements
We will not need much by way of GUI requirements as the app is very basic. We will require two button components and a label component, along with some horizontal arrangements to keep things aligned.
We will require the following components for this project:
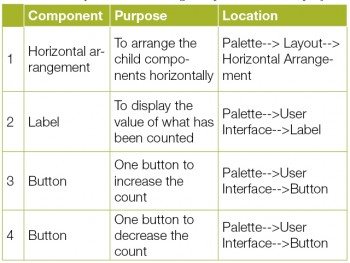
Getting started
1. Drag and drop the components mentioned above to the viewer.
2. The visible components can be seen by you while the non-visible components will be located beneath the viewer under the tag, Non-visible.
3. We have placed a label so as to put the name of the application.
4. Both buttons have been put within the Horizontal arrangement, so they are aligned horizontally.
5. We have also changed the background colour property of both buttons to identify them more clearly.
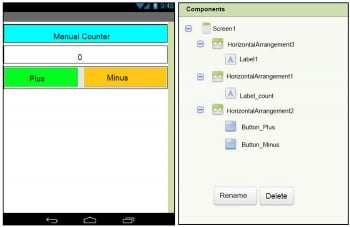
6. If you have dragged and placed everything, the layout will look somewhat as in Figure 1.
The components viewer will look like whats shown in Figure 2.
7. Make the necessary property changes like we did earlier when changing the text property, for the label and button components.
8. So this way, your graphical user interface is ready. Figure 1 shows exactly what the application will look like after installation.
Before heading towards the blocks editor to define the behaviour, lets discuss what actual functionality we expect from our application.
1. When we press the Plus button, the counter value should increase.
2. When we press the Minus button, the counter value should decrease.
So lets move on and add these two features using the block editor. I hope you remember how to switch from the designer to the block editor. There is a button available right above the Properties pane to switch between the two.
Block editor blocks
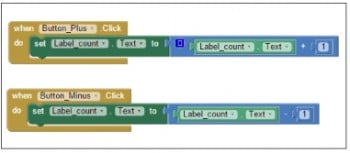
1. The blocks shown in Figure 3 are easy to understand. These indicate that when the button Plus is pressed, it should increase whatever figure is shown as the count label.
2. When the button Minus is pressed, it should decrease whatever figure is shown as the count label.
3. The additional Plus and Minus blocks you see fall under the mathematics category.
The automatic counter
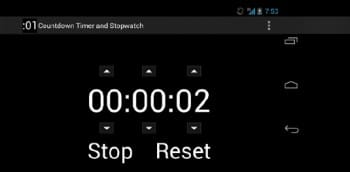
In the last section, you counted things manually using buttons. You pressed the Plus or Minus buttons to get the desired result. You will now be able to build another useful app, which is a simple countdown timer that will be triggered on pressing a button and will show you the time elapsed in seconds, minutes or hours.
GUI requirements
Not much is needed by way of GUI requirements as the whole thing is very basic. We will require two button components and a label component, along with some horizontal arrangements to keep things aligned.
We will require the following components for this project:
1. Drag and drop the components mentioned above to the viewer.
2. Visible components can be seen, while the non-visible components will be located beneath the viewer under the tag Non-visible.
3. We have placed a label to put the name of the application.
4. All buttons have been put within the Horizontal arrangement so as to keep them aligned horizontally.
5. We have also changed the background colour property of both buttons to identify them more easily.
6. You will see the clock component for the very first time. It has access to the inbuilt clock of the phone and performs actions accordingly.
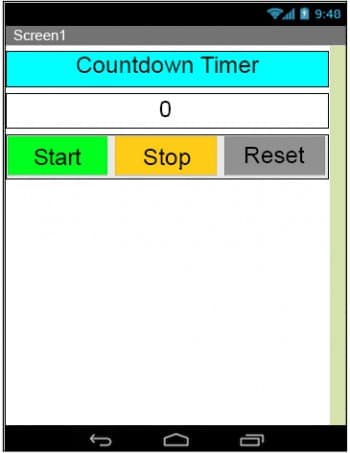
7. If you have dragged and placed everything, the layout will look something like whats shown in Figure 4.
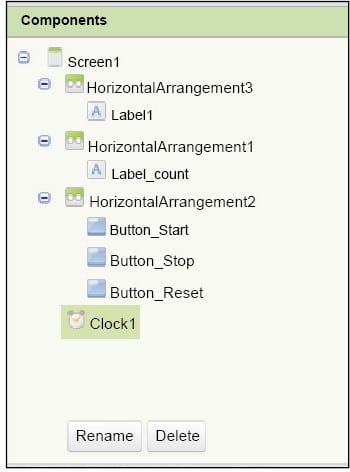
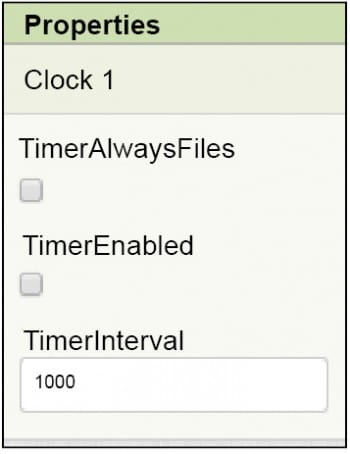
Figure 5 shows what the components viewer will look like. Since you are not very familiar with the clock component and its properties, set the properties as depicted in the picture shown in Figure 6.
8. Make the necessary property changes like we did in changing the text property, for the label and button components.
9. Now your graphical user interface is ready. Figure 4 shows exactly what the application will look like after the installation.
Now lets head towards the block editor to define the features, so that we can determine the actual functionality that we expect from our application.
1. When we press the Start button, the counter value should increase and continue to do so.
2. When we press the Stop button, the counter value should be paused to the current value.
3. When we press the Reset button, the counter value should be reset to the default 0.
So lets move on and add these two features using the block editor.
Block editor blocks
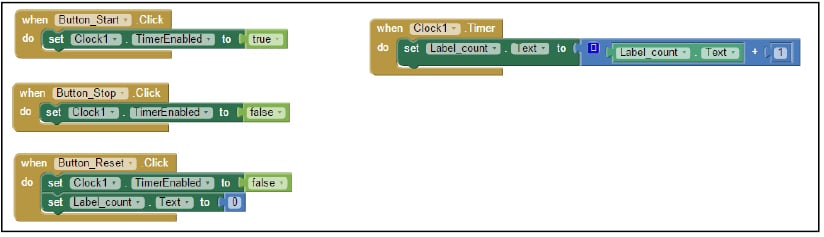
1. The blocks shown in Figure 7 are easy to understand. These say that when the button Start is pressed, it should increase whatever figure is visible as the count label.
2. When the button Stop is pressed, it should stop the timer at the current value. For stopping the clock, we do not need to set it to disable’; instead, we need to set enable’ as false.
3. When the Reset button is pressed, it stops the clock and sets the counter value to the default 0.
4. The fourth block is the one that you will see for the very first time. It indicates that when the timer is enabled, it will increase the label value by one in each repeat cycle. If you remember the properties of the clock component, we have set the timer interval as 1000 milliseconds, which means the clock will have a new cycle every second and hence will be increasing the value.
Now you are done with the block editor too. Next, we will move on to download and install the app on your phone to check how it works.
Packaging and testing
To test the app, you need to get it on your phone. First, you have to download the application to your computer and then move it to your phone via Bluetooth or USB cable. Ill tell you how to download it.
1. On the top row, click on the Build button. It will show you the option to download the apk to your computer.
2. As the downloading is going on, the progress can be seen and after a successful download, the application will be placed in the download folder of your directory or in the location you have set for it.
3. Now you need to get this apk file to your mobile phone either via Bluetooth or USB cable. Once you have placed the apk file on your SD card, you need to install it. Follow the on-screen instructions to install it. You might get some notification or warning saying, Installing from un-trusted source. Allow this from the Settings and after successful installation, you will see the icon of your application in the menu of your mobile. Here, you will see the default icon, which can be changed (we will tell you how to do so as we move ahead).
I hope your application is working exactly as per your requirements. Now, depending upon your usability and customisation, you can change various thingsbuttons, text and behaviour too.
Debugging the application
As of now, we have just created the prototype of the application with very basic functionality. What else would a user be interested in? Take care that certain features of the app do not annoy the user and check if your app is able to sustain itself. Consider the following cases:
1. Dont you think there should be a reset button to clear the value and start counting from the beginning?
2. If you were asked to add an additional reset button, will you be able to do so?
3. What extra GUI feature do you think should be added?
4. How many blocks should be added to furnish the reset functionality?
5. Will it be useful to store the counter value in the database and retrieve it if needed?
These are some of the scenarios that might occur and users will be pretty happy seeing them implemented.
Think over all the needs that may crop up, and how you could integrate these into the application. Do revert me if you fail to accomplish any of the above features.


