


In the last issue of OSFY, we developed an SMS assistant application using App Inventor 2. Lets now create a music player app. Listening to music on an Android phone is one of the greatest pleasures. Android phones normally have a music player app installed, by default, apart from which there are many custom made music players available in Googles Play Store. This tutorial shows you how to create a simple music player application using App Inventor 2.
The first step in the process will be to set up a GUI that will make it easy to assign or implement certain functions in the application.
GUI requirements
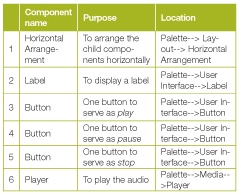
We will need three buttonsthe Play, Pause and Stop buttons to accomplish the simple tasks of playing the music, pausing it and stopping it.
For this project, we will require the components shown in Table 1.
Building the player
To build the player, follow these steps:
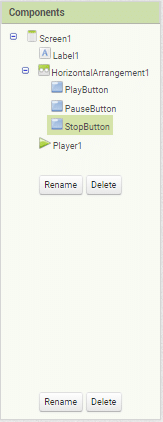
1. Drag and drop the components mentioned in Table 1, to the viewer.
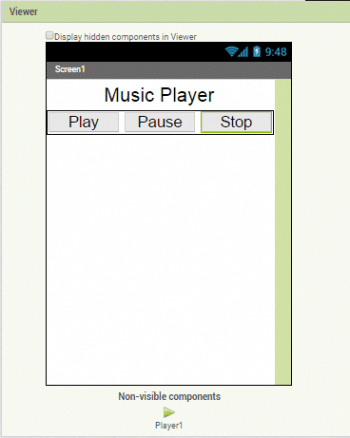
2. Visible components can be seen by you while the non-visible components will be located beneath the viewer under the tag Non-visible.
3. There is a label for the name of the application.
4. All buttons need to be put within the Horizontal arrangement so as to keep them aligned horizontally.
5. If you have dragged and placed everything, the layout will resemble the diagram in Figure 1.
Make the necessary property changes like we did in the previous article to change the text property for the label and button components.
Since we need to play music with the help of the player, upload the media file to the server. I hope you know how to do this.
Now your graphical user interface (GUI) is ready. This is exactly how the application will look after the installation.
We next head towards the block editor to define the GUIs behaviour. So lets discuss the actual functionality that we expect from our application.
1. We need to code it so that on pressing the Start button, it should start playing sound.
2. On pressing the Pause button, it should pause the audio play, which can be resumed from the same place on pressing the Play button again.
3. On pressing the Stop button it should stop the
audio completely.
So lets move on and add these functionalities using the block editor. The earlier article in this series discussed how to switch from the designer to the block editor. However, just to remind you, there is a button available right above the Properties pane to switch between the designer and block editor.
The block editor
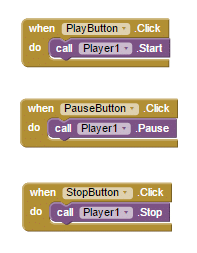
I have already prepared the blocks for you. All you need to do is drag the relevant blocks from the left side palette and drop them on the viewer. Arrange the blocks the same way you see them in the image. I will explain what each block does and how it is called.
The blocks shown in Figure 3 are easy to understand. They just say play, pause and stop the player when the particular button is pressed. And thats it!
Now we are done with the block editor too. Next, we will move to downloading and installing the app on your phone to check how it is working.
Packaging and testing
To test the app, you need to get it on your phone. First, you have to download the application to your computer and then move it to your phone via Bluetooth or a USB cable. Ill tell you how to download the app.
On the top row, click on the Build button. It will give you the option of downloading the apk to your computer.
You can view the progress of the download and after it is successfully completed, the application will be placed in the download folder of your directory or in the location you have selected for your download.
Now you need to get this apk file to your mobile phone either via Bluetooth or via USB cable. Once you have placed the apk file on your SD card, you need to install it. Follow the on-screen instructions. You might get some notification or warning regarding installation from an untrusted source. Allow this from the Settings and after successful installation, you will see the icon of your application in the menu of your mobile. Here you will see the default icon, which can be changed.
I hope your application is working exactly as per your design requirements. Now, depending upon your choice, you can customise various things like the image, sound and behaviour too.
Debugging the application
We have just created the prototype of the application with very basic functionality. Now come the various cases that require serious attention so as not to annoy the user, and which your app should be able to sustain. Consider the cases below:
1. The app is coded to play a single audio file which the developer has uploaded to the server. Can it also access media files from local storage, like the SD card?
2. We have labelled the buttons with simple text. Can we, instead, put images over the buttons as symbols for play, pause and stop?
3. Can we add visuals or media information during the play?
4. Can we show how much of the music has been played in terms of duration (minutes or seconds)?
These are some of the scenarios that could possibly occur, and which the user would be pretty happy to see implemented. Think about how you can integrate these functions into the application. Do ask me if you fail to accomplish any of the above cases.
You have successfully built another useful Android app for yourselfa music player with three button controls. Happy inventing!


How can I do if the files I wanted to play are located at external web cloud e.g google drive, how can I make that google drive mp3 audio files accessible and playable from my app? I have created app with thinkable app inventor but mp3 file failed to load