


Big Data is currently making waves across the tech field. Everyone knows that the volume of data is growing day by day. Old technology is unable to store and retrieve huge amounts of data sets. With a rapid increase in the number of mobile phones, CCTVs and the usage of social networks, the amount of data being accumulated is growing exponentially. But why is this data needed? The answer to this is that companies like Google, Amazon and eBay track their logs so that ads and products can be recommended to customers by analysing user trends. According to some statistics, the New York Stock Exchange generates about one terabyte of new trade data per day. Facebook hosts approximately 10 billion photos, taking up one petabyte of storage. The Big Data we want to deal with is of the order of petabytes 1012 times the size of ordinary files. With such a huge amount of unstructured data, retrieval and analysis of it using old technology becomes a bottleneck.

Big Data is defined by the three Vsvolume, velocity and variety. Were currently seeing exponential growth in data storage since it is now much more than just text. This large volume, indeed, is what represents Big Data. With the rapid increase in the number of social media users, the speed at which data from mobiles, logs and cameras is generated is what the second v(for velocity) is all about. Last of all, variety represents different types of data. Today data is in different formats like text, mp3, audio, video, binary and logs. This data is unstructured and not stored in relational databases.
In order to solve the problem of data storage and fast retrieval, data scientists have burnt the midnight oil to come up with a solution called Hadoop. It was created by Doug Cutting and Mike Cafarella in 2005. Cutting, who was working at Yahoo at that time, named this solution after his sons toy elephant.
So what is Hadoop? It is an open source framework that allows the storage and processing of Big Data in a distributed environment across clusters of computers using simple programming models. It is designed to scale up from single servers to thousands of machines, each offering local computation and storage. The core of Apache Hadoop consists of the storage part (Hadoop distributed file system) and its processing part (MapReduce). Hadoop splits files into large blocks and distributes them amongst the nodes in the cluster. It should be noted that Hadoop is not OLAP (online analytical processing) but batch/offline oriented.
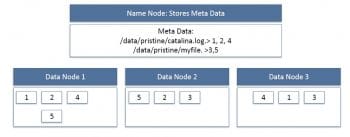
The challenge with Big Data is whether the data should be stored in one machine. Hard drives are approximately 500GB in size. Even if you add external hard drives, you cant store the data in petabytes. Lets say you add external hard drives and store this data, you wouldnt be able to open or process those files because of insufficient RAM. As for processing, it would take months to analyse this data. So the HDFS feature comes into play. In HDFS, the data is distributed over several machines, and replicated (with the replication factor usually being 3) to ensure their durability and high availability even in parallel applications.
The advantage of HDFS is that it is scalable, i.e., any number of systems can be added at any point in time. It works on commodity hardware, so it is easy to keep costs low as compared to other databases. HDFS is mainly designed for large files, and it works on the concept of write once and read many times. In HDFS, individual files are broken into blocks of fixed size (typically 64MB) and stored across a cluster of nodes (not necessarily on the same machine). These files can be more than the size of an individual machines hard drive. The individual machines are called data nodes.

Now, lets move on to the installation and running of a program on a standalone machine. The prerequisites are:
- Virtual Machine software which can be downloaded from https://my.vmware.com/web/vmware/free#desktop_end_user_computing/vmware_workstation_player/12_0
- Hadoop VM from Cloudera https://my.vmware.com/web/vmware/free#desktop_end_user_computing/vmware_workstation_player/12_0
- Hadoop has introduced several versions of the VM. The image present in the following link is 0.18 version of Hadoop https://developer.yahoo.com/hadoop/tutorial/module3.html
- Putty can be downloaded from http://www.putty.org/
- The last is WinScp and this can be downloaded from http://winscp.net/eng/download.php
First download the VM and install it on a Windows machineit is as simple as installing any media player. Just click Next, Next and Finish. After installation, unzip and extract Cloudera-Udacity-4.1 in a folder and now double click on the VM players quick launcher; click on Open Virtual Machine and select the extracted image file from the folder containing the vmx file. It will take some time to install. Do remember to set the RAM to 1GB or else your machine will be slow. After successful installation, the machine will start and you will find the screen shown in Figure 2.
Now, in order to interact with the machine, an SSH connection should be established; so in a terminal, type the following commands. First install the client, then the server. The SSH key will be generated by this and can be shared with other machines in the cluster to get the connection.
1. sudo dpkg -i openssh-client_1%3a5.3p1-3ubuntu7_i386.deb
2.sudo dpkg -i openssh-server_1%3a5.3p1-3ubuntu7_i386.deb
Now, to install Java on the UNIX side, download the JDK from http://www.oracle.com/technetwork/java/javase/downloads/jdk7-downloads-1880260.html.
Create the directory in the root mode, install the JDK from the tar file, restart your terminal and append /etc/profile as shown in Figure 3.
After installing the VM and Java, lets install Hadoop. The downloaded tar file can be unzipped using the command sudo tar vxzf hadoop-2.2.0.tar.gz C/usr/local
Now, some configuration files need to be changed in order to execute Hadoop.
The files with the details are given below:
1. In hadoop-env.sh add:
export JAVA_HOME=/usr/lib/jvm/jdk/<java version should be mentioned here>
2. In core-site.xml add the following between the configuration tabs:
<property> <name>fs.default.name</name> <value>hdfs://localhost:9000</value></property>
3. In yarn-site.xml, add the following commands between the configuration tabs:
<property> <name> yarn.nodemanager.aux-services</name><value>mapreduce_shuffle</value> </property>
<property><name>yarn.nodemanager.aux-services.mapreduce.shuffle.class</name>
<value>org.apache.hadoop.mapred.ShuffleHandler</value>
</property>
4. In mapred-site.xml, copy the mapred-site.xml.template and rename it as mapred-site.xml before adding the following between configuration tabs:
<property> <name>mapreduce.framework.name</name> <value>yarn</value></property>
5. In hdfs-site.xml add the following between configuration tabs:
<property> <name>dfs.replication</name> <value>1</value></property>
<property> <name>dfs.namenode.name.dir</name> <value>file:/home/hduser/mydata/hdfs/namenode</value>
</property>
<property> <name>dfs.datanode.data.dir</name>
<value>file:/home/hduser/mydata/hdfs/datanode</value>
</property>
6. Finally, update your .bashrc file.
Append the following lines in the end, save and exit.
#Hadoop variables
export JAVA_HOME=/usr/lib/jvm/jdk/<your java version>
export HADOOP_INSTALL=/usr/local/hadoop
export PATH=$PATH:$HADOOP_INSTALL/bin
export PATH=$PATH:$HADOOP_INSTALL/sbin
export HADOOP_MAPRED_HOME=$HADOOP_INSTALL
export HADOOP_COMMON_HOME=$HADOOP_INSTALL
export HADOOP_HDFS_HOME=$HADOOP_INSTALL
export YARN_HOME=$HADOOP_INSTALL
After all this, lets make the directory for the name node and data node, for which you need to type the command hdfs namenode format in the terminal. To start Hadoop and Yarn services, type start-dfs.sh and start-yarn.sh
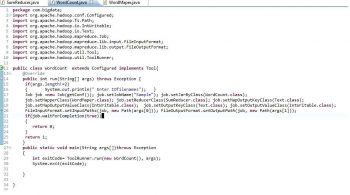
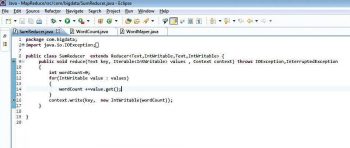
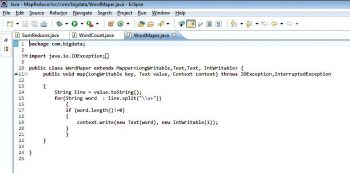
Now the entire configuration is done and Hadoop is up and running. We will write a Java file in Eclipse to find the number of words in a file and execute it through Hadoop. The three Java files are (Figures 4, 5, 6):
- WordCount.java
- SumReducer.java
- WordMapper.java
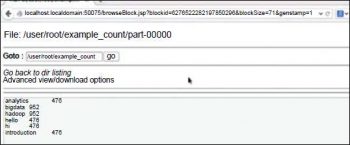
Now create the JAR for this project and move this to the Ubuntu side. On the terminal, execute the jar file with the following command hadoop jar new.jar WordCount example.txt Word_Count_sum. example.txt is the input file (its number of words need to be counted). The final output will be shown in the Word_count_sum folder as shown in Figure 7.
Finally, the word count example shows the number of times a word is repeated in the file. This is but a small example to demonstrate what is possible using Hadoop on Big Data.


