


This article presents the basics required to create your first Mozilla Firefox add-on. Mozilla Firefox is considered one of the best open source Web browsers developed for Windows, OS X and Linux, by the Mozilla Foundation.
Its key features include:
- Tabbed browsing
- Spell-checking
- Incremental find
- Live bookmarking
- Smart bookmarks
- Locationaware browsing (geo-location based on Google services)
- and many more
Additionally, Firefox allows third-party developers to add functions through extensions or add-ons. It also provides an environment for Web programmers, where they can use dev tools, such as the DOM Inspector, the Error Console or add-ons such as Firebug.
What is an add-on?
An add-on is an installable enhancement for a particular application. It allows the user to add or augment extra application features, such as a theme or any third-party feature. Add-ons are more popular with Firefox because it retains a high degree of extensibility, giving individual users the freedom to add the features that they like.
Add-on technologies
The technology behind an add-on may consist of one or more of the following:
- XUL (XML user interface language): This is used to design and define the user interface and the interaction with the user. A majority of the legacy Mozilla add-ons are written in XUL. It is one of the best and oldest ways to create a Mozilla add-on.
- Mozilla Jetpack: This is an add-on SDK aimed at speeding up the development time and minimising the learning period. It is also used to develop add-ons that do not require users to restart the system.
- JavaScript: This is the primary language of the Mozilla browser and is used for writing the logic for add-ons.
- DOM (Document Object Model): This is used to access or edit the HTML document that is loaded or to change the XUL interface in real-time.
- XPI (Cross-Platform Installer), XPConnect and XPCOM (Cross-Platform Component Object Model).
Thats the theory part; now let us start with the practical aspects.
Creating an add-on
We are now going to develop a simple yet powerful add-on for Mozilla Firefox. Let us call it the DuckDuckGo search add-on, which will let you search on the DuckDuckGo search engine through the Mozilla Firefox browser, and return the search results in the browser.
Technologies we are going to use:
- XUL for the UI design
- JavaScript for the logic
- DOM to access HTML and the XUL interface
Setting up the development environment
First, we need to set up a file structure for our add-on, so let us begin by creating a new folder on the computer. C:\DDG_addon in our case is the add-on folder. Now, inside that new folder, create a folder called content.
In root directory of our add-on folder, create two new empty text files, called install.rdf and chrome.manifest, and in the content folder, create a new empty text file called ui.xul and an empty JavaScript file logic.js
You should end up with the following directory structure:
- install.rdf
- chrome.manifest
- content\
- logic.js
- ui.xul
Description
install.rdf contains general information about the add-on.
chrome.manifest registers your add-ons content with the Chrome engine.
content is the directory containing XUL and JavaScript files.
logic.js is a JavaScript file containing the logic for the add-on.
ui.xul is the UI design of the add-on.
Creating the install manifest
Open the install.rdf file and copy the following code:
<?xml version=1.0?>
<RDF xmlns=http://www.w3.org/1999/02/22-rdf-syntax-ns#
xmlns:em=http://www.mozilla.org/2004/em-rdf#>
<Description about=urn:mozilla:install-manifest>
<em:id>sample@example.net</em:id>
<em:version>1.0</em:version>
<em:type>2</em:type>
<!-- Target Application this extension can install into,
with minimum and maximum supported versions. -->
<em:targetApplication>
<Description>
<em:id>{ec8030f7-c20a-464f-9b0e-13a3a9e97384}</em:id>
<em:minVersion>1.5</em:minVersion>
<em:maxVersion>35.0.*</em:maxVersion>
</Description>
</em:targetApplication>
<!-- Front End MetaData -->
<em:name>Duck Duck Go Search</em:name>
<em:description>A simple yet powerful add-on</em:description>
<em:creator>Aniket Kudale</em:creator>
<em:homepageURL>http://www.aniket.co/</em:homepageURL>
</Description>
</RDF>
Here, the code is written in XML. The file consists of general information about the add-on such as its version number, name, description, the version of the Firefox browser it supports, the creator of the add-on, etc.
- sample@example.net is the ID of the extension. It can be your email address.
Note: This parameter must be in the format of an email address.
- <em:version> 1.0</em:version> specifies the version of the add-on.
- <em:type>2</em:type> – the value 2 declares that it is installing an add-on.
- {ec8030f7-c20a-464f-9b0e-13a3a9e97384} is Firefoxs application ID.
- <em:minVersion>1.5</em:minVersion> specifies the earliest version of Firefox this add-on will work with.
- <em:minVersion>35.0.*</em:minVersion> specifies the minimum version of Firefox that this add-on will work with. In this case, 35.0.* indicates that the add-on works with Firefox 35.0 and its subsequent 35.0.x releases.
Adding the XUL
Firefoxs user interface is written in XUL and JavaScript. XUL provides the user interface for the Firefox browser through widgets like toolbars, buttons, menus, etc. We will be using XUL Overlays for our add-on. They provide a way of attaching UI widgets to XUL documents at runtime.
Open the ui.xul file and copy the following code:
<?xml version=1.0?> <overlay id=Scrapper-Overlay xmlns=http://www.mozilla.org/keymaster/gatekeeper/there.is.only.xul> <script type=application/x-javascript src=chrome://DDG_add-on/content/logic.js /> <toolbox id=navigator-toolbox> <toolbar id=DDGToolbar toolbarname=DuckDuckGo Toolbar > <label value=DuckDuckGo Search: /> <textbox id=DDGQuery cols=1 size=20 /> <toolbarbutton id=DDGButton label=Go oncommand=DuckDuckGoSearch(event) /> </toolbar> </toolbox> </overlay>
The <toolbar> called navigator-toolbox specifies the merge point within the browser window that we want to attach to. This specifies a new toolbar just below the address bar in the browser. It lets you edit this section as an HTML document, allowing you to add custom widgets such as label, textbox, buttons, etc. We will also add our logic.js file as source reference, where we will write the program logic for our add-on.
Using the above code, we will be creating an XUL based UI for interacting with our add-on. This XUL interface consists of a Label, a textbox (to enter a query) and a button (to trigger the function).
Creating a Chrome manifest for the add-on
Open the file named chrome.manifest that we created in our add-on directory (DDG_add-on) and then add the following code to it. This tells Firefox to merge our ui.xul into browser.xul when browser.xul loads.
content DDG_add-on content/
overlay chrome://browser/content/browser.xul chrome://DDG_add-on/content/ui.xul
Copy this code and remember that it must be in a single line. Finally, add the logic behind our add-on.
Adding JavaScript
Open the logic.js file located at our content directory in our add-on directory, and add the following code:
function DuckDuckGoSearch(event){
var query = document.getElementById(DDGQuery).value;
window._content.document.location = http://www.duckduckgo.com/?q= + encodeURI(query);
}
The above function gets the value of the element with the identity as DDGQuery, which we declared in our ui.xul file, and stores it in a variable named query. Now, using DOM, just append the extracted value with the URL of the DuckDuckGo search engine to load the page with the query entered by the user.
Now, let us make our add-on ready for deployment.
Creating a package for our add-on
Add-ons are generally packaged in zip files, with an XPI (Cross-Platform Installer) file extension. So, zip up all the files of the add-on folder. (Note: Zip the files in the DDG_add-on folder, in our case: content folder, install.rdf and chrome.manifest. When you open the zip file, you must see these files.) You can do this easily in Windows 7; just select all the files and sub-folders from our add-on (DDG_add-on) folder, right click and select Send To -> Compressed (Zipped) Folder. A .zip file, DDG_addon.zip, will be created. Just rename it as DDG_addon.xpi and you are ready to run your first Mozilla Firefox add-on.
Running the add-on
Open the Mozilla Firefox browser and just drag the add-on file into the browser. When you do this, the add-on installer will open up; select the add-on and click Install. After installation, restart the Firefox browser.
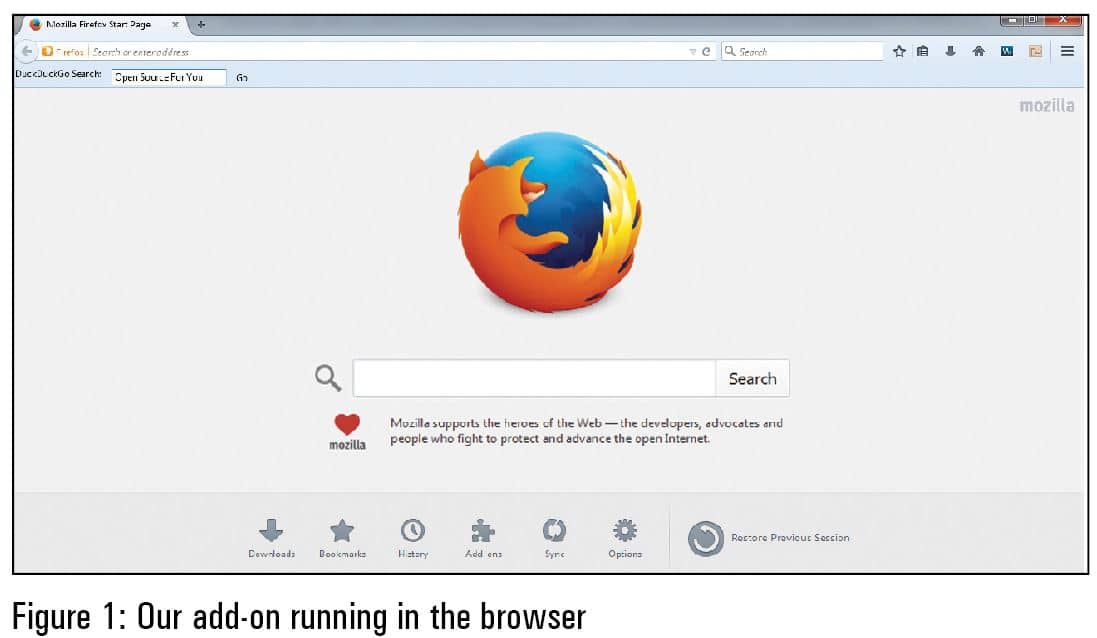
Now, you will see our add-ons toolbar under the address bar in the browser, as shown in Figure 1.
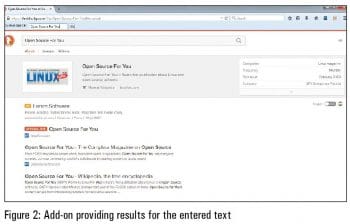
You can test the add-on by entering any text into the text field provided under the address bar and clicking the Go button. For example, we tested the add-on by entering the text Open Source For You, and clicked the Go button. DuckDuckGo search engine results for Open Source For You were displayed in the browser, as shown in Figure 2.
References
[1] http://en.wikipedia.org/wiki/Mozilla
[2] http://en.wikipedia.org/wiki/Firefox
[3] https://developer.mozilla.org/en-US/docs/Mozilla/Tech/XUL
[4] https://developer.mozilla.org/en-US/Add-ons/Overlay_Extensions/XUL_School/Getting_Started_with_Firefox_Extensions


