Modern life is incomplete without gadgets, smartphones, automated appliances, et al. These electronic devices aide us in our daily grind, making our otherwise mundane/hectic life a bit easier. So what controls these devices? In layman’s language, it’s a small circuit with preprogrammed human logic, called an embedded system. Listed below are some useful definitions.
- Embedded system (ES): An embedded system is some combination of computer hardware and software, either fixed in capability or programmable, that is specifically designed for a particular function. Industrial machines, automobiles, medical equipment, cameras, household appliances, air-planes, vending machines and toys (as well as the more obvious cellular phone and PDA) are among the myriad possible hosts of an embedded system.
- Image processing: In electrical engineering and computer science, image processing is any form of signal processing for which the input is an image, such as a photograph or video frame. The output of image processing may be either an image, or a set of characteristics or parameters related to the image. Most image-processing techniques involve treating the image as a two-dimensional signal, and applying standard signal-processing techniques to it. In other words, it is basically the transformation of data from a still or video camera into either a decision or a new representation. All such transformations are done to achieve some particular goal. The input data may be a live video feed, the decision may be that a face has been detected, and a new representation may be conversion of a colour image into a greyscale image.
- Embedded vision: Embedded vision is the merging of two technologies — embedded systems and image-processing/computer vision (also sometimes referred to as machine vision). Due to the emergence of very powerful, low-cost and energy-efficient processors, it has become possible to incorporate vision capabilities into a wide range of embedded systems. One successful example is the Microsoft Kinect video game controller, which uses embedded vision to track the movements of Xbox 360 users, avoiding the need for handheld controllers. Microsoft sold eight million Kinect units in the first two months after its introduction.
Moving on, the five basic components required to build an embedded system using Python are discussed below, in brief.
The operating system (OS)
The OS is the heart of an embedded vision system. Many different dependencies that are required to run software are provided by the OS, which is the interface between the hardware and the software. Of the many OSs in the market (such as Windows, Linux, etc.) there are reasons why Linux is preferable:
- It is open source, i.e., it is free of cost and free, as in “freedom”.
- It is virtually virus-free.
- It has pretty good support — bug trackers, documentation, forums, mailing lists, IRC, etc.
- It is easy on systems resources — that is, more resources can be dedicated to applications.
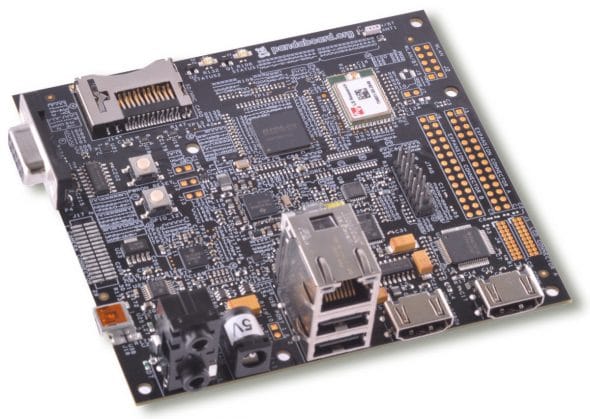
There are various Linux distributions like Ubuntu, Fedora, etc., to choose from. I personally prefer Ubuntu, because of its easy learning curve. Now, size is the main constraint for an embedded system. Using a PC OS won’t do. A much more portable solution is required, such as the PandaBoardshown in Figure 1.

Check out its specs:
- OMAP4 (Cortex-A9) CPU-based open development platform
- OMAP4430 Application processor
- 1 GB low-power DDR2 RAM
- Display HDMI v1.3 Connector (Type A) to drive HD displays, DVI-D Connector
- 8.89cm audio in/out and HDMI Audio out
- Full-size SD/MMC card
- Built-in 802.11 and Bluetooth v2.1+EDR
- Onboard 10/100 Ethernet
- Expansion: 1xUSB OTG, 2xUSB HS host ports, general-purpose expansion header
PandaBoard is such a powerful mobile computing platform that one can port various OSs like Android and Ubuntu 10.04 to it!
Image-Processing (IP) software
There are many software and libraries available for image processing, like MATLAB, OpenCV, etc. Licensing costs for MATLAB are very high, but OpenCV is preferable since:
- It is free.
- It is fast.
- Has good documentation, tutorials, user groups, forums, etc.
- There are a lot of prebuilt functions and algorithms to get a head start.
- There is active development on interfaces for other languages like Ruby, Python, MATLAB, etc.
OpenCV grew out of an Intel Research initiative to advance CPU-intensive applications. The intent behind OpenCV was to provide a platform that a student could readily use for developing applications, instead of reinventing basic functions from scratch. Figure 2 is a block diagram showing the different modules in OpenCV. Check out the documentation here.

Arduino
To make any changes in the external environment, we need a hardware circuit with a “brain”. This role can be filled by any microcontroller or microprocessor. Various companies such as Texas Instruments, NXP, Maxim, Atmel, etc., make microcontrollers.
A microcontroller cannot be directly used in a circuit, as is. A full development circuit board has to be made, providing access to different pins of the microcontroller. This process is not easy, as it involves designing the circuit, soldering, etc. All changes are permanent. Also, a program loader has to be made to load the code from the computer into the microcontroller. This can be quite cumbersome, so Arduino is used, due to the following reasons:
- It is open source, so all schematics are available and you can design the same board on your own.
- It is based on the concept of breadboard prototyping, which encourages the use of hook-up wires and breadboard, to make a circuit which can be easily modified later. This avoids the hassles of soldering.
- There are a number of tutorials, tons of code, forums, etc., to help beginners.
- The design of the board and IDE is so simple that one does not have to be an engineer to use it. Even a middle school student can use it.
- It is pretty cheap compared to other available development boards.
There are various versions of Arduino to choose from, such as Uno, Mega, Lilypad, etc. I personally prefer the Arduino Mega (Figure 3), which is a microcontroller board based on the ATmega1280.

It has 54 digital input/output pins, of which 14 can be used as PWM (Pulse-width modulation) outputs, 16 analogue inputs, 4 UARTs (hardware serial ports), a 16 MHz crystal oscillator, a USB connection, a power jack, an ICSP header, and a reset button. It contains everything needed to support the microcontroller; simply connect it to a computer with a USB cable, or power it with an AC-to-DC adaptor or battery to get started.
Pyserial
This is a library that provides Python support for serial connections (RS-232) over a variety of different devices: old-style serial ports, Bluetooth dongles, infra-red ports, and so on. It also supports remote serial ports via RFC 2217 (since V2.5). We use this for communication with the external hardware (Arduino). This library is easy to use, and has good documentation.
Python
Python is a general-purpose, high-level programming language whose design philosophy emphasises code readability. Python claims to combine remarkable power with very clear syntax, and its standard library is large and comprehensive.
OpenCV installation
Let us now proceed to OpenCV installation. All commands are meant to be run in a terminal.
- Install all prerequisites as shown below:
sudo apt-get install build-essential
sudo apt-get install cmake
sudo apt-get install pkg-config
sudo apt-get install libpng12-0 libpng12-dev libpng++-dev libpng3
sudo apt-get install libpnglite-dev libpngwriter0-dev libpngwriter0c2
sudo apt-get install zlib1g-dbg zlib1g zlib1g-dev
sudo apt-get install libjasper-dev libjasper-runtime libjasper1
sudo apt-get install pngtools libtiff4-dev libtiff4 libtiffxx0c2 libtiff-tools
sudo apt-get install libjpeg8 libjpeg8-dev libjpeg8-dbg libjpeg-prog
sudo apt-get install ffmpeg libavcodec-dev libavcodec52 libavformat52 libavformat-dev
sudo apt-get install libgstreamer0.10-0-dbg libgstreamer0.10-0 libgstreamer0.10-dev
sudo apt-get install libxine1-ffmpeg libxine-dev libxine1-bin
sudo apt-get install libunicap2 libunicap2-dev
sudo apt-get install libdc1394-22-dev libdc1394-22 libdc1394-utils
sudo apt-get install swig
sudo apt-get install libv4l-0 libv4l-dev
sudo apt-get install python-numpy
sudo apt-get install build-essential libgtk2.0-dev libjpeg62-dev libtiff4-dev libjasper-dev \
libopenexr-dev cmake python-dev python-numpy libtbb-dev libeigen2-dev yasm libfaac-dev \
libopencore-amrnb-dev libopencore-amrwb-dev libtheora-dev libvorbis-dev libxvidcore-dev
- Install Python development headers with
sudo apt-get install python-dev. - Download the OpenCV source code. It is recommended that you move the downloaded OpenCV package to your
/home/<user>directory. With that as your current directory, extract the archive, as follows:tar -xvf OpenCV-2.3.1a.tar.bz2 cd OpenCV-2.3.1/
- Make a new directory called build and cd into it (mkdir build; cd build).
- Run Cmake:
cmake -D WITH_TBB=ON -D BUILD_NEW_PYTHON_SUPPORT=ON -D WITH_V4L=OFF-D INSTALL_C_EXAMPLES=ON -D INSTALL_PYTHON_EXAMPLES=ON -D BUILD_EXAMPLES=ON ..
- Follow this with
makeandsudo make install(to install the library). - Next, configure the system to use the new OpenCV shared libraries. Edit a configuration file with
sudo gedit /etc/ld.so.conf.d/opencv.conf. Add the following line at the end of the file (it may be an empty file, which is okay) and then save it:/usr/local/lib
- Close the file and run
sudo ldconfig. - Open your system
bashrcfile (for me, that issudo gedit /etc/bash.bashrc) and add the following code at the end of the file:PKG_CONFIG_PATH=$PKG_CONFIG_PATH:/usr/local/lib/pkgconfig export PKG_CONFIG_PATH
- Save and close the file, then log out and log in again, or reboot the system.
In the second part of this series, I plan to cover the basics and functions of OpenCV, and then how to develop image-processing programs based on it. In the third (and final) part, I will cover Arduino and Pyserial programming, as well as how to integrate all five components to finally build an embedded system for image processing.


Rohan Thakker
i was searchin for this for a ling time… thanks a lot…. :) :)..
kindly provide the other two parts soon…. :)
[…] background-position: 50% 0px; background-color:#222222; background-repeat : no-repeat; } http://www.opensourceforu.com – Today, 5:59 […]
for free embedded projects
for free embedded projects
http://www.code2impress.com