The second day in the Linux device drivers’ laboratory was expected to be quite different from the typical software-oriented class. Apart from accessing and programming architecture-specific I/O mapped hardware in x86, it had a lot to offer first-timers with regard to reading hardware device manuals (commonly called data sheets) and how to understand them to write device drivers. In contrast, the previous session about generic architecture-transparent hardware interfacing was about mapping and accessing memory-mapped devices in Linux without any device-specific details.
x86-specific hardware interfacing
Unlike most other architectures, x86 has an additional hardware accessing mechanism, through direct I/O mapping. It is a direct 16-bit addressing scheme, and doesn’t need mapping to a virtual address for access. These addresses are referred to as port addresses, or ports. Since this is an additional access mechanism, it has an additional set of x86 (assembly/machine code) instructions. And yes, there are the input instructions inb, inw, and inl for reading an 8-bit byte, a 16-bit word, and a 32-bit long word, respectively, from I/O mapped devices, through ports. The corresponding output instructions are outb, outw and outl, respectively. The equivalent C functions/macros (available through the header <asm/io.h>) are as follows:
u8 inb(unsigned long port);
u16 inw(unsigned long port);
u32 inl(unsigned long port);
void outb(u8 value, unsigned long port);
void outw(u16 value, unsigned long port);
void outl(u32 value, unsigned long port);
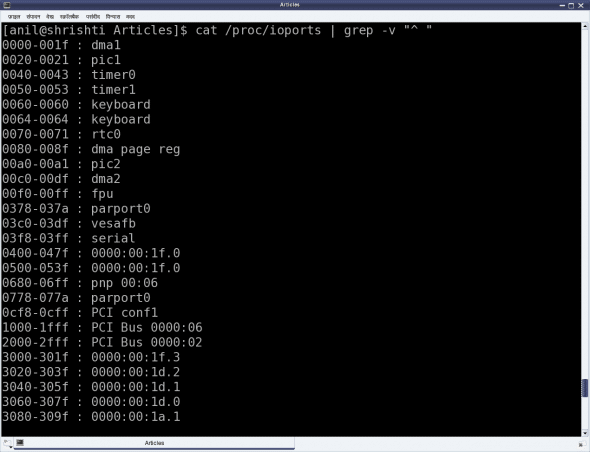
The basic question that may arise relates to which devices are I/O mapped and what the port addresses of these devices are. The answer is pretty simple. As per x86-standard, all these devices and their mappings are predefined. Figure 1 shows a snippet of these mappings through the kernel window /proc/ioports. The listing includes predefined DMA, the timer and RTC, apart from serial, parallel and PCI bus interfaces, to name a few.

Simplest: serial port on x86
For example, the first serial port is always I/O mapped from 0x3F8 to 0x3FF. But what does this mapping mean? What do we do with this? How does it help us to use the serial port? That is where a data-sheet of the corresponding device needs to be looked up.
A serial port is controlled by the serial controller device, commonly known as an UART (Universal Asynchronous Receiver/Transmitter) or at times a USART (Universal Synchronous/Asynchronous Receiver/Transmitter). On PCs, the typical UART used is the PC16550D. The data-sheet for this [PDF] can be downloaded as part of the self-extracting package [BIN file] used for the Linux device driver kit, available at lddk.esrijan.com.
Generally speaking, from where, and how, does one get these device data sheets? Typically, an online search with the corresponding device number should yield their data-sheet links. Then, how does one get the device number? Simple… by having a look at the device. If it is inside a desktop, open it up and check it out. Yes, this is the least you may have to do to get going with the hardware, in order to write device drivers. Assuming all this has been done, it is time to peep into the data sheet of the PC16550D UART.
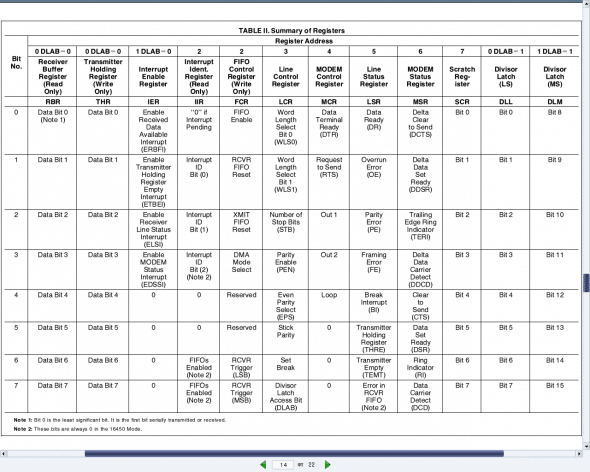
Device driver writers need to understand the details of the registers of the device, as it is these registers that writers need to program, to use the device. Page 14 of the data sheet (also shown in Figure 2) shows the complete table of all the twelve 8-bit registers present in the UART PC16550D.

Each of the eight rows corresponds to the respective bit of the registers. Also, note that the register addresses start from 0 and goes up to 7. The interesting thing about this is that a data sheet always gives the register offsets, which then needs to be added to the base address of the device, to get the actual register addresses.
Who decides the base address and where is it obtained from? Base addresses are typically board/platform specific, unless they are dynamically configurable like in the case of PCI devices. In this case, i.e., a serial device on x86, it is dictated by the x86 architecture—and that precisely was the starting serial port address mentioned above—0x3F8.
Thus, the eight register offsets, 0 to 7, exactly map to the eight port addresses 0x3F8 to 0x3FF. So, these are the actual addresses to be read or written, for reading or writing the corresponding serial registers, to achieve the desired serial operations, as per the register descriptions.
All the serial register offsets and the register bit masks are defined in the header <linux/serial_reg.h>. So, rather than hard-coding these values from the data sheet, the corresponding macros could be used instead. All the following code uses these macros, along with the following:
#define SERIAL_PORT_BASE 0x3F8
Operating on the device registers
To summarise the decoding of the PC16550D UART data sheet, here are a few examples of how to do read and write operations of the serial registers and their bits.
Reading and writing the ‘Line Control Register (LCR)’:
u8 val;

val = inb(SERIAL_PORT_BASE + UART_LCR /* 3 */);
outb(val, SERIAL_PORT_BASE + UART_LCR /* 3 */);
Setting and clearing the ‘Divisor Latch Access Bit (DLAB)’ in LCR:
u8 val;

val = inb(SERIAL_PORT_BASE + UART_LCR /* 3 */);

/* Setting DLAB */
val |= UART_LCR_DLAB /* 0x80 */;
outb(val, SERIAL_PORT_BASE + UART_LCR /* 3 */);

/* Clearing DLAB */
val &= ~UART_LCR_DLAB /* 0x80 */;
outb(val, SERIAL_PORT_BASE + UART_LCR /* 3 */);
Reading and writing the ‘Divisor Latch’:
u8 dlab;
u16 val;
dlab = inb(SERIAL_PORT_BASE + UART_LCR);
dlab |= UART_LCR_DLAB; // Setting DLAB to access Divisor Latch
outb(dlab, SERIAL_PORT_BASE + UART_LCR);

val = inw(SERIAL_PORT_BASE + UART_DLL /* 0 */);
outw(val, SERIAL_PORT_BASE + UART_DLL /* 0 */);
Blinking an LED
To get a real experience of low-level hardware access and Linux device drivers, the best way would be to play with the Linux device driver kit (LDDK) mentioned above. However, just for a feel of low-level hardware access, a blinking light emitting diode (LED) may be tried, as follows:
Connect a light-emitting diode (LED) with a 330 ohm resistor in series across Pin 3 (Tx) and Pin 5 (Gnd) of the DB9 connector of your PC.
Pull up and down the transmit (Tx) line with a 500 ms delay, by loading and unloading the blink_led driver, using insmod blink_led.ko and rmmod blink_led, respectively.
Driver file blink_led.ko can be created from its source file blink_led.c by running make with the usual driver Makefile. Given below is the complete blink_led.c:
#include <linux/module.h>
#include <linux/version.h>
#include <linux/types.h>
#include <linux/delay.h>
#include <asm/io.h>

#include <linux/serial_reg.h>

#define SERIAL_PORT_BASE 0x3F8

int __init init_module()
{
    int i;
    u8 data;

    data = inb(SERIAL_PORT_BASE + UART_LCR);
    for (i = 0; i < 5; i++)
    {
        /* Pulling the Tx line low */
        data |= UART_LCR_SBC;
        outb(data, SERIAL_PORT_BASE + UART_LCR);
        msleep(500);
        /* Defaulting the Tx line high */
        data &= ~UART_LCR_SBC;
        outb(data, SERIAL_PORT_BASE + UART_LCR);
        msleep(500);
    }
    return 0;
}

void __exit cleanup_module()
{
}

MODULE_LICENSE("GPL");
MODULE_AUTHOR("Anil Kumar Pugalia <email_at_sarika-pugs_dot_com>");
MODULE_DESCRIPTION("Blinking LED Hack");
Looking ahead
You might have wondered why Shweta is missing from this article? She bunked all the classes! Watch out for the next article to find out why.


Nice article Pugs !!! I just wonder about one thing. When you mentioned about the base address registers will be dictated by x86, is it like, after we insert the device into PCI slot, we can see the iomap with the command ioports on CLI prompt?
Please read carefully. If it is *not* a PCI device, its base address (not register) will be dictated by x86 architecture, and could be obtained from x86 reference manual (or googling).
U really Saved my brain power …. i was banging my head for all these little bits of information to be stitched together from so many days…. thanks anil… keep it up
Thanks for looking it from this angle.
On my computer I dont have a DB9 connector. Will this program work if I buy a USB to DB9 adapter?(I dont think it would work but I just wanted to confirm anyway). If not then how coul I get it to work? Are there some alternatives?
As you said right, it would not work with a USB to DB9 adaptor, with the above code. Other alternative could be to use any other low level interface, and then change the above code to program that, like PCI Serial Card.
I have been following all of your tutorial series. I like your style of explaining things. Its awesome. A doubt: In the c file: blink_led.c, How these lines:
data = inb(SERIAL_PORT_BASE + UART_LCR);
data |= UART_LCR_SBC;
outb(data, SERIAL_PORT_BASE + UART_LCR); – pulling the tx line low?
For that, you have to use the sysfs apis to expose your interface as a file under /sys. An beautiful example of that is the misc drivers. Check out drivers in the kernel source under drivers/misc/ folder
Hi Anil,
This is very nice article on i/o port accessing.But one thing is that, I think the module might not able to access the some i/o ports.So the first thing is that we have to check whether the i/o port is accessible by using the interface request_region() interface function .Correct me if i am wrong.
And i have one basic question.Is there any way to make normal RAM memory as a i/o port memory.
For first part you are correct.
For second part, RAM memory cannot be accessed as a I/O port
hello sir
i have added a line in blink_led.c-
printk(KERN_INFO “LED BLINK”);
but no string prints
Where are you expecting the print to come? Did you check dmesg?
in terminal after insmod blink_led.ko
That’s the problem. printk puts it in kernel’s ring buffer, not the terminal. Check it out by typing dmesg. It would be at the end of the dmesg log.
Hello sir
how do we know default baud rate setting and how can we change the baud rate setting i mean which resister we should modify??
Check out the Divisor Latch registers (both Low & High) and their explanations.
hello sir, i am following your article and in the above blink_led.c, am a bit confused as i find no module_init() and module_exit() macros. are they not needed when the driver is being inserted and removed using the insmod and rmmod commands?
Good question. I was expecting for at least someone to ask this question. Now, as you have asked, here goes the answer. init_module() & cleanup_module() are the pre-defined names for the constructor & the destructor, respectively. Hence, you do not need module_init & module_exit to translate your other function names to these pre-defined ones. Note of caution: Since kernel 2.6 onwards, if you are building the driver into the kernel, you have to define your own function names & then use module_init() & module_exit().
Dear Anil- Thanks for the wonderful article. I have also read an
article at url
http://www.freesoftwaremagazine.com/articles/drivers_linux
in
this url he made a driver for parallel port and then make an
application to flash LEDs on parallel port, But you have written a
similar code in the kernel space as a driver, I am confused whether the
blinking part should come in user space application program or we should
make driver for it as you have made.
There is no one answer to it. It varies from case to case. Moreover, my purpose was to demonstrate the the hardware interfacing calls like outb, which is in kernel space in both the cases.
Is it possible to do the same using qemu, as I don’t have root permissions for insmod?
But then you may not be able to access the real hardware, which is what this article is all about.
In Linux Device Driver 3.0 it is given that before accessing i/o ports they should be allocated using : – struct resource *request_region(unsigned long first, unsigned long n,
const char *name);
but it is not done in this example………..
It is not allocating, but reserving for access. For the complete details, check out the “Notes” section in the updated version of this article at http://sysplay.in/blog/linux-device-drivers/2013/09/accessing-x86-specific-io-mapped-hardware-in-linux/
hi
In specific target board, how to write ppp over uart driver in linux, here i am using beagle black and linux-3.12.10-ti2013.12.01 please share details how to start point to point protocol..
That driver would typically be already there part of the kernel.
hi sir,
once check bellow logs error while i running pppd manually…..
log1:
——-
am335x-evm:/etc/ppp/peers# pppd debug -detach defaultroute /dev/ttyUSB0 115200 &
[1] 1436
root@am335x-evm:/etc/ppp/peers# using channel 1
Using interface ppp0
Connect: ppp0 /dev/ttyUSB0
sent [LCP ConfReq id=0x1 ]
sent [LCP ConfReq id=0x1 ]
sent [LCP ConfReq id=0x1 ]
sent [LCP ConfReq id=0x1 ]
sent [LCP ConfReq id=0x1 ]
sent [LCP ConfReq id=0x1 ]
sent [LCP ConfReq id=0x1 ]
sent [LCP ConfReq id=0x1 ]
sent [LCP ConfReq id=0x1 ]
sent [LCP ConfReq id=0x1 ]
LCP: timeout sending Config-Requests
Connection terminated.
Modem hangup
log2:
===
Setting the abort string
Initializing modem
Script /usr/sbin/chat -v -t6 -f /etc/ppp/peers/gsm_chat finished (pid 1434), status = 0x3
Connect script failed
Do you have the modem connected? It is timing out.
hi sir,
finally i got the connection, and the problem was usb to serial connecter now i am able to make a calls and msgs through pppd..
and my next task is to enable gprs connection for browsing
Is
it possible to bring up the ppp0 device with ifconfig command? how can
it be bring up anyway?(ppp over uart interface) please give me
suggestion…
That’s great.
Regarding bringing up ppp0 connection, it should be similar to what you do with any other interface like eth0 – just that you should have the right configuration settings.
hi sir,
finally net device ppp0 node created, but i am facing with bellow problem
when i start ppp0 connection automatically when eth0 gets down
I am having a two connection. One is local area Ethernet connection which connects to internet.
Second connection is a GSM modem connected to my modem
What I am looking for is,
When eth0(local network) is down, start automatically ppp connection
When eth0 is up, turn off automatically ppp connection.
So in a way I am looking for continuous internet connect and priority is through eth0(local area network). can i assign priority net device nodes
(when i plugin gsm module or LAN device automatically detect network without any net device node disable )
I can configure my modem based ppp connection using pon/poff command.
You’d possibly need to write a some script automation based on the various net events – may be do some googling more more info.
Hi,
thank u for ur reply, i am following bellow steps for ppp over uart…
In kernel configuration:
0. Device Drivers -> Network device support -> PPP (point-to-point protocol) support
In driver side:
1. kernel have line discipline driver for N_PPP
2. Already linux have the ppp protocol.
3. we need download ppp version(ppp-2.4.5) and Crross compile pppd package.
# ./configure
# make CC=arm-linux-gnueabihf-gcc
4.Copy the pppd binaries to /usr/sbin/ on the board, and create the /etc/ppp/ directory for the configuration and control scripts
5. Configure the pppd in /etc with serial port (/dev/ttyXYZ), and set baud rate.
6. We have to interface the GSM to serial port.
Up to 0 to 3 steps are working fine but 4 and 5 steps i am unable understand please help me how to do.
In the ppp directory, where you have done the build, you may have folders for the built binaries and may be configurations & control scripts. Pick the files from there, and put them in the appropriate places on the board, as mentioned in step 4. And then follow the step 5 on the board.
hi,
i copied all binaries and scripts ppp dir to rootfs appropriate folder, how to check pppd is running or not as well as how ppp0 interface up….
Just do a ‘ps ax’ for seeing if ppd is running, and do ‘ifconfig -a’ for the checking the interface status.
ppd is not running and I couldn’t find interface ppp0 up only showing eth0 ……
Have you loaded the driver, and done the relevant configurations?
ppp node also showing in proc file system ( like 108 ppp) and i done all relevant scripts for that pppd…
Then, try running pppd manually, and see what does it say.