Machine learning is the new rage. It is indeed an exciting time when new frameworks and new tools are being developed constantly. This is a write up on Microsoft’s foray into open source with a new offering—ML.NET.
The number of developers working on machine learning (ML) is growing fast. One of the main reasons for this is the availability of an increasing number of easy-to-use, powerful ML frameworks from many industry leaders such as Google, Microsoft, etc. ML.NET is a recent ML framework from Microsoft with cross-platform open source features. This article will introduce you to the features of the ML.NET framework, along with code examples.
Machine learning is the new superstar in cyberspace. It has applications across all domains and has solved problems that were earlier considered unsolvable. Prominent examples are image recognition, behaviour understanding, speaker neutral voice recognition with almost 100 per cent accuracy, etc.
Research in ML can be classified into two types. One is the actual algorithm development, and the other is exploring and building various applications using ML. The first one requires a deep understanding of various mathematical concepts. The second one, however, doesn’t require you to understand the inner working mechanisms of the algorithms. The applications part of ML is gaining popularity across a wide spectrum of developers. The primary catalyst for this is the availability of various ML and deep learning (DL) libraries such as TensorFlow, Scikit Learn, Caffe, etc.

ML.NET was released by Microsoft on May 7, 2018. It is written in C# and C++, and its important attributes are listed below.
- ML.NET is cross-platform; it is supported on Linux, Windows and MacOS.
- It is open source (https://github.com/dotnet/machinelearning).
- It can be made to co-work with TensorFlow, CNTK, etc.
- If you are a .NET developer, you will find ML.NET very familiar and powerful for your .NET applications because of its machine learning features.
- The power of ML.NET has been proven with popular Microsoft features such as Windows Hello, Bing Ads.
- It has support for various ML scenarios such as sentiment analysis and recommendations. It supports deep learning (DL) scenarios also, such as image classification.
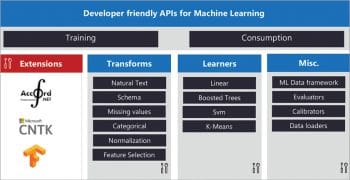
The complete list of ML.NET’s components is shown is Figure 2 (Source: https://blogs.msdn.microsoft.com/dotnet/2018/05/07/introducing-ml-net-cross-platform-proven-and-open-source-machine-learning-framework/).
ML.NET has components that support all aspects of ML, which include core data types, customisable pipelines, high performance math, data structures for heterogeneous data, tooling support, etc.

Installing and building your first app with ML.NET
As stated earlier, the ML.NET framework is cross-platform. It can be installed in the Windows environment with the following steps.
- Step 1: Download and install the .NET software development kit (.NET SDK).
- Step 2: Create the .NET app from the command prompt with the following commands:
> dotnet new console -o myApp

> cd myApp
The above command builds a command line based .NET app in the directory named myApp and fills it with the required files for the app.
- Step 3: Install the ML.NET package by executing the following command:
>dotnet add package Microsoft.ML --version 0.4.0
For the Ubuntu 18.04 environment, the installation requires the following commands. First register the Microsoft key and the product repository, and then install the required dependencies:
wget -q https://packages.microsoft.com/config/ubuntu/18.04/packages- microsoft-prod.deb

sudo dpkg -i packages-microsoft-prod.deb
Next, install the .NET SDK as shown below:
sudo apt-get install apt-transport-https

sudo apt-get update

sudo apt-get install dotnet-sdk-2.1
Download the ML.NET package with the following code:
$ dotnet add package Microsoft.ML
- Step 4: Any ML application has two components — the data set and the algorithm used to perform the actual task. For an ML app to succeed, both these components should be powerful. In this example application, we are going to work with a popular data set used by learners of ML applications – the iris data set. The purpose of this data set is to predict the type of iris flower. The iris data set can be downloaded from https://archive.ics.uci.edu/ml/machine-learning-databases/iris/iris.data. In Visual Studio, this data set can be copied on to the app’s output directory.
- Step 5: The Program.cs file is the core file containing the code. This file starts with the inclusion of libraries (Code: https://www.microsoft.com/net/learn/machinelearning-ai/ml-dotnet-get-started-tutorial):
using Microsoft.ML;

using Microsoft.ML.Data;

using Microsoft.ML.Runtime.Api;

using Microsoft.ML.Trainers;

using Microsoft.ML.Transforms;

using System;
Indicate the input features and class labels with the following code:
public class IrisData

{

[Column(“0”)]

public float SepalLength;

[Column(“1”)]

public float SepalWidth;

[Column(“2”)]

public float PetalLength;

[Column(“3”)]

public float PetalWidth;

[Column(“4”)]

[ColumnName(“Label”)]

public string Label;

}
For the prediction results, use the following class:
public class IrisPrediction

{

[ColumnName(“PredictedLabel”)]

public string PredictedLabels;

}
The core functionality is coded in the following function:
static void Main(string[] args)

{

// STEP 2: Create a pipeline and load your data

var pipeline = new LearningPipeline();

// If working in Visual Studio, make sure the ‘Copy to Output Directory’ // property of iris-data.txt is set to ‘Copy always’

string dataPath = “iris-data.txt”;

pipeline.Add(new TextLoader(dataPath).CreateFrom<IrisData>(separator: ‘,’));

// STEP 3: Transform your data // Assign numeric values to text in the “Label” column, because only // numbers can be processed during model training

pipeline.Add(new Dictionarizer(“Label”));

// Puts all features into a vector

pipeline.Add(new ColumnConcatenator(“Features”, “SepalLength”, “SepalWidth”, “PetalLength”, “PetalWidth”));

// STEP 4: Add learner

// Add a learning algorithm to the pipeline.

// This is a classification scenario (What type of iris is this?)

pipeline.Add (new StochasticDualCoordinateAscentClassifier());

// Convert the Label back into original text (after converting to number in step 3)

pipeline.Add(new PredictedLabelColumnOriginalValueConverter() { PredictedLabelColumn = “PredictedLabel” });

// STEP 5: Train your model based on the data set

var model = pipeline.Train<IrisData, IrisPrediction>();

// STEP 6: Use your model to make a prediction // You can change these numbers to test different predictions

var prediction = model.Predict(new IrisData() { SepalLength = 3.3f, SepalWidth = 1.6f, PetalLength = 0.2f, PetalWidth = 5.1f, });

Console.WriteLine($”Predicted flower type is: {prediction.PredictedLabels}”);

}
Step 6: The app can be run with the following code:
>dotnet run
There are many ML.NET tutorials available on the official website (https://docs.microsoft.com/en-gb/dotnet/machine-learning/tutorials/), including:
- Sentiment analysis
- Iris clustering
- Taxi fare predictor
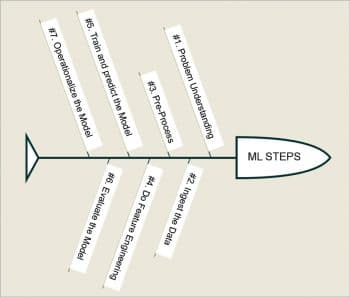
The major steps that need to be taken to solve most of the problems with ML.NET are:
- Understand the problems
- Ingest the data
- Pre-process the data and do feature engineering
- Train the model to make predictions
- Evaluate the model
- Operationalise the model
The sentiment analysis model can be trained with the following code:
var pipeline = new LearningPipeline(); pipeline.Add(new TextLoader<SentimentData>(dataPath, separator: “,”));

pipeline.Add(new TextFeaturizer(“Features”, “SentimentText”)); pipeline.Add(new FastTreeBinaryClassifier()); pipeline.Add(new PredictedLabelColumnOriginalValueConverter(PredictedLabelColumn = “PredictedLabel”));

var model = pipeline.Train<SentimentData, SentimentPrediction>();
The prediction can be done with the following code:
SentimentData data = new SentimentData

{

SentimentText = “Today is a great day!”

};

SentimentPrediction prediction = model.Predict(data);

Console.WriteLine(“prediction: “ + prediction.Sentiment);
A complete code example for sentiment analysis is available on the ML.NET official website at https://docs.microsoft.com/en-gb/dotnet/machine-learning/tutorials/sentiment-analysis.

A detailed ML.NET cookbook with various examples is available at https://github.com/dotnet/machinelearning/blob/master/docs/code/MlNetCookBook.md.
To summarise, ML.NET is a recent addition to the ML framework set. With its cross-platform support, it can be used in all major platforms such as Windows, Linux and MacOS. The ability to extend with other popular libraries such as CNTK makes ML.NET more powerful. .NET developers will find this framework very user friendly as it naturally fits into the .NET scheme of things. With its upcoming releases, the framework will mature and soon have the capability to solve much more complex machine learning and deep learning problems.


