Android Things, an Android based embedded OS, has been designed for use with IoT devices. Here is a tutorial on connecting Android Things with Raspberry Pi to write a small, interesting program.
The Internet of Things has been expanding at a rapid rate over the past few years. The number of devices using the Internet to stay connected has also increased as we see a lot of smart devices all around us. Google has now made a move into the IoT market, by officially introducing the stable Android Things 1.0 in May 2018. The latest version of Android Things is 1.0.2, which was released in July 2018.
Android Things is an Android based embedded operating system, designed for use with the low-power, memory-constrained IoT devices. The main advantage of Android Things is that it uses the same Android development tools, such as Android Studio, along with Google APIs. So Android developers can use Java or Kotlin to write a program that can run an IoT device.
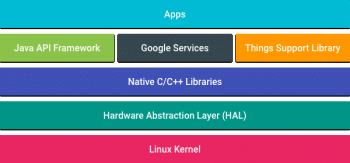
As always, Android keeps its products updated through regular releases, along with bug fixes, and also allows developers to release updates for the apps they developed through the Android Things console, similar to Android Apps updates in Google Play. Figure 1 shows the architecture of Android Things.
Developing a program in Android Things that makes an LED blink
Hardware requirements:
- Raspberry Pi 3 Model B board
- One LED bulb, a resistor of 1K Ohm, jumper wires and a breadboard
Software requirements:
- Google Android Things
- Android Studio
- Etcher image burner
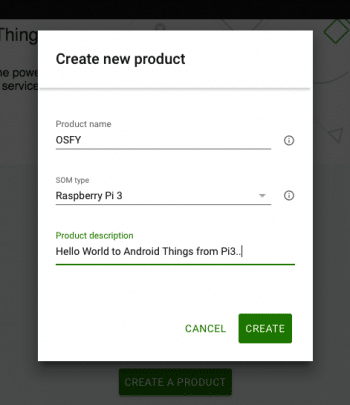
The experiment: So let’s set up the Android Things console. Go to https://www.partner.android.com/things/console/ for this. To create a new product, fill in the necessary details after selecting Create Product (Figure 2).
Now, create a new model or choose an already existing model. The model name is unique in that it includes letters and numbers.
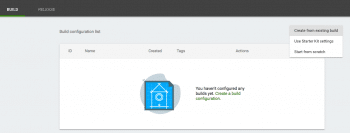
Select Build Menu. A new build can be created from scratch, using Starter Kit, or can be created from an existing build, which may not exist during the initial setup (Figure 3).
Name the build. Select the latest available model. In our case, it is OS Model 1.0.2.
There are options to select applications that need to be pre-installed. Build resources can be added using the next two options.
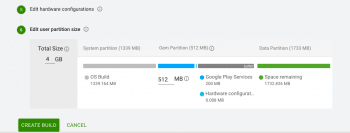
Hardware configurations and partitions can be changed if required. The total size can be also provided in the last menu (Figure 4).
Creating the build configuration can take a few seconds. Next, download the development package, which will be a .zip file, containing the boot image of Android Things configured.
Connecting to Raspberry Pi
The next step is to burn the image to an SD card for booting into Raspberry Pi. Etcher is a good option for the task. Use it to burn the image extracted from the .zip file that has been downloaded.
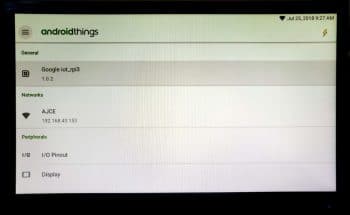
When Raspberry Pi is turned on with the inserted SD card, Android Things loads up. Next, connect to a Wi-Fi network (Figure 5).
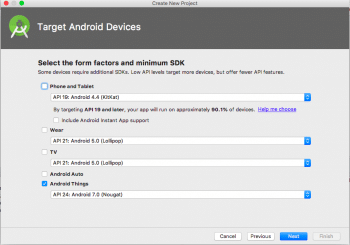
Open Android Studio and create a new project. Select Android Things as the target output device (Figure 6).
Select Android Things Empty Activity as the layout for this example.
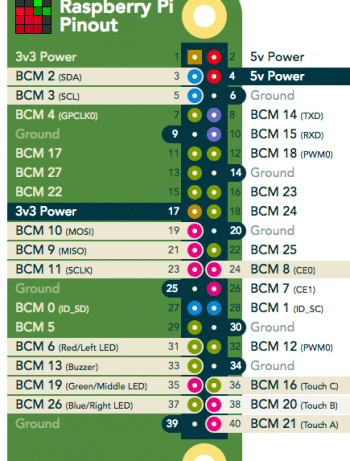
We use Kotlin for development; so create a Kotlin class for storing default values. Declare the following object. Here we use BCM13. It can be changed according to the board selected. See Figure 7 for the Raspberry Pi 3 board structure.
val gpioForLED = when (Build.DEVICE) {DEVICE_RPI3 -> “BCM13”else -> throw IllegalStateException(“Unknown Build.DEVICE ${Build.DEVICE}”)} |
Declare the following variables in the main class:
private val handler = Handler()private lateinit var ledGpio: Gpioprivate var ledState = false |
In order to start the flashing, a handler has to be initialised. So inside the onCreate function, add the following command:
ledGpio = PeripheralManager.getInstance().openGpio(BoardDefaults.gpioForLED)ledGpio.setDirection(Gpio.DIRECTION_OUT_INITIALLY_LOW)handler.post(blinkRunnable) |
The above code will connect the GPIO and set the initial output as LOW. Also, the handler is called. The code for the handler is as follows:
private val blinkRunnable = object : Runnable {override fun run() {// Toggle the GPIO stateledState = !ledStateledGpio.value = ledStateLog.d(TAG, “State set to ${ledState}”)// Reschedule the same runnable in {#INTERVAL_BETWEEN_BLINKS_MS} millisecondshandler.postDelayed(this, INTERVAL_BETWEEN_BLINKS_MS)}}companion object {private const val INTERVAL_BETWEEN_BLINKS_MS = 100L} |
The handler needs to be closed on the application’s exit, and the pins initialised must be freed. For that, add the following code to the onDestroy function:
override fun onDestroy() {super.onDestroy()handler.removeCallbacks(blinkRunnable)ledGpio.close()} |
Android Things and Android Studio are connected using
Android Wifi ADB Connect (Figure 8).

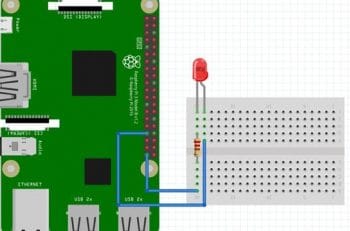
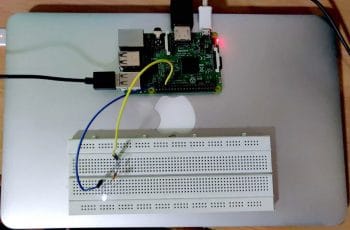
To set up the circuit, use the schematic given in Figure 9.
Switch on the Pi board and run the project on Android Studio. The LED will start blinking when the APK has finished installing (Figure 10).
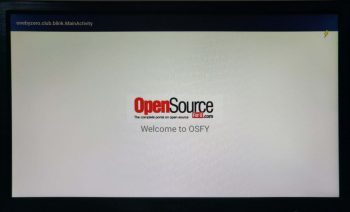
Like when designing on Android, we can also add custom designs on Android Things, for which you can edit the resource layout file using Android Studio (Figure 11).


