Before starting Android app development, one has to get acquainted with the fundamentals. This article serves as a primer for app development.
Android is an open source Linux-based operating system for smartphones and tablets.
The Android platform allows users to develop and use their own applications in the Android framework. All the applications are available through the Android Play Store developed by Google.
All the Android apps are written in Java. Android runs on a Linux kernel. The VM used by Android to run apps is the Dalvik Virtual Machine, which is open source.
Setting up the Android development environment
System requirements
Operating system
- Windows XP (32-bit), Vista (32- or 64-bit), or Windows 7 (32- or 64-bit)
- Mac OS X 10.5.8 or later (x86 only)
- Linux
Development tools
- Java JDK6 or greater
- Android Studio
Downloads
JDK
- Download the appropriate version (i.e., 32-bit or 64-bit) for your system from the link http://www.oracle.com/technetwork/java/javase/downloads/index.html.
- Install JDK.
- Set the environment variables like PATH (i.e., java_install_dir/bin) and JAVA_HOME (i.e., java_install_dir) which refer to the directory that contains the Java and javac commands.
- If the Java environment variables are not set, then we have to set the path for the JDK while installing Android Studio.
Android Studio
- Download Android Studio from the link https://developer.android.com/sdk/installing/studio.html.
- Once the download is completed, follow the installation instructions given below to set up Android Studio.
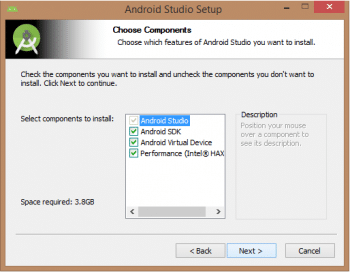
1. Once you launch Android Studio.exe, you can see the screenshot shown in Figure 1, which includes the installation for Android Studio, Android SDK, Android Virtual Machine and the Performance (Intel chip).
2. Choose the location to store Android Studio and Android SDK.
3. Configure the emulator setup. By default, the allocated RAM is 512MB.
4. Now it will fetch all the SDK packages into our local machine and install Android Studio.
Before developing any app, you need to install Android SDK packages. To download the SDK packages, follow the steps given below:
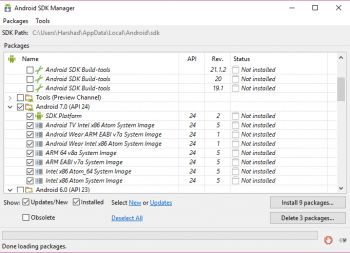
1. Go to Android Studio > Configure option > SDK Manager.
2. Some of the packages are already selected. Apart from those, choose some other required tools and packages from the following choices:
- Android SDK tools
- Android SDK platform-tools
- Android SDK build-tools (highest version available)
- SDK platform (from the latest Android version folder)
- A system image for the emulator, such as the ARM EABI v7a system image
3. Install the packages chosen for the selected tools and packages.
- To run and test the developed Android App, we need an emulator. Create an emulator as follows.
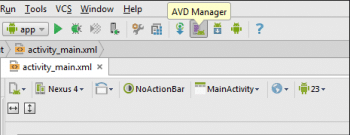
1. Click on the AVD manager icon in Android Studio.
2. Click on the Create button to create a new emulator. You can see all the available AVDs here.
3. Give the proper details to the AVD, and you will be able to see your AVD in the AVD manager.
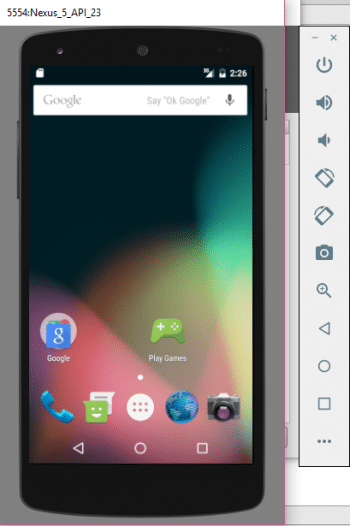
4. Once you start the AVD, it will display the screen shown in Figure 4, as seen in an Android mobile.
The ‘Hello World’ Android app
To make the sample Hello World Android app in Android Studio, follow the steps given below:
1. Add the new Android project in Android Studio.
2. Give the project details and the location where you want the Android projects stored.
3. Specify the minimum SDK for the app.
4. Select the blank activity.
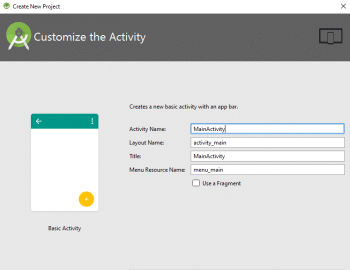
5. Insert the activity’s name and details.
Files/components structure
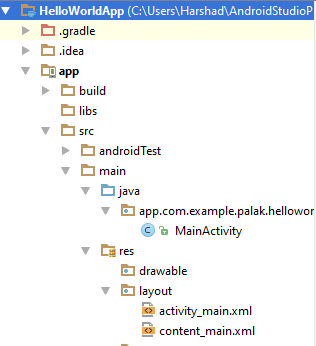
Given below are the important files and directories of Android projects and their functions.
1. src: This contains the main .java source file, which is the primary activity class that is being executed when the app is launched.
2. bin: This contains the .apk file for our project, which stores all the packages needed while running the app.
3. res/layout: This is the directory that contains the app’s layout files.
4. AndroidManifest.xml: This is the manifest file that explains all the basics of the app and its components.
5. res/values: This is the directory that stores various XML files, which contain a collection of resources like the string and colour definitions.
6. String file: This contains all the text used by the app— for example, labels for buttons, the default text, etc. It is located in the res/values folder.
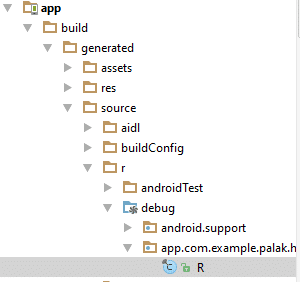
7. R file: This fills the gap between the activity Java files and the resources. It is generated automatically.
Running the ‘Hello World’ app
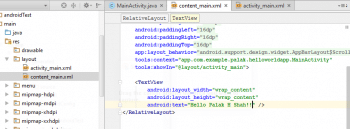
By default, the project will have the text ‘Hello World’. If you wish to modify the text, you can do so in the content_main.xml file.
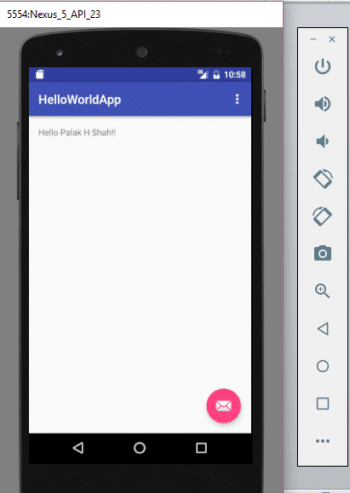
To run the app, click on the Play button and select the AVD to play the app. The AVD manager will launch the AVD and our app will be hosted on it. You can see the output in Figure 9.
Application components
Activities: An activity is the component that provides a screen to interact with. Each activity has its own window to host the user interface.
An app can contain more than one activity, which is integrated with others. There is always a main activity, which is being executed while launching the app. Then, any activity can initiate other activities to execute different tasks.
To create an activity, you need to create a subclass of activity. In your class, you should implement methods of the activity life cycle such as when the activity is created, destroyed, stopped and resumed.
Given below are the important callback methods.
- onCreate(): This method is called while creating the activity. We must implement this method, as only this will initialise all other components of the app. To define the layout of the app, we should call setContentView() here so that while running the app, it will open with the proper layout.
- onPause(): This method is called when the activity becomes invisible to the user and another activity gets priority.
- onRestart(): This is called when the activity starts its execution again.
- onStart(): This is called once the activity makes itself visible to users.
- onResume(): This is called once the activity resumes its execution.
- onStop(): This is called once the activity is no longer visible.
- onDestroy(): This is called to finish executing the activity.
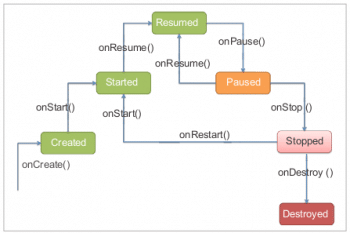
The diagram in Figure 10 explains the life cycle of an activity during app execution.
Intent: Android Intent is the message/value passed between app components such as activities, services, content providers, etc. It is used to request an action from another component. It is used with the method startActivity() to initialise the action.
The main uses of Android Intents are:
1. To start the service
2. To launch the activity
3. To display any URL
4. To dial a call
5. To display a list of contacts, etc
There are two types of Android Intents.
1) Implicit Intent: This specifies the general action, which is taken care of by any available component instead of specifying the component to handle the action. For example, you may write the following code to view the Google home page:
Intent int1=new Intent();

int1. setAction(Intent. ACTION_VIEW);

int1.setData(Uri.parse(“http://www.google. com”));

startActivity(int1);
2) Explicit Intent: In contrast, this specifies the component. To start a component in an app, we can use Explicit Intent. For example, the following code will make the activity start a subordinate service:
Intent int2 = new Intent(Activity1.this, Activity2.class);

startActivity(int2);
Services: A service is an application component that is used to perform operations of long duration in the background and no user interaction is required. As it is running in the background, no front-end operations will affect the execution of the service. We need a service to handle all background tasks like handling network transactions, performing I/O files or playing music.
A service can take the following two forms.
1) Started: A Started service can run in the background indefinitely and stop itself once the operation is done. A service starts its execution when an application component called the startService() method is made. Destroying the component that started the service will not affect how a service running in the background is executed.
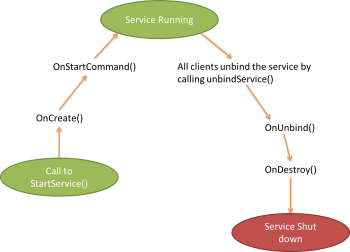
2) Bound: Bound services allow interaction between services; they get results, send requests and carry out interprocess communications (IPC). When an application component calls the method bindService(), the service will be bound with that component. A Bound service stops once the application component bound to it is destroyed. The service cannot be stopped until all components attached to the service unbind the service.
Like activities, services also have the following important methods:
- onStartCommand(): When any component requests the service to be started, the system will call this method.
- onBind(): When any component wants to bind the service, the system will call this method.
- onUnbind(): This method is called once all the components unbind the service.
- onRebind(): This method is called when any new components try to bind the service, after the service has been unbound by all its components.
- onCreate(): This method is called when a service is requested by any component.
- onDestroy(): This method is called when a service no longer exists, and it is used to clean up the resources.
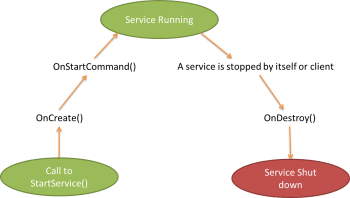
Figure 11 explains the life cycle of Started services during app execution.
Figure 12 explains the life cycle of Bound services during app execution.
Content providers: A content provider component passes the data from one app to another if requested. All requests of this type are handled by the ContentResolver class. This is a central repository that stores the content in one place and allows different applications to access it. It is the same as a database, wherein the manipulation of content is allowed. Usually, the content is stored in the SQLite database.
Shown below is the form of the URI which we should specify in the query string to query a content provider:
<prefix>://<authority>/<data_type>/<id>
Given below are the methods to implement the ContentProvider class.
- onCreate(): This method is called once the content provider is started.
- query(): This returns the result of the query.
- insert(): Adds a new row into the content provider.
- delete(): Deletes an existing row from the content provider.
- update(): Updates an existing row from the content provider.
- getType(): Returns the MIME type of the data at the given URI.


