This article gives readers a basic introduction on how to use the REST API.
Today, the buzz word is ‘data’ and organisations owning large volumes of useful data are considered wealthy. Earlier, the data that a company owned was solely used within the organisation; but times have changed. The world now interacts and communicates through data — in the form of JSON, XML, Video, Excel and many more such formats. Many Twitter and Facebook APIs are consumed by developers every day for their own purposes. In Google Translate, the user can render a sentence in any language desired. A Twitter API can easily find the top trending tweets. To add to the list, there are several sites that give information about weather conditions merely by the user providing the geo location.
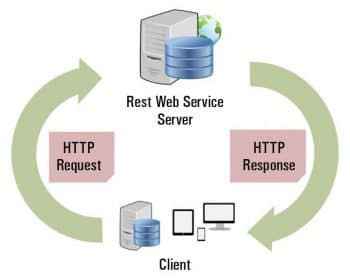
The handshake between the producer and the consumer of the data or the server and the client can be done in many ways but the most popular is by using RESTful Web services. A Web service is what is offered by one electronic device to another, communicating with each other via the World Wide Web. Almost every organisation today uses the RESTful Web services to provide its data as a service. In this article, we will create a simple Web service in Java and access it through Postman (the software to test the Web services).
The best way to start is to know the basics of REST Web services. REST is an architecture based Web service, which stands for Representational State Transfer and it uses different URIs to expose business logic. REST uses the HTTP methods like Get for read-only access to resources, Put to create new resources, Delete to remove the resource, Post to update or create a new resource, and Options to get supported operations on a resource. In REST, all the contents like text files, videos, images and HTML pages are treated as resources that are provided by the server. The REST client accesses and modifies them. REST uses different resource representations like JSON, XML and text.
In designing a RESTful Web application, it is pertinent to ask the question, “How RESTful is the API?” To answer this, we have a model developed by Leonard Richardson called the Richardson Maturity Model. It states that APIs can be categorised in four levels — 0, 1, 2 and 3. Level 0 or Swamp of POX states that there is one URI; the request body contains all the details and uses plain old XML. Level 1 is the starting point for REST and it has individual URIs for each resource. If we introduce different HTTP methods to do different operations on the resource URI, then it is called Level 2. Finally, if one implements HATEOS, i.e., the responses have links to further information that the client can use, the API is said to be at Level 3.
To develop a REST API we need JAX-RS (which is a bunch of interfaces and annotations implemented by different libraries like Jersey), RESTEasy or Apache Wink. You can use any library to develop the API but I will use Jersey.
Let’s set up the environment to kickstart the Web service. The prerequisites for the project are:
a) Java 1.6 and above
b) Eclipse EE version (Kepler)
c) A Web server (Tomcat, in our case)
d) Postman (a Chrome extension)
Start with downloading the latest version of Java and get it installed on your machine.
1. You can download Java 1.8 the Oracle website.
2. Eclipse Kepler can be downloaded from its official site.
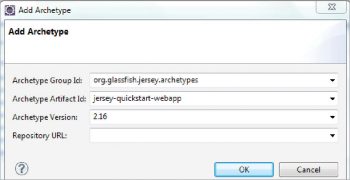
3. Create a Maven project in Eclipse named ‘REST’. We will create a Maven project as we want all the JARs to be downloaded and linked from the Maven repository. You can very well download the JARs and attach them to the project. To create the Maven project, select the archetype as Jersey (if you don’t find the Jersey archetype, then this is not registered in your development machine). You can very well add the archetype with the details shown in Figure 2.
After completing the Maven project, download the Apache Tomcat server, where the REST services will be deployed. In my case, it was 64-bit Windows Zip. Install the Tomcat server, integrate it to Eclipse and then start it.
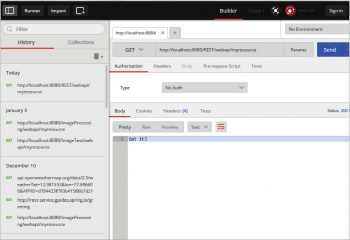
Install Postman, which comes as a Chrome plugin. Click on Settings in the Chrome browser and go to Extensions. Scroll down and click Get more extensions. Search for Postman in the Search tab and add it to Chrome.
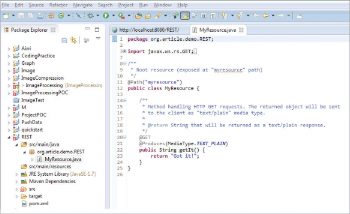
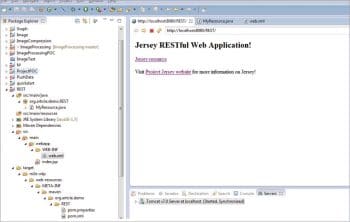
Now, let’s start coding. In the Maven project, you will find MyResource.java that has the getIt() method which returns ‘Got it!’ by default, as shown in Figure 3. This Java file has three annotations named @Path, @Get and @Produces. The @Path annotation identifies the URI path template to which the resource responds, the @Get annotation is a request method designator and corresponds to the HTTP method, and the @Produces annotation is used to describe the output which can be text, JSON or XML. Right-click on the project and run it on the server. This will display a page in the browser with the link http://localhost:8080/REST/, as shown in Figure 4. Upon clicking the Jersey Resource button you will be redirected to http://localhost:8080/REST/webapi/myresource where you will see ‘Got It!’ as output. The reason behind this is that web.xml has the servlet mapping as /webapi. The above URL can also be accessed through Postman to verify the output. In Postman, you can paste the URL, select the request type as Get and click the Send button. This will return ‘Got It!’ as the output.
We can conclude that in order to access the resources from different portals, we need Web services, and one of the most widely used is REST Web services. Its security features, like user authentication and header checks, are of particular importance.


