Here’s a superior caching engine for your Web applications. It will get them to work at blazing speeds with minimal configuration.
Web applications have evolved immensely and are capable of doing almost everything you would expect from a native desktop application. With this evolution, the amount of data and the accompanying need for processing has also increased. Apparently, a full-fledged Web application in a production set-up needs high end infrastructure and adds a lot of latency on the server side for processing repetitive jobs by different users. Varnish is a super-fast caching engine, which can reside in front of any Web server to cache these repeated requests and serve them instantly.
Why Varnish?
Varnish has several advantages over other caching engines. It is lightweight, easy to set up, starts working immediately, works independently with any kind of backend Web server and is free to use (FreeBSD licence). Varnish is highly customisable, for which the Varnish Configuration Language (VCL) is used.
The advantages of this tool are:
- Lightweight, easy to set up, good documentation and forum support
- Zero downtime on configuration changes (always up)
- Works independently with any Web server and allows multi-site set up with a single Varnish instance
- Highly customisable with an easy configuration syntax
- Admin dashboard and other utilities for logging and performance evaluation
- Syntax testing and error detection of configuration without activation
There are only a few limitations to this tool. Varnish does not support the HTTPS protocol, but it can be configured as an HTTP reverse proxy using Pound for internal caching. Also, the syntax of VCL has been changing for various commonly used configurations with the newer versions of Varnish. It is recommended that users refer to the documentation for the exact version to avoid mistakes.
Varnish is a powerful tool and allows you to do a lot more. For instance, it can be used to give temporary 301 redirections or serve your site while the backend server is down for maintenance.

Configuration and usage
Let us go through the steps to install and configure Varnish. For this tutorial, we’ll use Ubuntu 14.04 LTS with the NGINX server.
Varnish 4.1 is the latest stable release, which is not available in Ubuntu’s default repositories. Hence, we need to add the repository and install Varnish using the following commands:
apt-get install apt-transport-https
curl https://repo.varnish-cache.org/GPG-key.txt | apt-key add -
echo “deb https://repo.varnish-cache.org/ubuntu/ trusty varnish-4.1” \
     >> /etc/apt/sources.list.d/varnish-cache.list
apt-get update
apt-get install varnish
With this, Varnish is already running on your server and has started to cache. The Varnish configuration file is generally located at /etc/varnish/default.vcl.
Varnish has several built-in sub-routines, which are called the several stages of the caching fetch process. We can also define custom sub-routines, which can be called within these built-in sub-routines. The following are the built-in sub-routines for Varnish.
- vcl_init – Called every time before the configuration file is loaded
- vcl_fini – Called every time after the configuration file is discarded
- vcl_recv – Called when a new HTTP request is received by Varnish
- vcl_pipe – Called when the request is sent to the backend
- vcl_pass – Called before delivery, when the request is coming from the backend fetch
- vcl_hit – Called when the request is found in the Varnish cache
- vcl_miss – Called when the request is not found in the cache before forwarding to the backend
- vcl_hash – Called after the hash is created for the received request
- vcl_purge – Called when the cache is purged for the request
- vcl_deliver – Called when the output is delivered by Varnish
- vcl_backend_fetch – Called before fetching a request from the backend
- vcl_backend_response – Called after the response from the backend is received by Varnish
- vcl_backend_error – Called when fetching from backend fails after max_retries attempts
These sub-routines can be used in the VCL configuration file to perform the desired actions at various stages. This gives us high flexibility for customisation in Varnish. We can also check the syntactical correctness of the configuration file using the following command:
varnishd -C -f /etc/varnish/default.vcl
Varnish gives a detailed description of any error in the syntax, similar to what is available with NGINX and Apache servers.

Performance and benchmarking
To see the actual difference in performance, we have used the Apache Benchmark tool, which is available with the apache2-utils package. For our tests, we have hosted a fully loaded WordPress site on a t2.micro instance of EC2 in AWS. Let’s call it mywebsite.com in our local host file to avoid DNS resolution delays in our tests. This server runs Varnish on Port 80 and the NGINX server on Port 8080.
The syntax to run the test is ab -n <num_requests> -c <concurrency> <addr>:<port><path>
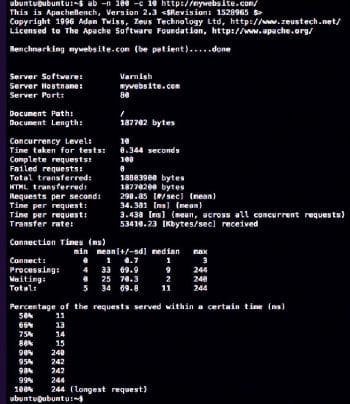
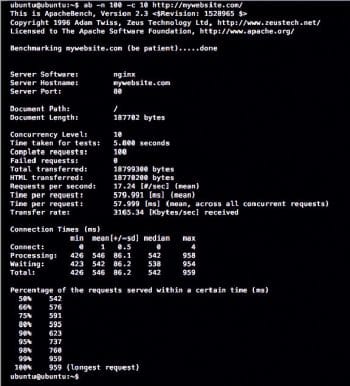
Figures 1 and 2 show the statistics on running 100 requests with 10 concurrent threads.
Considering the benchmarking result, we get the mean time spent per request with Varnish as 3.438 ms, and without Varnish as 57.999 ms. It is evident that Varnish is a winner and a must-have tool for your Web servers, allowing you to boost the performance up to 1000x, depending on your configurations and architecture.


