Large pools of compute, storage and networking resources exist in data centres and in enterprises. To manage them, the ideal tool would be OpenStack, which gives administrative control via a dashboard. In this article, we will explore the configuration of DevStack and Tempest, looking deeper into the challenges and analysing Tempest test results across different OSs and hardware platforms.
In today’s fast-paced world, resource sharing and resource optimisation are two big game changers, as these not only simplify infrastructure planning but also hold promise in the area of cloud computing.
Cloud computing has several advantages. It helps to save on capital and operational expenditure, and is easy to use. Cloud computing involves a big pool of hardware systems connected in private or public networks, to provide scalable infrastructure for application, data and file storage.
OpenStack
OpenStack is a cloud operating system that controls large pools of compute, storage and networking resources through a data centre used for developing private and public clouds. Being an open source platform, it gives administrators control through a dashboard (usually Horizon or a custom-built one using REST APIs), while empowering users to provision resources through a Web interface.
The OpenStack Foundation, a non-profit organisation, oversees both development and community-building around these projects, and is backed by some of the biggest companies in software development and hosting.
Generally speaking, OpenStack fits between the PaaS and IaaS layers, though not compulsorily so. It lets users deploy virtual machines (VMs) and other instances, which handle different tasks that manage a cloud environment, on-the-fly. It makes horizontal scaling easier, which means that tasks which benefit from running concurrently can easily serve more or fewer users on-the-fly by just spinning up more instances as and when required.
OpenStack was initially incubated and developed by NASA, CERN and Rackspace. It is backed by thousands of developers around the world, who are ready to help build a strong, robust and secure environment. OpenStack has well integrated features and components to carry out all cloud related activities like provisioning, orchestration, pricing, billing, etc.
This free and open source cloud computing platform could reach an estimated market size of US$ 1.7 billion by the end of 2016, according to a report from the analyst firm 451 Research.
A recent announcement at OpenStack.org stated: “OpenStack is enterprise ready.” In fact, OpenStack is revolutionising the way we approach computing, storage and networking.
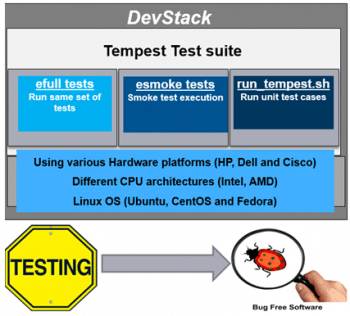
DevStack
DevStack is an opinionated script to help you quickly create an OpenStack development environment. It can also be used to demonstrate how to start and run OpenStack services, and provides examples of using them from a command line.
DevStack, as the name itself suggests, is used specifically for development work on OpenStack. The OpenStack/DevStack environment is set up after running stack.sh (a script to start DevStack configuration). From Git repositories we can download the latest version of DevStack.
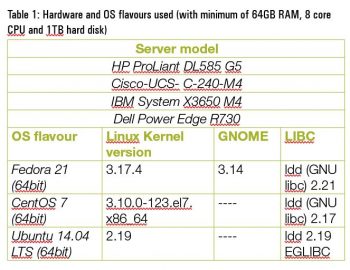
DevStack has evolved to support many configuration options, alternative platforms and support services. In this article, I have considered Ubuntu 14.04, CentOS 7.0 and Fedora 21. More on DevStack and its configurations will be described later.
Some well-known features of OpenStack/DevStack are: Neutron, Cinder, Keystone, Glance, Swift, Nova and Horizon. Not all the features are covered and explained here.
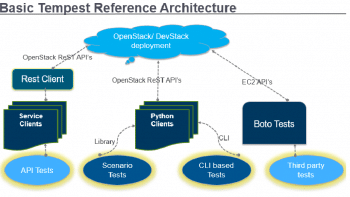
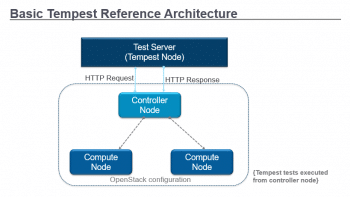
The basic Tempest reference architecture
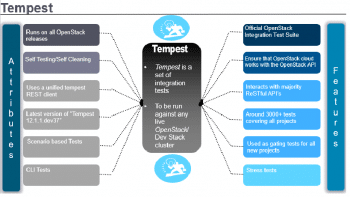
Tempest is an OpenStack integration test suite based on the unittest2 framework and currently uses the Nosetest runner.
Tempest is a set of integration tests to be run against any live OpenStack/DevStack cluster. It has a collection of tests for OpenStack API validation, different scenarios and other specific tests that are useful in validating OpenStack deployment. Tempest also drives some load in the OpenStack cloud environment, so that some part of load testing is also covered. This is possible because it runs all API validation tests in parallel.
Overall, all Tempest does is run tests against OpenStack service endpoints by exercising REST API calls and validate the responses.
Tempest is not exactly tied to any single test runner, but ‘testr_’ is the most commonly used tool. Once all the required configuration is done, Tempest can be run in various ways:
1) Tests can be run in parallel.
2) Tests can be run by selecting individual components serially.
3) Using the ‘tox’ command, tests can be run again in two ways.
- tox –efull: This will run the same set of tests as the OpenStack gate.
- tox –esmoke: This is to run the tests tagged as ‘smoke’.
4) Tempest also has a set of unit tests that test the Tempest code itself. These tests can be run by the run_tempest.sh command.
The various types of tests that can be executed using Tempest are:
- Smoke tests
- Positive tests
- Negative tests
- Stress tests
- White box tests
Tempest is based on httplib2 and built using the REST framework.
The bare minimum hardware required for OpenStack/DevStack installation is given below:
To check the virtualisation support for the processor, use the following commands:
Note: Throughout this document ‘Kilo/Liberty’ releases of OpenStack/Devstack versions are used.
Troubleshooting
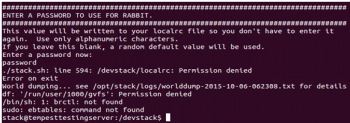
1. Whenever you create the localrc file as the root user and try to run the stack.sh command from the stack user, the error shown in Figure 5 will be encountered.
Solution: When such an error is encountered, change the ownership of devstack directory to stack user, using the command given in Figure 6.
2. If you are using a proxy, while running the stack.sh command you may get the error shown in Figure 7.
Solution: The best practice is to have an Internet connection without a proxy, which will help you avoid most of the issues.
3. When we clone ‘nova’ manually to /opt/stack/nova from the Git repository and try to execute the command ‘stack.sh’, the following exception will be encountered:
raise Exception (“Versioning for this project requires either an sdist”
Exception: Versioning for this project requires either an sdist tarball, or access to an upstream git repository. Are you sure that git is installed?
Solution: To avoid the above exception, copy the .git directory from the cloned devstack directory to the /opt/stack/nova directory.
4. For downloading the earlier stable DevStack version from the Git repository, use the commands given below.
Solution: Choose the stable version from the Git, for example, ‘kilo’ or any latest (‘liberty’) release.
$ git clone -b stable/kilo https://github.com/OpenStack-dev/devstack.git
Cloning into ‘devstack’...
remote: Counting objects: 28160, done.
remote: Compressing objects: 100% (14/14), done.
remote: Total 28160 (delta 3), reused 0 (delta 0), pack-reused 28146
Receiving objects: 100% (28160/28160), 9.59 MiB | 6.00 KiB/s, done.
Resolving deltas: 100% (19543/19543), done.


DevStack installation on Ubuntu 14.04 LTS
After successfully installing Ubuntu 14.04 on the selected hardware, the following steps will configure and install DevStack and Tempest.
Note: Make sure that you have root user privileges, as most of the times, root user access is required.
Step 1: To get the latest version of Ubuntu packages, run the following command:
# apt-get update
Step 2: Install the Git package for downloading devstack files. Run the following command to install the Git package on the host machine:
#apt-get install git
Step 3: Download the DevStack master branch using the Git clone command from the link http://git.OpenStack.org/OpenStack-dev/devstack. The output after executing this command is shown below:
# git clone https://git.openstack.org/openstack-dev/devstack
It will take a few minutes to complete the cloning and this will depend upon your connectivity speed.
Step 4: Now, change the directory to the devstack directory (# cd devstack/). Use the ls command to make sure that the folders listed below and the files are in the devstack directory.
# cd devstack/
# ls
Step 5: Once we are in the devstack directory, go to the Tools directory and execute the script create-stack-user.sh. This script execution will create a stack user and we have to provide sudo privileges for this user.
# cd tools/
# ./create-stack-user.sh
Step 6: This is an optional step. But it would be better to edit the ‘sudoers’ file as shown in the command below.
# vi /etc/sudoers
Step 7: Change the ownership of the devstack directory using the chown command, where we downloaded the DevStack files. This is the best practice to avoid permission issues while executing the stack.sh script later.
#chown -R stack:stack /devstack/
Step 8: Now run the stack.sh script. Before that, we need to switch to the stack user and create an empty file called localrc in the devstack directory. Before creating the localrc file, make sure that you are in the cloned devstack directory.
#su stack
# vi localrc
The localrc file will contain all the passwords which we enter while running the stack.sh script. Later, if we execute the stack.sh script, there’s no need to enter all the passwords, as localrc holds them already.
Note: stack.sh can be run only by a non-root account, which is why we had to create a stack user.
Now execute the stack.sh script and enter the passwords when prompted. It will take some time to complete the installation. After successful installation, we can see the output shown below:
# ./stack.sh
Running Tempest on DevStack
DevStack contains the inbuilt Tempest suite. The required configuration file can be seen in the /opt/stack/tempest directory.
To run a unit test, change the directory to /opt/stack/tempest and execute the run_tempest.sh script.
# ./run_tempest.sh
This will create venv and start the execution of unit tests.
# tox -efull
# tox –esmoke
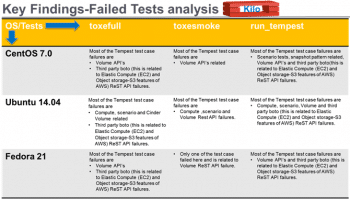
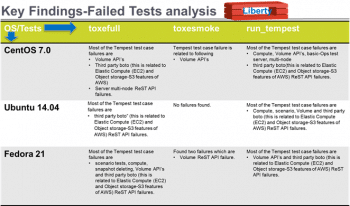
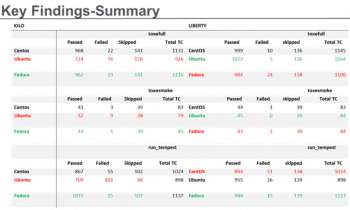
Key findings
Here is a list of the key findings of all that we have explored in this article:
- Tempest test results across different OpenStack releases and OS flavours are distinct.
- One of the primary reasons for this ambiguity is that each OS flavour has different kernel versions.
- The newer the kernel version used, the more stable are the test results.
- Tempest test results across different OpenStack releases are distinct because different OpenStack releases on different hardware platforms are used.
- Tempest execution on the Liberty release on various Linux OS flavours yields more stable test results as compared to the Kilo release.
- The more recent the OpenStack version, the more stable are the test results.


