Welcome to the world of mobile application development with the CLI Apache Cordova framework. This article is a tutorial on building a torch application for Android using Web technologies and Apache Cordova.
Mobile apps are everywhere, from smartphones to tablets and now even on smart watches. But developing an app for each specific platform or device can be a tedious task. Imagine a situation where you have an idea for an app and you want to build that app for your target platforms — Android, iOS and Windows. In simple words, it is like developing that same app three times using platform-specific SDKs and APIs. This can be tedious and time consuming. What if there was a way to develop an app that will run on all platforms? This is where Apache Cordova enters the picture.
What is Apache Cordova?
Apache Cordova (earlier known as PhoneGap) is an open source mobile application development framework. It allows programmers to build apps for multiple mobile platforms using standard Web technologies like HTML5, CSS3 and JavaScript instead of relying on platform-specific SDKs and APIs. The resulting apps built using Apache Cordova are hybrid, which means they are neither native mobile apps nor are they Web based. Apache Cordova supports the following platforms – Android, BlackBerry, Firefox OS, iOS, Symbian, Ubuntu Touch, webOS, Windows Phone and Windows 8.
Components of Cordova
A Cordova app has several important components, which are listed below.
WebView: WebView provides the application with its entire user interface, which means you will see your app interface through the WebView component. Think of it as a browser that displays Web pages (user interface). In fact, WebView is an HTML rendering engine, which renders HTML pages.
Web App: This is where your application code is stored. The app is implemented as an HTML Web page and is typically named index.html, which points to external files such as CSS, JavaScript and other important resources required for it to run. This component also has a very crucial file called config.xml, which stores all-important metadata information about the app, such as its name, description and some specific parameters affecting the working of the app.
Plugins: Plugins are an important component of the Cordova ecosystem. They provide an interface for Cordova and native components to communicate with each other, and are bound to standard device APIs. In other words, they enable you to invoke native code from JavaScript. Apache Cordova maintains such a set of plugins called the Core Plugins, which allow your application to access core device capabilities such as the battery, camera, accelerometer, etc.
Installing Cordova
We are now going to create a mobile app using HTML, CSS, JavaScript and Apache Cordova. Let us first install the Apache Cordova CLI (command-line-interface) tool. Follow the steps shown below:
1. Download and install Node.js (https://nodejs.org/). The Cordova command line tool is distributed as an npm package, so we will use Node and npm to install Cordova.
2. Install the Cordova module using the npm utility of Node.js. The Cordova module will be automatically downloaded by the npm utility.
a. If you are using Windows, run the following command in the command prompt:
C:\>npm install -g cordova |
b. If you are using Linux or OS X, run the following command in the terminal:
$ sudo npm install -g cordova |
After the installation, you should be able to run cordova on the command line with no arguments, and it should print the help text.
Creating an app
In this article, we are going to create a torch app for an Android mobile using Apache Cordova. This is an app that will switch the camera flash of the mobile, on or off, on the press of a button.
Let’s start by going to the directory in which you want to create your Cordova project (in my case, it’s C:\project\) via the command prompt (if you are using Windows OS) or the terminal (if you are using Linux OS), and run the following command:
C:\project>cordova create torchapp com.app.torch Torch |
This command statement creates the required directory structure for your Cordova app.
Here is a brief description.
- cordova create: This script generates a default Web-based application whose home page is the index.html file in /www directory. This page loads up when you run your app. In short, this is the entry point of the app.
- torchapp: This is the name of the directory in which the app will be created.
- com.app.torch: This is the default reverse domain value, in which the classes will be stored. You can use your own domain value.
- Torch: This is the name (title) of the app.
After running the above command, a new Cordova project will be created in the torchapp directory, which will have the following structure:
·hooks\· platform\· plugins\· www\o css\o img\o js\o index.html· config.xml |
- hooks\: This directory is used to store scripts for customising cordova-cli-commands.
- platform\: This directory contains all the scripts and source code for the platform that you add to your Cordova project.
- plugins\: This directory is used to store plugins, which will be used in the app.
- www\: This directory stores all the Web artefacts of the project, such as CSS, HTML and JavaScript files. Most of the code will be stored here. In short, this is the brain of the Cordova app.
- config.xml: This file contains all the important information about the Cordova app, such as its name, description, content-src, etc. It allows you to customise the behaviour of your project.
Adding the platform
Since we are creating an app for the Android platform, we need to add the platform to the Cordova project. Go to the Cordova project’s directory, torchapp, and run the following command:
C:\project\torchapp>cordova platform add android –save |
The above command statement will add the Android platform to the Cordova project. If we want to add any other platform, say iOS, we just need to replace the keyword ‘android’ with ‘iOS’ and run the command. The above command statement will also create the important files required for the Android platform in the app’s platform\ directory.

Prerequisites for building an app
To build and run apps on the computer, you need to install SDKs for each targeted platform; or if you are using a browser for the development, you can use a browser platform that does not require any platform SDKs.
You can check if your system meets the requirements for building the platform by running the following command:
C:\project\torchapp>cordova requirements |
Since we are targeting the Android platform for the app, it will give the following as the output:
Requirements check results for android:Java JDK: installed .Android SDK: installedAndroid target: installed android-21,android-22,android-23,Google Inc.:Google APIs:22Gradle: installed |
This check is necessary to make sure we have installed all dependencies.
Creating the app
We are now going to create the app for an Android mobile phone; we have already created directories and other important files for this app.
Technologies we are going to use are:
- HTML – for the user interface design
- CSS – for styling the HTML page
- JavaScript – for the logic of the app
- Flashlight-PhoneGap-Plugin – to access the mobile camera’s flash
Creating the app interface
First, we need some icons/images for the application. Visit http://www.flaticon.com and download the icon of the power button, preferably of size 64×64 pixels in .png format, rename it power.png and copy it to the www/img/ directory in the Cordova project’s directory. (In my case, it’s C:\project\torchapp\www\img\ directory.)
After this, open the index.html file located in the torchapp/www/ directory. Use your favourite code editor and copy the following HTML code:
<!DOCTYPE html><html><head> <meta http-equiv=”Content-Security-Policy” content=”default-src ‘self’ data: gap: https://ssl.gstatic.com ‘unsafe-eval’; style-src ‘self’ ‘unsafe-inline’; media-src *”> <meta name=”format-detection” content=”telephone=no”> <meta name=”msapplication-tap-highlight” content=”no”> <meta name=”viewport” content=”user-scalable=no, initial-scale=1, maximum-scale=1, minimum-scale=1, width=device-width”> <link rel=”stylesheet” type=”text/css” href=”css/index.css”> <title>Torch Light</title></head><body> <div class=”app”> <div id=”deviceready” align=”center”> <img src=”img/power.png” id=”torch”/> </div> </div> <script type=”text/javascript” src=”cordova.js”></script> <script type=”text/javascript” src=”js/index.js”></script></body></html> |
This index.html file is the entry point of the mobile app. As you can see, it contains references to external CSS and JavaScript files. In simple words, our app is a Web application that will be compiled to the targeted platform. This file has references to CSS files, which are used for styling the Web page, and also to JavaScript files, wherein we write the logic for the application.
We have added the icon that we have downloaded and stored in the img directory to the HTML file. So, when we open index.html in the Web browser, the image will appear in the top-centre position. When we click or press this image on our mobile, it will trigger an event code, which we are going to write in the index.js file located in the js/ directory, where all app logic is written.
Adding style to the app
Open the index.css file located in the torchapp/www/css/ directory. Using your favourite code editor, copy the following CSS code:
body { background-color: white;} |
The index.css file is used to add CSS styles to our application. We have just added a simple CSS code, which turns the background colour of the app white.
Installing and adding the flashlight/torch plugin
We are developing a torch application, so we need access to the mobile’s camera flashlight. There is a Cordova plugin which enables access to the camera flashlight. In this way, we can access or turn on/off the camera’s flashlight using JavaScript code.
Let’s install and add this plugin to the Cordova project by running the following command in your project directory:
C:\project\torchapp> cordova plugin add cordova-plugin-flashlight |
This command adds the plugin to the Cordova project. We can access this plugin using JavaScript code.
Adding logic to the app
Now, open the index.js file located in the torchapp/www/js/ directory. Using your favourite code editor, copy the following JavaScript code:
var app = { // Application Constructor initialize: function () { this.bindEvents(); }, bindEvents: function () { document.addEventListener(‘deviceready’, this.onDeviceReady, false); }, onDeviceReady: function () { app.receivedEvent(‘deviceready’); document.getElementById(“torch”).addEventListener(“click”, function () { window.plugins.flashlight.toggle(); }); }, receivedEvent: function(id) { console.log(id); } };app.initialize(); |
Here is the explanation.
This JavaScript code consists of four functions: initialize (), bindEvents(), onDeviceReady() and receivedEvent().
- initialize(): This is a default application constructor. It makes a call to bindEvent() when the application starts up.
- bindEvent(): This is a bind event listener that binds events such as load, deviceready, offline, etc, which are required on start up. In the above code, this function is listening for the ‘deviceready’ event. Once the device is ready, it makes a call to onDeviceReady().
- onDeviceReady(): This is a ‘deviceready’ event handler; in this function, we make an explicit call to app.receivedEvent(), which specifies the device is ready. We have added the plugin code to turn on the flashlight of the mobile’s camera in this function. We have added a click event listener to an element whose ID is ‘torch’, which means that when we click that element, the window.plugins.flashlight.toggle() function is called. In simple words, it toggles the flashlight on/off, when we click the element.
- receivedEvent(): This function is used to handle the deviceready event.
Building the app
We are done with the coding part; now let us build the .apk file of the app so that we can install it on our Android mobile phone.
Run the following command to build the project for the Android platform:
C:\project\torchapp>cordova build android |
This command generates a .apk file at C:\project\torchapp\platforms\android\build\outputs\apk\ location in our project directory with the name ‘android-debug.apk’.
Note: You can use the cordova build command to build the app for multiple target platforms such as iOS, Windows Phone, etc, by suitably replacing the keyword android in the above command statement.
Installing and testing the app
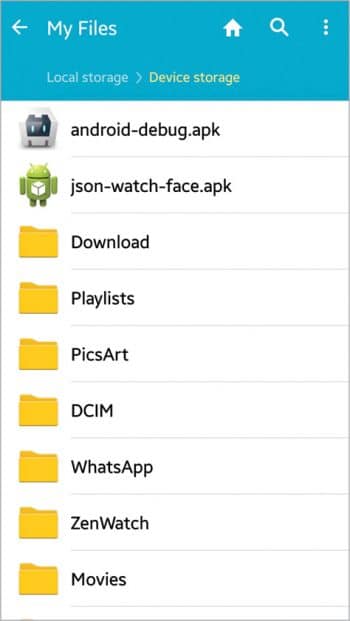
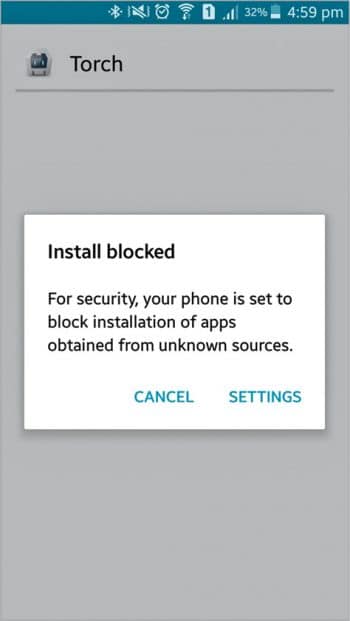
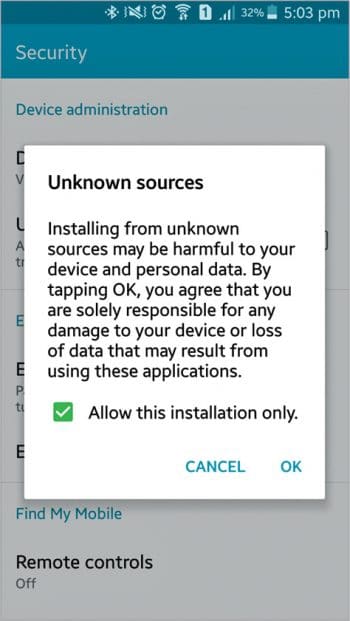
Now copy or transfer the android-debug.apk file to your phone via USB cable or Bluetooth, as shown in Figure 1, and install it (while installing, you may receive an ‘Install blocked’ message, as shown in Figure 2. So click Settings, check the ‘Unknown Sources’ option and select ‘OK’, as shown in Figure 3). This will now give you access permission of the app; next, click on ‘Install’.
After installing the app, open it as shown in Figure 4. Since this is a torch application, we have created a white background for the app, so the user can use the bright screen light as well. When you open the app, you will see a black power button image at the top-centre. Click on it to toggle the mobile camera flashlight on/off.
Note: You can also refer to and download this project’s source code from my GitHub repository. Visit https://github.com/aniketkudale/torch-app/.




Great…Thanks!!!