This article, which is aimed at Android developers and image processing enthusiasts, explains how to extract text out of a captured image, using the Tesseract library.
Optical character recognition (OCR) is a technology that enables one to extract text out of printed documents, captured images, etc. Android currently doesn’t come prebundled with libraries for OCR, unlike for voice-to-text conversion, which can be done using android.speech.RecognizerIntent. To build an Android app that can perform OCR or leverage these capabilities, one might have to opt for external libraries.
About Tesseract
Tesseract is a well-known open source OCR library that can be integrated with Android apps. It was originally developed by Hewlett Packard Labs and was then released as free software under the Apache licence 2.0 in 2005. The development has been sponsored by Google since 2006.
One could leverage OCR for building many Android applications like, for instance, scanning business cards and importing the text to a contact list, scanning an image and playing aloud the extracted text for the visually impaired, and so on. In this article, we will use the tess-two library, which is Tesseract with a Java native interface layer over it, to compile on Android platforms.
Integration with Android
The prerequisite is that the device should be running Android 2.3 (Honeycomb) or a higher version. In Android Studio, which is the official IDE for Android app development, tess-two could be integrated in the following way:
1. Start with downloading tess-two from https://github.com/rmtheis/tess-two.
2. Once complete, create a folder named ‘libraries’ in your application directory. Place the downloaded tess-two folder under Libraries. We may have to do this as tess-two needs to be configured using Gradle. The folder names here could be anything, but the same name needs to be given in settings.gradle and the app’s build.gradle while building the app.
3. Create build.gradle under the tess-two directory to configure the script that will build tess-two. You could use this simple build.gradle code given below:
apply plugin: ‘com.android.library’buildscript { repositories { mavenCentral() }}android { compileSdkVersion 23 buildToolsVersion “23.0.3” defaultConfig { minSdkVersion 15 targetSdkVersion 23 } sourceSets.main { manifest.srcFile ‘AndroidManifest.xml’ java.srcDirs = [‘src’] resources.srcDirs = [‘src’] res.srcDirs = [‘res’] jniLibs.srcDirs = [‘libs’] }} |

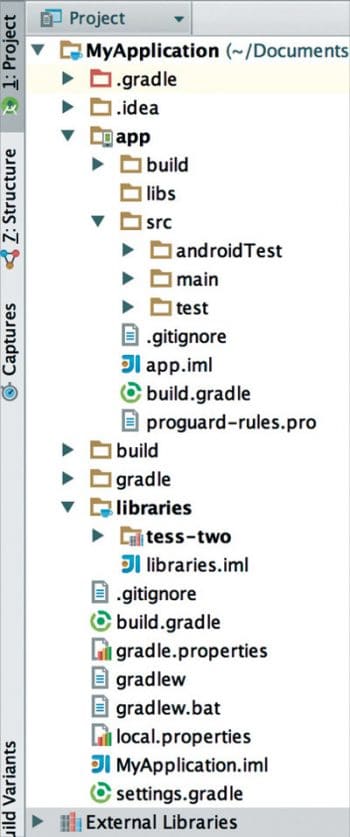
Modify the compiled SDK and build versions according to the toolset available. The project structure will look somewhat like what’s shown in Figure 1.
4. tess-two needs Android NDK during runtime, which helps in embedding C and C++ code into your Android apps. This is needed for performance-intensive applications like OCR. Download the NDK if you don’t have one. You could get it from http://developer.android.com/ndk/downloads/index.html and build the NDK by following the steps shown below.
Set the following environment variables:
- NDK as path to your downloaded and uncompressed NDK folder
- PATH as $NDK:$PATH
- NDK_PROJECT_PATH to your tess-two folder’s path under Libraries, which was created in Step 2
Now, you are all set to build the NDK by running the ‘ndk-build’ command from the downloaded NDK directory in Linux and Mac terminals or by using ‘ndk-build.cmd’ from the Windows command prompt. Finally, set the NDK path in Android Studio (File->Project Structure->SDK Location->Android NDK Location).
apply plugin: ‘com.android.library’buildscript {repositories {mavenCentral()}}android {compileSdkVersion 23buildToolsVersion “23.0.3”defaultConfig {minSdkVersion 15targetSdkVersion 23}sourceSets.main {manifest.srcFile ‘AndroidManifest.xml’java.srcDirs = [‘src’]resources.srcDirs = [‘src’]res.srcDirs = [‘res’]jniLibs.srcDirs = [‘libs’]}} |
5. Now that it is getting compiled as a separate library, we may have to include tess-two as a dependency for the actual app by adding the following line in the build script of the main project (the build.gradle under the app folder):
compile project(‘:libraries:tess-two’) |
Append this under the dependencies element of the app’s build script (build.gradle under the app folder).
Finally, to compile both the app and the tess-two library, append the following line in settings.gradle (given below):
include ‘:libraries:tess-two’ |
Using the tess-two methods
With the above steps, Tesseract APIs should be compilable from the app. Before jumping onto invoking tess-two, you need to convert the image in .png or .jpg form to an Android bitmap. The following code snippet explains how to achieve this. Here, it is assumed that the image is stored in the internal storage (being referred by Environment.getExternalStorageDirectory()).
String path = new File(Environment.getExternalStorageDirectory(), <image_name>).getAbsolutePath();
FileInputStream fis = new FileInputStream(path);
Bitmap bitmap = BitmapFactory.decodeStream(fis); |
One might experience several issues while obtaining the bitmap from an image. These include:
1. The BitmapFactory.decodeStream() might throw an out-of-memory exception or, in some cases, might not throw an exception but return a null bitmap. Make sure the image is not too big and RAM has enough space. A 500kb image typically takes nearly 5MB of RAM. Google provides suggestions for efficiently handling large bitmaps at http://developer.android.com/training/displaying-bitmaps/load-bitmap.html.
2. The bitmap could be null because there are no read/write permissions for the image storage. Make sure AndroidManifest.xml has these permissions set.
3. Double check the path from where the image is being read. It is always safe to use the getAbsolutePath() method for paths.
Once you have the bitmap, you could make use of tess-two methods for the text extraction.
A sample code is shown below:
TessBaseAPI tessTwo = new TessBaseAPI();tessTwo.init(Environment.getExternalStorageDirectory().toString(), “eng”);tessTwo.setPageSegMode(TessBaseAPI.PageSegMode.PSM_SINGLE_LINE);tessTwo.setImage(bitmap);String recognizedText = tessTwo.getUTF8Text();tessTwo.end(); |

The TessBaseAPI instance creation shown in the first line of the above snippet will try to load some of the .so libraries of NDK and, if this fails, the app will crash without even throwing any exception, at times. So make sure the NDK is all compiled and the path is set in Android Studio before building the app.
Initialise the TessBaseAPI as shown in the second line of the code to use the path where the tessdata (tesseract trained data) is present. The tessdata is a compilation of all possible image patterns that Tesseract will match against to recognise the text. You may obtain tessdata from https://github.com/tesseract-ocr/tessdata for your language of interest and place it in a folder called tessdata, which is under the path that will be mentioned in the init() method, as in the second line above. In this article, I have used the internal storage to store the English version of tessdata, and the path to tessdata is <path returned by Environment.getExternalStorageDirectory().toString()>/tessdata/eng.traineddata. The init() method in the second line takes in ‘eng’ for eng.traineddata.
The third line sets the page segmentation mode using the method setPageSegMode() which tells the Tesseract engine how to treat the image — if it’s a single line, a single word or a block, and so on. Finally, set the bitmap image to be processed using setImage() and get the text using getUTF8Text().
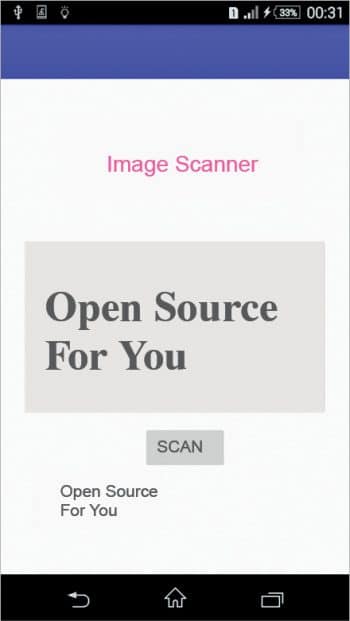
I’ve made a sample app, as shown in Figure 2, where clicking the Scan button pops up the camera, and the text gets extracted from the captured image with just the click of the camera.


1) why are you using as external lib ? already we have gradle link to get Lib.
2) is there any chance to improve accuracy of scanning ?
1) The gradle link here refers to the library that is present under the project directory and is needed for TessBase APIs to compile.
2) There are several ways to improve the accuracy like –
[2.1] Resizing the image followed by converting it to greyscale so that the text portion gets highlighted which is easy for text classification followed by removing noise pixels from the bitmap which makes it easier for recognition. (Ref link : http://stackoverflow.com/questions/9480013/image-processing-to-improve-tesseract-ocr-accuracy)
[2.2] You could set the page segmentation mode to different options so that Tesseract can only look for text as per that. (Ref: https://tesseract.patagames.com/help/html/T_Patagames_Ocr_Enums_PageSegMode.htm)
[2.3] Additionally, you could also tell the Tesseract library to look for only certain charecters like 0-9,a-z and A-Z so that the library can bail out other special characters during its pattern recognition stage and improve accuracy (Ref: http://stackoverflow.com/questions/17169148/why-tesseract-ocr-library-ios-cannot-recognize-text-at-all/19902200#19902200)
Let me know if any.
Thanks,
Shravan.I.V.
The native methods in my TessBaseAPI are not getting resolved.
https://github.com/rmtheis/tess-two. Error This is not the wed page you are looking you.
Page not fount in github repo.
Error:A problem occurred configuring project ‘:app’.
> executing external native build for cmake C:UsersName…..AndroidStudioProjectsMyApplicationOCRappCMakeLists.txt Do you know that this mean ?
Error:Cannot read packageName from C:UsersVEENAAndroidStudioProjectscart_for_shoppinglibrariestess twoAndroidManifest.xml
Plz give me the solution for it
Please create the apk files instalation for the final compiled source so we can easily tested the function.
Can this be used to scan to read printed bank cards?
the method is not that clear.
I am using the tess-two:9.0.0 in my android project. Its working fine but some time the api dont read the data from the image and it get fixed by its. What can be the reason for this issue? Plz help in figuring out.
Thanks