
This article is an introduction to React, which is a JavaScript library used to create UIs. React JS abstracts away the DOM from you, providing a simpler programming model and better performance.
React, a JavaScript library for creating user interfaces, has been adopted by Facebook and Instagram. React is intended to be the V in MVC (Model-View-Controller), i.e., the user interface. It has been built to solve the problem of large applications where data changes over time. It is ideal for single page application (SPA). It is used to create interactive, reusable and state full components. Instagram.com is entirely written in React. It uses a high speed virtual DOM (Document Object Model), and has an easy-to-use and understand syntax.
React became popular because of its rapid DOM rendering speed. A Web page is made up of the structure of HTML elements. It creates a tree for all nodes, but reading and writing the DOM is slow. React JS uses the concept of a virtual DOM to make it faster.
The virtual DOM of React JS
Normally, when the DOM is updated, the rendering of the page takes place.
Reading and writing the DOM is slow, whereas reading and writing JavaScript objects is fast. The React virtual DOM is a JavaScript object. React never reads from the real DOM, and it writes DOM only if it is absolutely necessary and that, too, only the required content is written.
In Figure 1, we can see that JavaScript directly interacts with the DOMreading and writing it. When we use methods like getElementById we are basically querying the DOM for a specific element.
In the same way, when we change the element class or content of the element, we are writing back to the DOM. In JavaScript, this happens many times if the state is changed frequently. If we are using views or some other method to update, we are rendering the same data again and again. This happens even if the changes take place in a small portion. As we continue to render, it slows down our apps. When we use some templating to generate the view, the case is entirely different, in which case, we may not have any idea of how the DOM is being updated.
The React approach is different. It only interacts with the virtual DOM, which is a JavaScript object as shown in Figure 2. When we use getDOMNode, we get the state of the DOM, and when we call the render function, React will update the virtual DOM which is nothing but a JavaScript object. Virtual DOM will push only the necessary changes to the real DOM, i.e., it reconciles with the real DOM.


Downloading the starter kit
React can be downloaded from https://facebook.github.io/react/downloads.html. As shown in Figure 3, click on Download React and select Download the starter kit. It has certain examples to demonstrate how React can be used. Extract the Zip file which will have two folders- Build and Examples. The Build folder contains all the required JavaScript files and the Examples folder has different examples of React.
Alternatively, we can use the script tag in our HTML file to link to React as shown in the following code:
<script src=https://fb.me/react-0.14.8.min.js></script> <script src=https://fb.me/react-dom-0.14.8.min.js></script>
For this article, we will follow the latter approach.


A sample application
Let us start with a simple application of displaying Hello World. To display the output, we need to use the React.render function, which takes two arguments what is to be printed and where. For printing Hello World, we will use React.createElement which is similar to a JavaScript element. It takes the tag name, properties object, and the variable number of the child arguments. We will create the div tag, which will display the Hello World contents. Figure 4 shows the code of the helloworld.html file.
Open the HTML file in a browser; it will display Hello World as shown in Figure 5.
The basic example is very simple, but when updating many elements on pages or adding elements, the created elements will be difficult to maintain. React allows you to create reusable components using JSX.
JSX stands for JavaScript XML. It allows users to create JavaScript objects using the HTML syntax. The JSX approach is that the markup and code that generates it are tied together. Using a templating system will make the display logic more complex and cumbersome.
JSX syntax needs to be converted into JavaScript before it runs in the browser. Babel is a tool that will compile JSX into JS. We need to add a link for Babel in the script. We also need to set the type as text/babel.
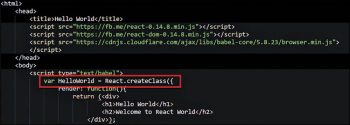
Let us modify the above example to make it a component and use JSX instead of createElement. We will create a class which will have the render function. We will store it in a variable HelloWorld, making it a component that can be used later in React.render. Figure 6 shows the new updated code with JSX.
The output is shown in Figure 7.

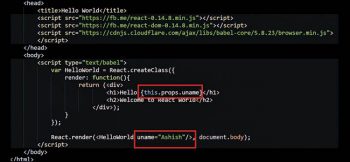

Lets now add the properties to our components. Properties are nothing but attributes to an HTML. In the React class, these can be accessed using this.props, and a change in properties will render the component again. Let us add the property uname to display Hello followed by uname. Figure 8 shows the modified code.
Refresh the browser, or open the modified file in a browser. This will display Hello followed by a name as shown in Figure 9.
We can separate the JSX code in a different JavaScript file. We will try to build a simple list that will display the data that has been entered in a text box, in a bulleted list. The React approach is to view everything as components, breaking them down in the form of a UI hierarchy. Apart from properties, components can handle events and save states too, which we will look at in the next example.
For this application, we need the following three components:
- Form for input: AddItem component
- List to display data: DisplayList component
- Main component to hold the above two: AppMain component
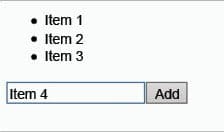
The output of the application is shown in Figure 10.
The code for AddItem is shown in Figure 11, DisplayList is shown in Figure 12 and AppMain is shown in Figure 13.
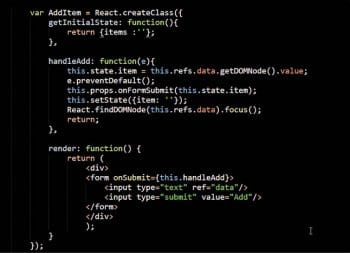

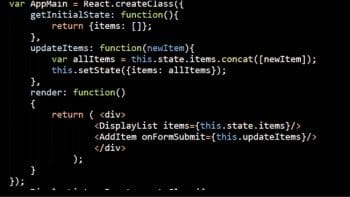
Changes in properties and the state will trigger updates and rendering, which in turn will update the component state. Properties and states are both used to hold some information in the form of JavaScript objects, which are used in the display. The major difference is that the state starts with a default value and changes value in due course. To set the state, first the getInitialState method is used.
This is a simple demo of how to use React JS. For more details, refer to the online documentation at https://facebook.github.io/react/docs/getting-started.html. More examples can also be found if you download the starter kit from the download page.


