This article in the GNU Emacs series takes readers on how to use HTML mode, do indentation, and use the Magit interface.
HTML mode
You can use HTML mode to effectively edit HTML and CSS files using GNU Emacs. To start the mode, use M-x html-mode. You will see the string HTML in the mode line.
Default template
A default HTML template can be started by opening a test.html file, and using C-c C-t html. It will produce the following content:
<html>
<head>
<title>
You will then be prompted with the string Title: to input the title of the HTML page. After you type Hello World, the default template is written to the buffer, as follows:
<html>
<head>
<title>Hello World</title>
</head>
<body>
<h1>Hello World</h1>
<address>
<a href="mailto:user@hostname">shakthi</a>
</address>
</body>
</html>


Tags
You can enter HTML tags using C-c C-t. GNU Emacs will prompt you with the available list of tags. A screenshot of the available tags is shown in Figure 1.
The anchor tag can be inserted using a. You will then receive a message prompt: Attribute:. You can provide the value as href. It will then prompt you for a value, and you can enter a URL, say, http://www.shakthimaan.com. The anchor tag will be constructed in the buffer as you input values in the mini-buffer. You will be prompted for more attributes. If you want to finish, simply hit the Enter key and the anchor tag will be completed. The final output is shown below:
<a href=http://www.shakthimaan.com></a>
You can insert a h2 tag by specifying the same after C-c C-t. You can also add attributes, as required. Otherwise, simply hitting the Enter key will complete the tag. The rendered text is as follows:
<h2></h2>
You can insert images using the alt tag. You can specify the src attribute and a value for the same. It is also a good practice to specify the alt attribute for the image tag. An example is shown below:
<img alt=image src=http://shakthimaan.com/images/ShakthiK-workshop-A4-poster.png>
Unordered lists can be created using C-c C-t followed by ul. It will then prompt you for any attributes that you want included in the tag. You can hit the Enter key, which will prompt you with the string List item: to key in list values. An example of the output is shown below:
<ul>
<li>One
<li>Two
<li>Three
</ul>
You can neatly align the code by highlighting the above text and indenting the region using C-M-\. The resultant output is shown below:
<ul>
<li>One
<li>Two
<li>Three
</ul>
If you wish to comment out text, you can select the region and type M-q. The text is enclosed using <!– and –>. For example, the commented address tags in the above example look like what follows:
<!-- <address> -->
<!-- <a href="mailto:shakthi@achilles">shakthi</a> -->
<!-- </address> -->
A number of major modes exist for different programming environments. You are encouraged to try them out and customise them to your needs.
Accents
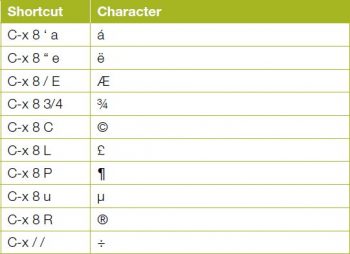
In HTML mode, you can insert special characters, accents, symbols and punctuation marks. These characters are mapped to Emacs shortcuts. Some of them are listed in the following table:
Indentation
Consider the following paragraph:
When we speak of free software, we are referring
to freedom, not
price. Our General Public Licenses are designed to
make sure that you
have the freedom to distribute copies of free software
(and charge for
this service if you wish), that you receive source code or can get it
if you want it, that you can change the software or use pieces of it
in new free programs; and that you know you can do these things.
You can neatly fit the above text into 80 columns and 25 rows inside GNU Emacs using M-q. The result is shown below:
When we speak of free software, we are referring to freedom, not price. Our General Public Licenses are designed to make sure that you have the freedom to distribute copies of free software (and charge for this service if you wish), that you receive source code or can get it if you want it, that you can change the software or use pieces of it in new free programs; and that you know you can do these things.
You can also neatly indent regions using the C-M-\ shortcut. For example, look at the following HTML snippet:
<table>
<tr>
<td>Tamil Nadu</td>
<td>Chennai</td>
</tr>
<tr>
<td>Karnataka</td>
<td>Bengaluru</td>
</tr>
<tr>
<td>Punjab</td>
<td>Chandigarh</td>
</tr>
</table>
After indenting the region with C-M-\, the resultant output is shown below:
<table>
<tr>
<td>Tamil Nadu</td>
<td>Chennai</td>
</tr>
<tr>
<td>Karnataka</td>
<td>Bengaluru</td>
</tr>
<tr>
<td>Punjab</td>
<td>Chandigarh</td>
</tr>
</table>
If you have a long line which you would like to split, you can use the C-M-o shortcut. Consider the quote:
When youre running a startup, your competitors decide how hard you work. Paul Graham
If you keep the cursor after the comma, and use C-M-o, the result is shown below:
When youre running a startup, your competitors decide how hard you work. Paul Graham

Magit
Magit is a fantastic interface to Git inside GNU Emacs. There are many ways in which you can install Magit. To install it from the Melpa repository, add the following to your ~/.emacs:
(require package) (add-to-list package-archives (melpa . http://melpa.org/packages/) t)
When you do M-x list-packages, you will see magit in the list. You can press i to mark Magit for installation, followed by x to actually install it. This will install Magit in ~/.emacs.d/elpa. The version installed on my system is magit-20160303.502.
When you open any file inside GNU Emacs that is version controlled using Git, you can start the Magit interface using M-x magit-status. I have bound this key to the C-x g shortcut in ~/.emacs using the following:
(global-set-key (kbd C-x g) magit-status)
The default Magit screenshot for the GNU Emacs project README file is shown in Figure 2.
Pressing l followed by l will produce the history log in the Magit buffer. A screenshot is provided in Figure 3.
You can make changes to the project sources and stage them to the index using the s shortcut. You can unstage the changes using the u shortcut. After making changes to a file, you need to use M-x magit-status to update the Magit buffer status.
A sample screenshot of the modified files and staged changes is shown in Figure 4.


You can hit TAB and Shift-TAB to cycle through the different sections in the Magit buffer. To commit a message, press c followed by c. It will pop up a buffer where you can enter the commit message.
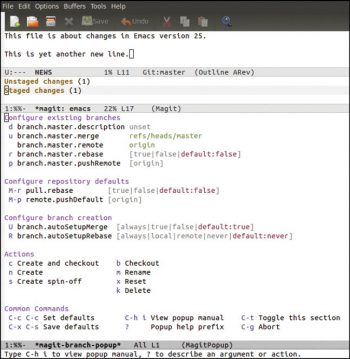
You can create and check out branches using the b shortcut. A screenshot of the Magit branch pop-up menu is shown in Figure 5.
All the basic Git commands are supported in Magit – diffing, tagging, resetting, stashing, push-pull, merging and rebasing. You can read the Magit manual (http://magit.vc/ ) to learn more.


