First impressions are the best. When building a Linux system for a Linux newbie, it is important that you go beyond the default installation. You need to add additional software, configure the system for the best combination of convenience and aesthetics, and provide the new user with simple tips and tricks to be self-sufficient.
Linux distributions
In this article, I would recommend Linux Mint. You could however choose whichever distribution you are comfortable with. As Mint is based on Ubuntu (which, in turn, is based on Debian), it uses the DEB package format, and thus benefits from the many software repositories with DEB packages. DEB packages also make it easy to install and uninstall Linux software programs.
When downloading the Mint OS ISO file, select the 64-bit version. The 32-bit version will not be a good choice as the OS would then be not able to access more than 3GB of the system RAM. Another thing to note before downloading the ISO file is the desktop manager. Mint comes in two flavours – Cinnamon and Mate.
The desktop
This article recommends Linux Mint with the Mate desktop. Mate is a fork of the GNOME 2 desktop manager. Like Windows 8, GNOME 3 seems to favour visual bling at the expense of features. It relies on extensions to provide settings and features that are considered basic in GNOME 2. In contrast, the Mate desktop offers all the usability and accessibility benefits of GNOME 2, and looks great with the Nimbus theme.
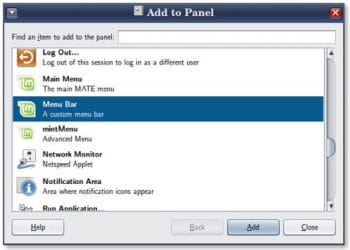
The Linux Mint Mate desktop uses a custom main menu. The original GNOME 2 style has been made optional and surprisingly described as a custom menu bar. Go ahead and get rid of the Main Mate Menu, and add the old GNOME 2-style Menu Bar.
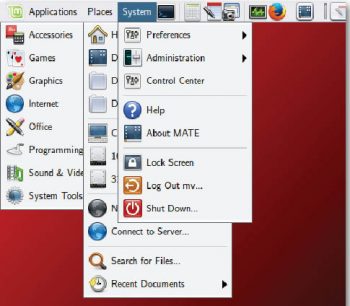
The GNOME 2-style main menu is neatly organised – all software programs are available under Applications; all important storage locations (important home directories, bookmarks, network locations, etc) and recent documents are under Places; and all settings and administrative tasks are under System.
From one corner on the desktop, it provides you with complete control over the entire system. Many new modern alternatives do not have this simplicity and force users to scramble all over the screen.
Other things that you might want to add to the panel would be:
- Workspace switcher
- Notification area
- Window list
- Show desktop
You might also want to add icons of important programs to the panelthat of the browser, email client, the Mate terminal and screenshot, and Pluma (the text editor).
All these simple enhancements will greatly improve the usability of the desktop and will prove extremely valuable when you are providing support over the phone or by email. As mentioned earlier, first impressions are the best. Default installations of Linux can look so drab or intimidating that many new users will simply revert to the familiar comfort of their old OS.
User accounts
The default account in Mint/Ubuntu is an administrator account. Even though admin permissions are available only with sudo, it is best to create a desktop account for the user. Tell the user to log in to the default account only for troubleshooting. You can also tell the user that for simple admin tasks, the admin shell can be accessed by typing su [default-acccount-username].
Software repositories
After the OS is installed and updated, you may have to install proprietary drivers for the graphics card. After that, you should install regular software packages that will be useful.
sudo -apt-get install artha ark clamtk mirage inkscape arista audacious easytag ripperx winff bluefish rapidsvn meld
dosemu wine samba smbclient wvdial gnome-ppp
The Samba client package adds support for Windows shares in the Caja file manager. In most cases, LAN locations of other computers and devices can be accessed using addresses in the format smb://192.168.x.x/share_name/directory_path.
If the user would like to share local directories with DNLA media devices (PlayStation or WD TV), then type sudo apt get install ushare to install ushare. The command ushare -c path-to-shared-directory will turn the specified directory into a DNLA media server share.
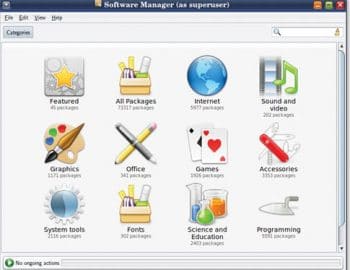
Introduce the new users to the Software Manager or Software Center app in the distro so that they can explore and install applications on their own.
And just to demonstrate how powerful FOSS can be, open GIMP and show users how to add filters such as drop shadows to an image.
FFmpeg
With the proliferation of devices such as smartphones and digital cameras, almost everyone needs to work with a wide variety of audio and media file formats. FFmpeg can be used to convert media files from one format to another. Because many of these formats are encumbered by software patents, the default ISO installation may not add the necessary codecs to play many popular formats.
The FFmpeg website has a page with steps for manually compiling and installing FFmpeg from source. Follow these steps and FFmpeg binary files will be created in a directory named bin in the user’s home directory. Copy these files to /usr/bin directory.
After this, FFmpeg will be available for a variety of programs, such as Arista Transcoder, RipperX (for audio CDs), Pitivi and WinFF.
To list all codecs supported by that FFmpeg installation, type the command ffmpeg -codecs in a terminal. It will give you an idea of what sort of conversions are possible. Here are a couple of examples of FFmpeg-based media file conversion:
ffmpeg -i tank.flv -f mp4 tank.mp4 # converts tank.flv to MP4 format
ffmpeg -i tank.flv -vn -f mp3 tank.mp3 # removes video stream to create an audio file
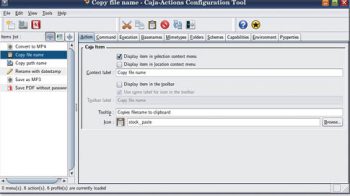
Caja Actions
The introduction of GNOME 3 broke many GNOME 2 applications. The most affected was the file and desktop manager, Nautilus. Hence, the Mate desktop uses Caja, a fork of the old Nautilus program. Nautilus had an extension manager named Nautilus Actions Configurations. For Caja, there is Caja Actions, a fork of Nautilus Actions Configuration.
The following steps allow you to compile and build Caja Actions:
sudo apt-get install checkinstall xclip xsel yelp-tools libglib2.0-dev devscripts build-essential libgtk2.0-dev
libunique-dev libgtop2-dev libgtop2-7 libxml2-dev uuid-dev libcaja-extension libcaja-extension-dev docbook-utils
mkdir build-caja-actions
cd build-caja-actions
git clone git://github.com/raveit65/caja-actions.git
cd caja-actions/
NOCONFIGURE=1 ./autogen.sh
./configure --with-gtk=2 --enable-html-manuals
sudo make
sudo checkinstall --install=no
These steps create a DEB file. Run it to install Caja Actions. If, after this, an option for Caja-Actions Configuration Tool does not appear under the System -> Preferences menu, then create one manually with the command caja-actions-config-tool.
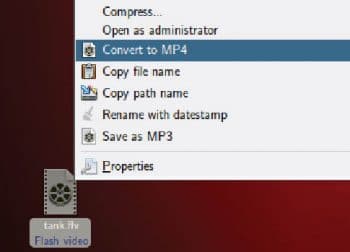
After launching this app, you can create your own context menu options for files and directories. These custom menu options can be made to run commands, scripts and programs. Here are a few scripts to get you started:
- Copy path name
•\Use parameter as %f
• Use command as below
printf $1 | xclip -selection clipboard notify-send $1
- Copy file name
• Use parameter as %b
• Use the same command as used for Copy path name - Convert to MP4 for playing with consumer electronic devices
• Use parameter as %f
• In the Basenames tab use filters for *.3gp, *.avi, *.flv, *.mov, *.mpeg, *.mpg, *.ogv, *.vob, *.webm, *.wmv
• In the Execution tab use mode as terminal
• In the command tab use the code given below
sBaseName=$(basename $1)
sOutputFileName=~/Desktop/${sBaseName%.*}.mp4
ffmpeg -i $1 -f mp4 -qscale 0 $sOutputFileName
notify-send Saved as $sOutputFileName
- Save as MP3 (remove video from a media file so that you can listen to it in an audio player)
• Use parameters as %d and %f
• Basename filters for *.3gp, *.avi, *.flv, *.mov, *.mp4, *.mpeg, *.mpg, *.ogv, *.vob, *.webm, *.wmv
• In the Execution tab use mode as terminal
• In the command tab use the code given below
sInputFile=$1/$2
sOutputFileName=$(basename $sInputFile)
sOutputFileName=~/Desktop/${sOutputFileName%.*}.mp3
ffmpeg -i $sInputFile -vn -aq 0 $sOutputFileName
notify-send Saved as $sOutputFileName
- Rename with datestamp – useful for archiving
• Use parameters as %d and %b
• Basename filter for *.pdf
• In the Execution tab use mode as terminal
• In the command tab use the code given below
sBasename=$(basename $2)
sExtension=${sBasename##*.}
sFilename=${sBasename%%.*}
sTimestamp=`date --reference=$1/$2 +%Y-%m-%d_%H%M-%S`
if [ $sFilename == $sExtension ]
then
notify-send Sorry: no extension found.
else
notify-send $sFilename-$sTimestamp.$sExtension
mv $1/$2 $1/$sFilename-$sTimestamp.$sExtension
fi
- Remove password from PDF (useful with bank statements and other such documents)
• Use parameter as %f
• In the Execution tab use mode as terminal
• In the command tab use the code given below
sOutputFileName=$(basename $1)
sOutputFileName=~/Desktop/${sOutputFileName%.*}-unencrypted.pdf
stty -echo
read -p Enter password to decrypt PDF: sPassword
stty echo
qpdf --password=$sPassword --decrypt $1 $sOutputFileName
Seamonkey and Firefox
The Seamonkey project took off where the old Netscape Internet Suite left off. Seamonkey provides four applications in one program:
- A Firefox-based Web browser
- A Thunderbird-based email client, Usenet reader and RSS feed reader
- A WYSIWYG Web page editor named Composer
- An IRC client named Chatzilla
The advantage of using Seamonkey, over Firefox and Thunderbird separately, is speed. Web links in the Seamonkey email client are instantly loaded in the Seamonkey browser. Similarly, mail links in the Seamonkey browser are instantly handled by the Seamonkey mail client. Add-ons written for Firefox and Thunderbird mostly work without a problem in Seamonkey.
Seamonkey does not have the many quirks that Firefox has of late chosen to annoy its fans with. For example, when Firefox gets opened after clicking a Web link in some program, it will not display the page immediately, but will instead be busy updating all its add-ons first!
Seamonkey stores all its settings and data (including e-mail and bookmarks) in the ~/.mozilla/Seamonkey directory. If you are moving to a new Linux installation, just copy this directory to the .mozilla directory of the new home directory. As Seamonkey (or Thunderbird) is also available for Windows, it is easy to import mail from Windows-based e-mail clients such as Outlook. The imported mail (mbox files) can then be easily moved to the Linux OS.
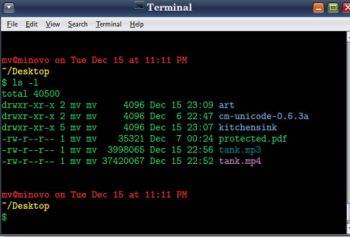
Mate-terminal
The mate-terminal prompt can be made more informative with this setting in the end of the ~/bashrc file.
PS1=\a\n\n\e[31;1m\u@\h on \d at \@\n\e[33;1m\w\e[0m\n$
Google fonts
If the new user is planning to work with GIMP or Inkscape, then the default set of fonts may not be enough. Get all the fonts from the Google repository with the following commands:
wget https://googlefontdirectory.googlecode.com/hg/ofl/ -r -nc -nd -np -A.ttf
sudo mkdir /usr/share/fonts/truetype/goog-fonts
sudo cp *.ttf /usr/share/fonts/truetype/goog-fonts
fc-cache -r
Support
While offering support is great, you should not make the user feel totally dependent on you. You should provide links to sites such as AskUbuntu.com, UbuntuForums.org, LinuxQuestions.org and of course, Open Source For You. This will make new users realise that Linux is not some obscure OS and that there is a big community behind it. For totally new computer users, you can provide general precautions against Nigerian scams, the need to avoid shouting in CAPS, and email etiquette tips. Last but not the least, inform the user that many FOSS projects are supported by voluntary donations.
References
[1] http://www.fsf.org/blogs/community/help-a-friend-skip-windows-10-and-try-gnu-linux Free Software Foundation; Help a friend skip Windows10 and try GNU
[2] http://mate-desktop.org Mate Desktop Project
[3] https://ffmpeg.org/trac/ffmpeg/wiki/UbuntuCompilationGuide FFmpeg compilation guide for Ubuntu
[4] http://github.com/raveit65/ Caja Actions Project
[5] http://www.seamonkey-project.org Seamonkey Project


