Most organisations would like to engage with their customers or the community by sending out regular product updates. As the volume of emails sent grows, over-aggressive filters at the receiving end are likely to flag these emails as Spam and trash them, often without informing the sender of this action. As a consequence of this, the reputation of the organisation’s domain may get tarnished, resulting in the domain being listed on one of the several online blacklists like Spamhaus.
To set up your own bulk mailing infrastructure, lets assume that you have access to the command line, ideally on a VPS or dedicated server. I have used a Centos 6.4 VPS, so the commands are for Centos, but Ubuntu users can easily adapt the steps. First, heres an inventory of the things we need.
- A VPS or bare metal machine connected to the Internet
- PHPList
- MySQL
- A registered domain with access to change the DNS zone entries
PHPList
PHPList is a popular open source newsletter manager written in PHP. Lets use this to set up our bulk mailing infrastructure to manage our subscription lists. So get started and download the required files like the PHPlist TGZ from http://www.phplist.com into your home directory.
$wget http://downloads.sourceforge.net/project/phplist/phplist/3.0.6/phplist-3.0.6.tgz?r=http%3A%2F%2Fwww.phplist.com%2Fdownload&ts=1403941429&use_mirror=jaist
Its a long URL, so rather than typing it, you can copy the URL from the direct link that appears when you download PHPList from Sourceforge. Alternatively, you can download it to your laptop and then upload it to your server, though I wouldn’t recommend it.
Unpack the archive in your HOME folder. This should create a directory called phplist-3.0.6. This directory has a sub-directory called public_html/lists which contains the files that are required to run PHPList; the rest of the files are not required for PHPList to work. However, we’ll let these files remain.
$tar -zxvf phplist-3.0.6.tgz
MySQL
Now, lets create a database for PHPList. Most Linux distributions have MySQL installed by default. To check if MySQL is installed, type the following in your CLI:
$ mysql -V
mysql Ver 14.14 Distrib 5.1.69, for redhat-linux-gnu (i386) using readline 5.1
If you already haven’t installed MySQL, you can do so by running and following the online instructions:
$yum install mysql
Connect to MySQL and create the database phplist
as follows:
$mysql -u[your username] -p[your password]
Then, at the MySQL prompt, type:
mysql> create database phplist;
Query OK, 1 row affected (0.00 sec)
Configure PHPList to connect to MySQL
Lets configure PHPList to connect to the database that we just created. Open the config file available in the lists/config/ directory using Nano, and replace the values for the database user and password.
nano phplist-3.0.6/public_html/lists/config/config.php

# what is your Mysql database server hostname
$database_host = "localhost";

# what is the name of the database we are using
$database_name = "phplist";

# what user has access to this database
$database_user = "your username";

# and what is the password to login to control the database
$database_password = 'your password';

# if test is true (not 0) it will not actually send ANY messages, but display what it would have sent
# this is here, to make sure you edited the config file and mails are not sent "accidentally"
# on unmanaged systems
define ("TEST",0);
DNS entries
Now, set up a domain (www.yourdomain.in) and point the A record to your IP address. Set up your Apache or NGINX server virtual host document root to point to the directory phplist-3.0.6/public_html/ and restart your server. (The Apache configuration files are available in /etc/httpd/conf.d and those of Nginx are available under /etc/nginx/conf.d)

PHPList configuration
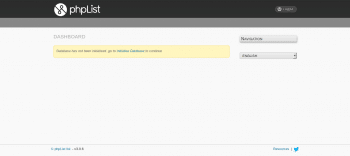
Fire up your browser and visit http://www.yourdomain.in/admin. You should see the PHPList dashboard (Figure 1).
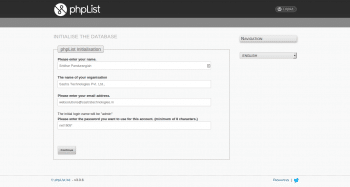
Click the initial database link and follow the instructions. PHPList will be installed within a few seconds (Figure 2). Do the developers a favour and tell them that you have installed PHPList by clicking the Tell us about it button. Then click phpList Setup to continue with the installation.

Click on Verify settings. Use admin for the login name and the password you provided during the installation in order to log in. Lets not change any other settings, for now.
Click the Configure attributes. PHPList has a set of default lists that can be used while creating newsletters. We’ll load the following by clicking the Predefined Defaults and then clicking Countries in the world and States in India. Then click on the Add button.
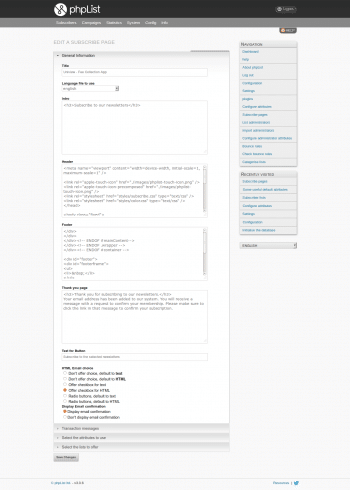
Having done this, lets create a Subscribe page. Click on Create subscribe page and create a page to subscribe to your newsletter (Figure 3).

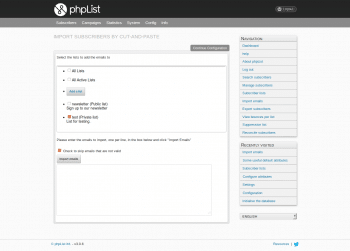
Lets now add some subscribers to our list. Just copy and paste a few emails in the box, click the Import button and you are done (Figure 4).
Before we send out campaign mails, we should set a few domain entries. This is to ensure that our bulk mails are not flagged as spam at the receiving end. For this, we have to follow some of the best practices as espoused by large webmail providers like Gmail.

Finalise an IP address
The first step is to finalise the IP address for your PHPList. If you recall, at the beginning of the article, I did mention that you should be on a VPS or dedicated server. These servers should be on a static IP and not on a DHCP.
Your mail server should have a DNS and RDNS entry in your DNS zone file
Earlier, we had created an A record in the DNS zone file that pointed to the server. An A record is looked up by the browser and other programs to resolve the domain name to an IP address. You should create an RDNS or Reverse DNS entry (also known as PTR) to let recipient mail servers look up the URL from the IP address sent in the email packet. This is one way of ensuring that the email is not spoofed and its origin is trustworthy. To create a RDNS record:
1. Create an RDNS zone.
2. If your IP address is 123.456.789.81, drop the last octet and reverse the string so that the RDNS is 789.456.123
3. Append .in-addr.arpa to the string above to get 789.456.123.in-addr.arpa. This is the hostname for the RDNS zone.
4. Add a new PTR record and use the last octet of your IP address (81) for the name. Enter the domain name for the CNAME.
Have different mail IDs for different purposes
In an organisation, you will send email communications for different purposes. As a good practice, you should use a different ID for each of these purposes. If you send a monthly newsletter, then the sender ID should be set to newsletters@yourdomain.com. All promotional mailers should have a sender ID like promotions@yourdomain.com, and so on. You should ensure that this is configured in PHPList. Remember that this is a send only email ID and it need not exist. And yes, any mails to this ID will result in a bounce, which is the reason for ensuring we have a Reply to address.
Finalise the From and Reply to addresses
Even if you include a note telling people not to reply to the email, its highly unlikely that someone will notice your note before hitting the Reply to button on their email clients. So its a good practice to include a Reply to header and associate an address with it.
If you associate an address with it, then you should ensure that you have an actual email box associated with this address. You can do this by signing up with an email service or by setting up Postfix, Dovecot or Squirrelmail on a server. If you purchase an email service, then the MX records are set up by the provider. If you roll out your own, ensure that you create the MX records in your DNS Zone file. This is because the email clients look up the MX records for transporting email from the client PC to the mail server or MTA.
Have a different Reply to address
Just as you have different email IDs for different purposes, its a good practice to have a different Reply to’ address for each type of email, so that when recipients respond to your mail by hitting the Reply to’ button on their email clients, they land in the boxes designated for them.
Publish the SPF and PTR records
An SPF or Sender Policy Framework specifies which servers can send emails to yourdomain.com. In most cases, an SPF record is created by your hosting providers but for the sake of this article, let’s create one for our bulk email server.
yourdomain.com. IN TXT "v=spf1 a mx ptr -all"
The v=spf1 is the version specification for the SPF being used. a’ means that the IP address of yourdomain.com is allowed to send emails while mx means that even the mx servers can send email. You can also specify a different server for mx by mentioning mx:sastratechnologies.com. The PTR mechanism means that if a host has a PTR record ending with mydomain.com, then it can send email.
Sign with DKIM using a key thats less than 1624 bits
DKIM stands for Domain Key Identified Mail. It provides a method for validating a domain name identity that is associated with the message through cryptographic authentication. We’ll use Opendkim Milter to sign our outgoing email.
PHPList is an email generator and Opendkim is a milter or a mailfilter! The two must be bridged by an MTA or Mail Transfer Agent. Most distributions of Linux have Sendmail installed. We’ll cover the process of installing DKIM and configuring Sendmail to use the DKIM milter. The process is similar to using Postfix as your MTA.
Install Opendkim by using the following command:
$yum install opendkim openssl
Set it to run on startup:
$chkconfig --levels 235 opendkim on
Generate a private key, as follows:
$openssl genrsa -out default.private 1024
Generate a public key:
openssl rsa -in default.private -pubout -out default.public -outform PEM
As the root user, or by using sudo su, move the private key to the directory for Opendkim to read the private key. Ensure that you change the ownership of the key:
$mv default.private /etc/opendkim/keys/.
$chown opendkim /etc/opendkim/keys/default.private
We need to instruct Opendkim to use the KeyTable file. So, open the DKIM configuration file and look for the following line and uncomment it:
KeyTable /etc/opendkim/KeyTable
Create an entry in the KeyTable by editing the file using Nano or any other editor. The domain key should be as shown below:
$nano /etc/opendkim/KeyTable

default._domainkey.sastratechnologies.in sastratechnologies.in:default:/etc/opendkim/keys/default.private
Create a TXT record in your DNS Zone file, where you set the HOST to default_domainkey and the value to the key value. It should look something like what follows:
v=DKIM1; g=*; k=rsa; p=MIGfMA0GCSqGSIb3DQEBAQUAA4GNADCBiQKBgQDrwLEIYP2BAC53zzJn3WPnC9oD
Mq0l+b+zs5O2FtjXVqi0+Fs4gMLJDCdltOHpLU2hoPXpnyTFmi2/lwsF9KXS6MLt
dy/XpiwaXYbi+Zw68PMWhougUomF/XOkY0j2yTHF/9M+ZI0RVmR6eGWLWtByjO7Y
Y7ED+lYOfRCYqLq57wIDAQAB
where p is the value of the public key that we generated, i.e., default.public
Now instruct Sendmail to use DKIM by editing submit.mc and adding the following line:
nano /etc/mail/submit.mc
INPUT_MAIL_FILTER(`dk-filter', `S=inet:8891@localhost')dnl
Build a new submit.mc by running:
m4 /etc/mail/submit.mc > submit.cf
Restart Sendmail:
/etc/init.d/sendmail restart
Now all mails that you send out using PHPList will be signed by Sendmail using the Openssl keys we generated.
Update contact information on WHOIS and abuse.net
Its a good practice to have a listing on abuse.net to allow non-intended recipients of your bulk mail to report abuse. To do that, send an email (TXT, not HTML) to update@abuse.net. Ideally, you should list the email address that recipients will use to report abuse, and the email should look similar to the following:
sastratechnologies.com: abuse@sastratechnologies.com
Ensure that your contact information on WHOIS is up to date. You can do this via your domain registrar.
This apart, there are certain last minute details that you should look into before you send your first email newsletter.
For starters, make changes to the email text body, as follows.
Include a link to add the address in the address book
Your email text body should have a link telling subscribers to add the sender ID to their address book, especially on public mail servers like Gmail and Yahoo. If the senders address is in your address book, the incoming mail is not classified as spam.
Include an explanatory message
At the bottom of the page, include a line to mention why the recipient is receiving this email. Figure 5 gives an example of a large online retailer using such a message in the footer of its bulk email.

Include a link to unsubscribe
Include a link, which when clicked on, unsubscribes the recipient from the list.
Include a Reply to email ID as a form of unsubscribing
You should have an email ID to which recipients can send an email to unsubscribe. We find that most people prefer to include a link rather than an email address for unsubscribing, to avoid the email ID from being harvested (Figure 5).
Send confirmation messages to subscribers that offer a facility to unsubscribe
Periodically, send a summary mail of the newsletter subscriptions and allow the recipient to unsubscribe by clicking a link from within this email.
Have an email ID for people to report abuse
Earlier in this article we created an email ID for abuse reporting and listed it on abuse.net. So do ensure that this email ID is monitored and any reports of abuse are dealt with appropriately.
Use the precedence:bulk header field
Though some people advocate the usage of a precedence: bulk field in the header of your email messages, we have seen very few organisations use it. The Huffington Post sets a precedence: bulk in its daily briefs but several others don’t.
RFC is the Request For Change, a mechanism by which users request for changes in programs. The RFC 2076 deals with common Internet message headers and explains in great detail the commonly occurring headers in email messages. It discourages the use of the precedence header, as many recipient servers will just filter that off.
Send your first newsletter
Now that you are set, create your first email campaign. Ensure that you include everything mentioned above in your email, and then send it out to a close circle of friends. Enjoy the response you receive!
References
[1] PHPLIST: A popular open source newsletter manager http://www.phplist.com
[2] Sendmail: An industry standard MTA (Mail Transfer Agent) – http://www.sendmail.com/
[3] OpenDKIM: An open source milter service for providing DKIM services – http://www.opendkim.org/
[4] OpenSSL: An open source project to develop a robust, commercial grade, full-featured and open source toolkit implementing SSL – http://www.openssl.org/
[5] MXToolBox: An online service for querying the DNS zone file of your domain. It gives you an indication if your DNS server changes have been propagated – http://mxtoolbox.com


