We will focus on the RTC DS1347 to explain how device drivers are written for RTC chips. You can refer to the RTC DS1347 datasheet for a complete understanding of this driver.
Linux SPI subsystem
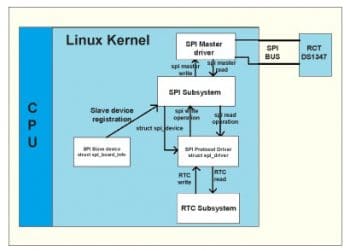
In Linux, the SPI subsystem is designed in such a way that the system running Linux is always an SPI master. The SPI subsystem has three parts, which are listed below.
The SPI master driver: For each SPI bus in the system, there will be an SPI master driver in the kernel, which has routines to read and write on that SPI bus. Each SPI master driver in the kernel is identified by an SPI bus number. For the purposes of this article, lets assume that the SPI master driver is already present in the system.
The SPI slave device: This interface provides a way of describing the SPI slave device connected to the system. In this case, the slave device is RTC DS1347. Describing the SPI slave device is an independent task that can be done as discussed in the section on Registering RTC DS1347 as an SPI slave device.
The SPI protocol driver: This interface provides methods to read and write the SPI slave device (RTC DS1347). Writing an SPI protocol driver is described in the section on Registering the DS1347 SPI protocol driver.
The steps for writing an RTC DS1347 driver based on the SPI bus are as follows:
1. Register RTC DS1347 as an SPI slave device with the SPI master driver, based on the SPI bus number to which the SPI slave device is connected.
2. Register the RTC DS1347 SPI protocol driver.
3. Once the probe routine of the protocol driver is called, register the RTC DS1347 protocol driver to read and write routines to the Linux RTC subsystem.
After all this, the Linux RTC subsystem can use the registered protocol drivers read and write routines to read and write the RTC.
RTC DS1347 hardware overview
RTC DS1347 is a low current SPI compatible real time clock. The information it provides includes the seconds, minutes and hours of the day, as well as what day, date, month and year it is. This information can either be read from or be written to the RTC DS1347 using the SPI interface. RTC DS1347 acts as a slave SPI device and the microcontroller connected to it acts as the SPI master device. The CS pin of the RTC is asserted low by the microcontroller to initiate the transfer, and de-asserted high to terminate the transfer. The DIN pin of the RTC transfers data from the microcontroller to the RTC and the DOUT pin transfers data from the RTC to the microcontroller. The SCLK pin is used to provide a clock by the microcontroller to synchronise the transfer between the microcontroller and the RTC.
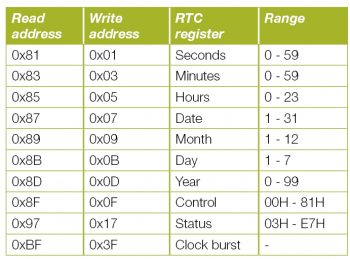
The RTC DS1347 works in the SPI Mode 3. Any transfer between the microcontroller and the RTC requires the microcontroller to first send the command/address byte to the RTC. Data is then transferred out of the DOUT pin if it is a read operation; else, data is sent by the microcontroller to the DIN pin of the RTC if it is a write operation. If the MSB bit of the address is one, then it is a read operation; and if it is zero, then it is a write operation. All the clock information is mapped to SPI addresses as shown in Table 1.

When the clock burst command is given to the RTC, the latter will give out the values of seconds, minutes, hours, the date, month, day and year, one by one, and continuously. The clock burst command is used in the driver to read the RTC.

The Linux RTC subsystem
The Linux RTC subsystem is the interface through which Linux manages the time of the system. The following procedure is what the driver goes through to register the RTC with the Linux RTC subsystem.
1. Specify the drivers RTC read and write routines through the function pointer interface provided by the RTC subsystem.
2. Register with the RTC subsystem using devm_rtc_device_register API.
The RTC subsystem requires that the driver fill the struct rtc_class_ops routine, which has the following function pointers.
read_time: This routine is called by the kernel when the user application executes a system call to read the RTC time.
set_time: This routine is called by the kernel when the user application executes a system call to set the RTC time.
There are other function pointers in the structure, but the above two are the minimum an interface requires for an RTC driver.
Whenever the kernel wants to perform any operation on the RTC, it calls the above function pointer, which will call the drivers RTC routines.
After the above RTC operations structure has been filled, it has to be registered with the Linux RTC subsystem. This is done through the kernel API:
devm_rtc_device_register(struct device *dev, const char *name, const struct rtc_class_ops *ops, struct module *owner); |
The first parameter is the device object, the second is the name of the RTC driver, the third is the driver RTC operations structure that has been discussed above, and the last is the owner, which is THIS_MODULE macro.
Registering the RTC DS1347 as an SPI slave device
The Linux kernel requires a description of all devices connected to it. Each subsystem in the Linux driver model has a way of describing the devices related to that subsystem. Similarly, the SPI subsystem represents devices based on the SPI bus as a struct spi_device. This structure defines the SPI slave device connected to the processor running the Linux kernel. The device structure is written in the board file in the Linux kernel, which is a part of the board support package. The board file resides in arch/ directory in Linux (for example, the board file for the Beagle board is in arch/arm/mach-omap2/board-omap3beagle.c). The struct spi_device is not directly written but a different structure called struct spi_board_info is filled and registered, which creates the struct spi_device in the kernel automatically and links it to the SPI master driver that contains the routines to read and write on the SPI bus. The struct spi_board_info for RTC DS1347 can be written in the board file as follows:
struct spi_board_info spi_board_info[] __initdata = {.modalias = ds1347,.bus_num = 1,.chip_select = 1,}; |
Modalias is the name of the driver used to identify the driver that is related to this SPI slave devicein which case the driver will have the same name. Bus_num is the number of the SPI bus. It is used to identify the SPI master driver that controls the bus to which this SPI slave device is connected. Chip_select is used in case the SPI bus has multiple chip select pins; then this number is used to identify the chip select pin to which this SPI slave device is connected.
The next step is to register the struct spi_board_info with the Linux kernel. In the board file initialisation code, the structure is registered as follows:
spi_register_board_info(spi_board_info, 1); |
The first parameter is the array of the struct spi_board_info and the second parameter is the number of elements in the array. In the case of RTC DS1347, it is one. This API will check if the bus number specified in the spi_board_info structure matches with any of the master driver bus numbers that are registered with the Linux kernel. If any of them do match, it will create the struct spi_device and initialise the fields of the spi_device structure as follows:
master = spi_master driver which has the same bus number as bus_num in the spi_board_info structure.chip_select = chip_select of spi_board_infomodalias = modalias of spi_board_info |
After initialising the above fields, the structure is registered with the Linux SPI subsystem. The following are the fields of the struct spi_device, which will be initialised by the SPI protocol driver as needed by the driver, and if not needed, will be left empty.
max_speed_hz = the maximum rate of transfer to the bus.
bits_per_word = the number of bits per transfer.
mode = the mode in which the SPI device works.
In the above specified manner, any SPI slave device is registered with the Linux kernel and the struct spi_device is created and linked to the Linux SPI subsystem to describe the device. This spi_device struct will be passed as a parameter to the SPI protocol driver probe routine when the SPI protocol driver is loaded.
Registering the RTC DS1347 SPI protocol driver
The driver is the medium through which the kernel interacts with the device connected to the system. In case of the SPI device, it is called the SPI protocol driver. The first step in writing an SPI protocol driver is to fill the struct spi_driver structure. For RTC DS1347, the structure is filled as follows:
static struct spi_driver ds1347_driver = {.driver = {.name = "ds1347",.owner = THIS_MODULE,},.probe = ds1347_probe,}; |
The name field has the name of the driver (this should be the same as in the modalias field of the struct spi_board_info). Owner is the module that owns the driver, THIS_MODULE is the macro that refers to the current module in which the driver is written (the owner field is used for reference counting of the module owning the driver). The probe is the most important routine that is called when the device and the driver are both registered with the kernel.
The next step is to register the driver with the kernel. This is done by a macro module_spi_driver (struct spi_driver *). In the case of RTC DS1347, the registration is done as follows:
module_spi_driver(ds1347_driver); |
The probe routine of the driver is called if any of the following cases are satisfied:
1. If the device is already registered with the kernel and then the driver is registered with the kernel.
2. If the driver is registered first, then when the device is registered with the kernel, the probe routine is called.
In the probe routine, we need to read and write on the SPI bus, for which certain common steps need to be followed. These steps are written in a generic routine, which is called throughout to avoid duplicating steps. The generic routines are written as follows:
1. First, the address of the SPI slave device is written on the SPI bus. In the case of the RTC DS1347, the address should contain its most significant bit, reset for the write operation (as per the DS1347 datasheet).
2. Then the data is written to the SPI bus.
Since this is a common operation, a separate routine ds1347_write_reg is written as follows:
static int ds1347_write_reg(struct device *dev, unsigned char address, unsigned char data){struct spi_device *spi = to_spi_device(dev);unsigned char buf[2];buf[0] = address & 0x7F;buf[1] = data;return spi_write_then_read(spi, buf, 2, NULL, 0);} |
The parameters to the routine are the address to which the data has to be written and the data which has to be written to the device. spi_write_then_read is the routine that has the following parameters:
struct spi_device: The slave device to be written.
tx_buf: Transmission buffer. This can be NULL if reception only.
tx_no_bytes: The number of bytes in the tx buffer.
rx_buf: Receive buffer. This can be NULL if transmission only.
rx_no_bytes: The number of bytes in the receive buffer.
In the case of the RTC DS1347 write routine, only two bytes are to be written: one is the address and the other is the data on that address.
The reading of the SPI bus is done as follows:
1. First, the address of the SPI slave device is written on the SPI bus. In the case of RTC DS1347, the address should contain its most significant bit set for the read operation (as per the DS1347 datasheet).
2. Then the data is read from the SPI bus.
Since this is a common operation, a separate routine, ds1347_read_reg, is written as follows:
static int ds1347_read_reg(struct device *dev, unsigned char address, unsigned char *data){struct spi_device *spi = to_spi_device(dev);*data = address | 0x80;return spi_write_then_read(spi, data, 1, data, 1);} |
In the case of RTC DS1347, only one byte, which is the address, is written on the SPI bus and one byte is to be read from the SPI device.
RTC DS1347 driver probe routine
When the probe routine is called, it passes an spi_device struct, which was created when spi_board_info was registered. The first thing the probe routine does is to set the SPI parameters to be used to write on the bus. The parameters are the mode in which the SPI device works. In the case of RTC DS1347, it works on Mode 3 of the SPI:
spi->mode = SPI_MODE_3; |
bits_per_word is the number of bits transferred. In the case of RTC DS1347, it is 8 bits.
spi->bits_per_word = 8; |
After changing the parameters, the kernel has to be informed of the changes, which is done by calling the spi_setup routine as follows:
spi_setup(spi); |
The following steps are carried out to check and configure the RTC DS1347.
1. First, the RTC control register is read to see if the RTC is present and if it responds to the read command.
2. Then the write protection of the RTC is disabled so that the code is able to write on the RTC registers.
3. Then the oscillator of the RTC DS1347 is started so that the RTC starts working.
Till this point the kernel is informed that the RTC is on an SPI bus and it is configured. After the RTC is ready to be read and written by the user, the read and write routines of the RTC are to be registered with the Linux kernel RTC subsystem as follows:
rtc = devm_rtc_device_register(&spi->dev, "ds1347", &ds1347_rtc_ops, THIS_MODULE); |
The parameters are the name of the RTC driver, the RTC operation structure that contains the read and write operations of the RTC, and the owner of the module. After this registration, the Linux kernel will be able to read and write on the RTC of the system. The RTC operation structure is filled as follows:
static const struct rtc_class_ops ds1347_rtc_ops = {.read_time = ds1347_read_time,.set_time = ds1347_set_time,}; |
The RTC read routine is implemented as follows.
The RTC read routine has two parameters, one is the device object and the other is the pointer to the Linux RTC time structure struct, rtc_time.
The rtc_time structure has the following fields, which have to be filled by the driver:
tm_sec: seconds (0 to 59, same as RTC DS1347)
tm_min: minutes (0 to 59, same as RTC DS1347)
tm_hour: hour (0 to 23, same as RTC DS1347)
tm_mday: day of month (1 to 31, same as RTC DS1347)
tm_mon: month (0 to 11 but RTC DS1347 provides months from 1 to 12, so the value returned by RTC needs to have 1 subtracted from it)
tm_year: year (year since 1900; RTC DS1347 stores years from 0 to 99, and the driver considers the RTC valid from 2000 to 2099, so the value returned from RTC is added to 100 and as a result the offset is the year from 1900)
First the clock burst command is executed on the RTC, which gives out all the date and time registers through the SPI interface, i.e., a total of 8 bytes:
buf[0] = DS1347_CLOCK_BURST | 0x80;err = spi_write_then_read(spi, buf, 1, buf, 8);if (err)return err; |
Then the read date and time is stored in the Linux date and time structure of the RTC. The time in Linux is in binary format so the conversion is also done:
dt->tm_sec = bcd2bin(buf[0]);dt->tm_min = bcd2bin(buf[1]);dt->tm_hour = bcd2bin(buf[2] & 0x3F);dt->tm_mday = bcd2bin(buf[3]);dt->tm_mon = bcd2bin(buf[4]) - 1;dt->tm_wday = bcd2bin(buf[5]) - 1;dt->tm_year = bcd2bin(buf[6]) + 100; |
After storing the date and time of the RTC in the Linux RTC date and time structure, the date and time is validated through rtc_valid_tm API. After validation, the validation status from the API is returnedif the date and time is valid, then the kernel will return the date and time in the structure to the user application; else it will return an error:
return rtc_valid_tm(dt); |
The RTC write routine is implemented as follows.
First, the local buffer is filled with the clock burst write command, and the date and time passed to the driver write routine. The clock burst command informs the RTC that the date and time will follow this command, which is to be written to the RTC. Also, the time in RTC is in the bcd format; so the conversion is also done:
buf[0] = DS1347_CLOCK_BURST & 0x7F;buf[1] = bin2bcd(dt->tm_sec);buf[2] = bin2bcd(dt->tm_min);buf[3] = (bin2bcd(dt->tm_hour) & 0x3F);buf[4] = bin2bcd(dt->tm_mday);buf[5] = bin2bcd(dt->tm_mon + 1);buf[6] = bin2bcd(dt->tm_wday + 1);/* year in linux is from 1900 i.e in range of 100in rtc it is from 00 to 99 */dt->tm_year = dt->tm_year % 100;buf[7] = bin2bcd(dt->tm_year);buf[8] = bin2bcd(0x00); |
After this, the data is sent to the RTC device, and the status of the write is sent to the kernel as follows:
return spi_write_then_read(spi, buf, 9, NULL, 0); |
Contributing to the RTC subsystem
The RTC DS1347 is a Maxim Dallas RTC. There are various other RTCs in the Maxim database and they are not supported by the Linux kernel, just like it is with various other manufacturers of RTCs. All the RTCs that are supported by the Linux kernel are present in the drivers/rtc directory of the kernel. The following steps can be taken to write support for the RTC in the Linux kernel.
1. Pick any RTC from the Manufacturer (e.g., Maxim) database which does not have support in the Linux kernel (see the drivers/rtc directory for supported RTCs).
2. Download the datasheet of the RTC and study its features.
3. Refer to rtc-ds1347.c and other RTC files in the drivers/rtc directory in the Linux kernel and go over even this article for how to implement RTC drivers.
4. Write the support for the RTC.
5. Use git (see References below) to create a patch for the RTC driver written.
6. Submit the patch by mailing it to the Linux RTC mailing list:
- a.zummo@towertech.it
- rtc-linux@googlegroups.com
- linux-kernel@vger.kernel.org
7. The patch will be reviewed and any changes required will be suggested, and if everything is fine, the driver will be acknowledged and be added to the Linux tree.
References
[1] DS1347 datasheet, datasheets.maximintegrated.com/en/ds/DS1347.pdf
[2] DS1347 driver file https://git.kernel.org/cgit/linux/kernel/git/torvalds/linux.git/tree/drivers/rtc/rtc-ds1347.c
[3] Writing and submitting your first Linux kernel patch video, https://www.youtube.com/watch?v=LLBrBBImJt4
[4] Writing and submitting your first Linux kernel patch text file and presentation, https://github.com/gregkh/kernel-tutorial


