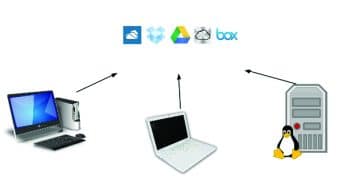
DokuWiki is the most simple, flexible and extensible Wiki around. It can store content in a flat file, instead of a typical database. So, while your application runs on different devices, the data can be stored on the cloud, to be accessed from many different computing devices.
Key features
A wiki is a powerful Web authoring mechanism that simplifies content creation without the need for much knowledge of mark-up languages like HTML. There are many wikis around that you could run on a LAMP or a WAMP stack. DokuWiki has the features of a regular wiki, such as being able to create Web content, allow editing by multiple users, format documents and store media such as images or documents.
A special feature that stands out in DokuWiki is the plain text files that store content. Content stored as plain text files has several advantages. You do not need to run databases such as MySQL where you have hosted the wiki. This not only means fewer overheads to set up and administer but also easy data backup and restore. Another advantage of having plain text files is that they can be stored on cloud services (like Google Drive or Dropbox). This makes your wiki content accessible across Windows PCs, Mac laptops or Ubuntu desktops. Also, since the content is in plain text, you can view the files in Notepad even on a mobile device.
Extensions are another key distinguishing feature of DokuWiki. They come as themes and also functional add-ons. Themes help in personalising the layout, the organisation of data and the look-and-feel, whereas add-ons (also known as plugins) extend the functionality of the wiki. There are already dozens of themes and hundreds of plugins to choose from. If you still need customisation, writing a plugin or theme is easy!
Setting up DokuWiki on Windows
To set up DokuWiki, you just need Apache Server with PHP language support. You do not need MySQL or any other database. XAMPP is a popular WAMP stack for the Windows operating system.
1. Download and install XAMPP (say, C:\xampp)
2. Download the DokuWiki zip file from http://download.dokuwiki.org/ (e.g., Downloads directory)
3. Unzip the file
4. Copy the directory (and all sub-directories) dokuwiki to C:\xampp\htdocs\
5. You should see the following directory — C:\xampp\htdocs\dokuwiki\
6. Start Apache Server from XAMPP Control Panel
7. Go to http://localhost/dokuwiki/ in the browser
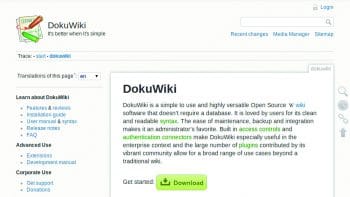
8. You should see the DokuWiki home page
Note that all the wiki content you create will be under the directory C:\xampp\htdocs\dokuwiki\data\pages\
You will see start.txt file under the directory which contains the welcome text.
Setup instructions are provided only for Windows, but the same instructions with a few changes (in the directory path) can help installation on Mac OS X and Linux platforms.
Sharing content across computers
Let us now set up a wiki such that you can access the content across multiple computers. Cloud storage services such as Google Drive have client software running as a service on Windows, Mac OS and Ubuntu (Grive). These client software ensure that the folder Google Drive is always backed up in the cloud. The cloud stored files are available on different devices and get synced.
We can leverage this feature from the cloud service to link with DokuWiki. On Windows, the Google Drive application creates a folder with the name Google Drive in the respective users home directory. The client runs as a service and is visible in the tray as an icon. This service ensures the files are synced up with the cloud as and when changes happen.
DokuWiki expects the data files to be residing in C:\xampp\htdocs\dokuwiki\data\pages. You can create a link under this directory to the Google Drive folder using the mklink command:
C:\xampp\htdocs\dokuwiki\data\pages> mklink /J gwiki <Google Drive directory> |
You will see a link created under this directory named gwiki. This is the link name for the target Google Drive folder.
You additionally need to enable FollowSymLinks options in the Apache configuration file. This will ensure that the Apache Server allows the directory traversal below the gwiki directory through the symbolic link.
To start creating content to store under the gwiki directory, you can type gwiki:test in the search bar. Since no page like that exists, you will be shown an option to Create this page. You are now ready to create your first wiki page that gets stored in the cloud.
Similar linking of the Google Drive directory can be achieved on Mac OS X and Ubuntu systems using the link (ln) command.
Basic text editing in DokuWIki
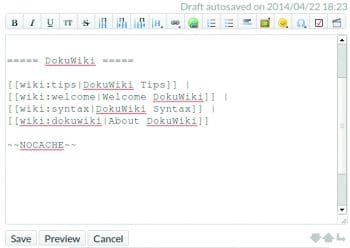
DokuWIki comes with its own rules for formatting text, just like other wikis. It comes with a friendly editor toolbar that inserts the wiki syntax and lets you focus on content editing. While you can use text syntax like the = sign for a heading, it is convenient and advisable to use the format toolbar.
The first five buttons in the toolbar are for making text Bold, Italics, Underline, Code text and strike.
Buttons with the H character are for headings. The first button in this series creates a heading of the same level as the previous one. This button is helpful when you are creating the outline of the document. For example, after the document title, which is H1, you create the first chapter with the H2 heading size. For the rest of the chapter, which will be at the same level (H2), you can just click this button.
To create a heading lower than the previous one, you need to select the second Heading button. To create a heading which is higher than the previous one, you should use the third Heading button. The fourth Heading button lets you create any heading from H1 to H6. Once you get used to the first three buttons, you will rarely use the fourth button.
Linking pages
The buttons with a chain link (shaped like the horizontal 8) are to be used to create links within the wiki pages and external Web pages. To link wiki pages already created, it is easy to click on the link button and select the file from the pop-up.
When creating a new document, it is possible that the leaf pages are not yet created. You can create page links that are place holders, as follows:
[[wiki-page-test|Wiki Test Page]] |
Editing sections
DokuWiki allows editing of sections of a Web page by focusing on the parts of the page being edited. Section edits are created automatically based on the Heading level.
Adding media
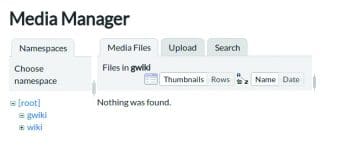
DokuWiki has a Media Manager to upload images and videos from the browser to the server for linking in documents later. You can create a document repository with links from the wiki.
Namespaces
Namespaces allow the grouping of pages. A namespace is similar to a directory. It makes for better organisation of wiki pages. For example, you could create one namespace for each team (to share common content) or for each subject (to take notes).
Referencing pages within the context of a namespace is simple. For example,
[[team-a:start| Team A Home]] |
In the above example, team-a is the namespace and start.txt is the wiki page. Note that .txt extension is not required when referring to the wiki pages.
Version control
DokuWiki does version control of wiki pages. This helps to recover any content erased mistakenly. You can also see the difference between two versions with track changes.
Recommended additions
The following additions are recommended in your DokuWiki.
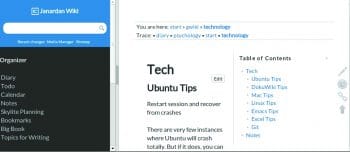
Sidebar creation: Create a page name sidebar.txt. Give a list of high level links to your wiki homepage. This sidebar should reside in the data/pages directory.
Theme change: While the default theme dokuwiki is good, a much better theme is codowik. This has a modern look-and-feel, and is responsive to screen dimensions across multiple screen resolutions.
To change the theme, follow the steps given below:
1. Go to the DokuWiki home page (see References section)
2. Search codowik in the right side search bar
3. Click on codowik (template)
4. Download
5. Unzip the downloaded file
6. Copy the directory codowik to C:\xampp\htdocs\dokuwiki\lib\tpl\
7. Open C:\xampp\htdocs\dokuwiki\conf\local.php file
8. Replace the $conf[template] variable value with codowik (instead of dokuwiki)
9. Reload the DokuWiki page (http://localhost/dokuwiki)
If all the steps are followed, you should be able to see your start page with a new template.
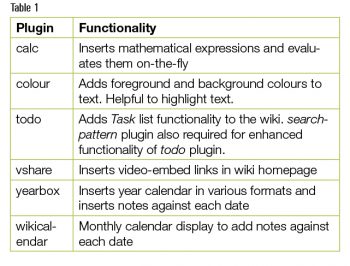
Plugins: There are hundreds of add-ons for DokuWiki. Table 1 lists a few useful plugins you could try.
Table 1
To install plugins, follow these steps :
1. Search for plugins based on their name (in the above table) in DokuWiki homepageTo install plugins, follow these steps:
Plugin Functionality
2. Download the zip file.
3. Unzip the file in any temporary folder.
4. Copy the unzipped directory to C:\xampp\htdocs\dokuwiki\lib\plugins
5. For each plugin, there is a keyword that you need to insert in your wiki page. For more on the keyword and syntax, refer to the documentation on plugins. For example: calc: 19.99*65=
Further customisation
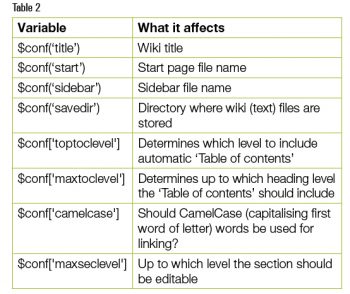
DokuWiki is highly customisable and no knowledge of programming is required. You can edit the values of various configuration variables in the file under dokuwiki/conf. The main configuration file is dokuwiki.php and theslocal file is appropriately named local.php
Some important customisation variables are given in Table 2.
For hosting a wiki in an intranet set-up, DokuWiki has user management and authentication plugins. Also, access control lists can be created with simple configuration changes.
If hosted in a local area network using a Wi-Fi home router, DokuWiki pages can be viewed and edited from a mobile (with a screen of 11.43 cm/4.5 inch or above) or iPad. The basic formatting and editing features have been tested and work well.
There are several advantages of shifting documentation creation from file-based proprietary formats (like DOC and One Note) to Web hosted browser-based editing software. Considering the simple setup and numerous features that DokuWiki offers, it is certainly worth reviewing for your personal and company needs..
References
[1] DokuWiki Home https://www.dokuwiki.org/dokuwiki
[2] DokuWiki Syntax https://www.dokuwiki.org/wiki:syntax
[3] DokuWiki configuration https://www.dokuwiki.org/config


