 OpenAM provides a system for integrating diverse Web applications-to share common authentication and authorisation systems. It can protect applications running on any Web or application server. With a centralised login for all applications, users need to log in only once on the OpenAM server to access any application. OpenAM also provides URL-based authorisation support on the protected resource.
OpenAM was originally known as openSSO when Sun Microsystems owned this open source project. Once Oracle decided to stop its support for openSSO, Forgerock (http://forgerock.com/) took over the code and started supporting it.
OpenAM is very easy to set up and manage. It provides cross-platform support. It just needs a Tomcat server to run the OpenAM server. OpenAM provides policy agents, which run along with the application or Web server. Policy agents protect the resources on the server based on the policy defined in the server. OpenAM provides support for keeping user information in a separate data store like Active Directory. The key benefit is that you get an authentication and authorisation system for free.
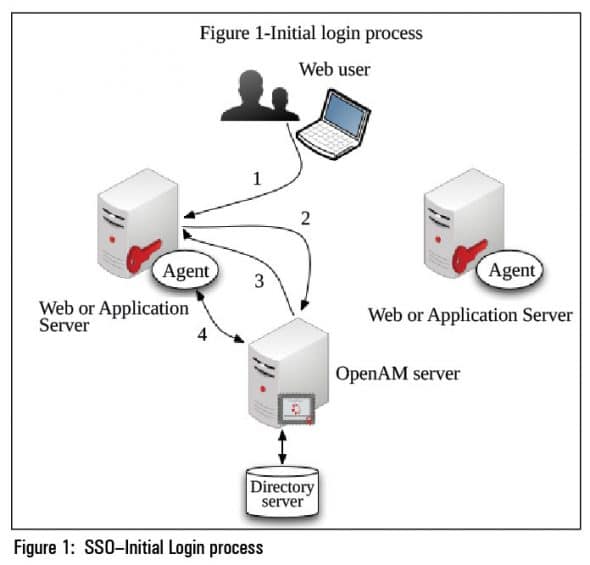
Initial login process
1. The browser sends a request to a protected resource for the first time without an SSO token.
2. The agent running on the Web server intercepts the request, and redirects it to the OpenAM server for authentication.
3. The OpenAM server performs authentication and sends back the SSO token to the agent.
4. The agent validates the token and allows access to the protected resource, based on the authorisation rules.
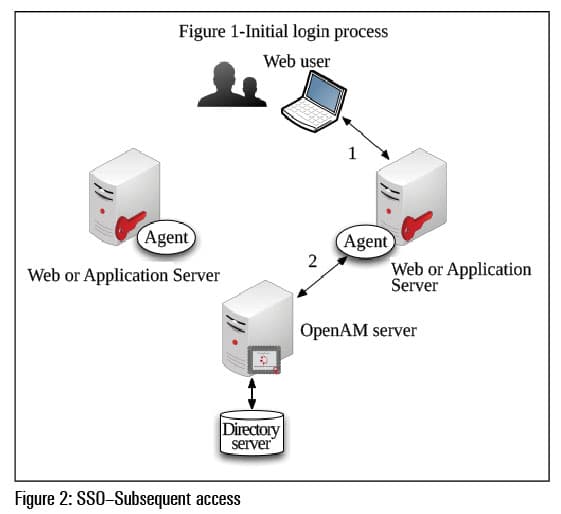
Subsequent access
1. The browser sends a request to another protected resource with the SSO token.
2. The agent validates the token with the OpenAM server, and will not redirect the user to the login page if the token is valid and has not expired.
Setting up the OpenAM server
OpenAM server runs under Tomcat as a Web application. Install Tomcat and download OpenAM_10.0.0.war from http://forgerock.com/openam.html. Copy OpenAM_10.0.0.war to the Tomcat Web apps directory. Access the OpenAM server URL (http://example.OpenAM.com:8080/OpenAM). First time access will take you to the OpenAM configuration steps. Configure OpenAM with the default directory server or the directory server in which you have user information.

 Setting up the OpenAM agent
Create an agent profile in the OpenAM server for the agent, and download the appropriate agent installer from http://forgerock.com/OpenAM.html. Run the agent installer on the Web server in which you want to protect the resources. Configure the agent with the OpenAM server and agent profile details. After successful installation, a request to the Web server without an SSO token will be redirected to OpenAM server.
Platforms supported
OpenAM server can be installed on RHEL 4/5/6, Ubuntu, Solaris, Windows Server 2003 and Windows 2008 Server. Agents are available for Tomcat, Weblogic, Jboss, Glassfish and Oracle Application Server 10g.
Benchmark result
Kiran Ramineni published this benchmark result in the OpenAM mailing list. (http://lists.forgerock.org/pipermail/openam/2012-June/006676.html)
References
[1] http://forgerock.com/OpenAM.html
[2] OpenAM mailing list emails


We have been trying to integrate OpenAM in our organisation as well and one of the greatest advantages of the software is that it is Open Source. We have also done things like OpenID Connect federation with this software as well, however the software is marred with bugs which make it a real pain. However, it is extremely powerful and am glad that it is being adopted throughout.
I have the problem in redirecting from openAM page to web server. It says page isn’t redirecting properly.
Redirect loop I guess. You have an issue with cookie settings.
We have deployed OpenAM 12 in tomcat web server under ubuntu 14.04 LTS and successfully integrated with OpenDJ(2.6) as well. after integration the page was not redirected to login page. what could the reason?
FYI: Same War file is successfully deployed and run in Windows family and integated with OpenDJ.