Clonezilla is back-up and restore software that is a powerful alternative to Symantec’s famous, yet expensive, commercial software Norton Ghost.
Do you often format your partition and reinstall Windows along with other software because of malware intrusion, hard disk failure or for some other reason? You may be wasting hours reinstalling and configuring the system the way it was before it was formatted. You may be a cluster manager or a lab assistant, managing hundreds of homogeneous systems. In which case, you can set up a single system with the desired configuration, make an image of this system and then deploy this image to other nodes in the network. All of this can be easily done using Clonezilla.
Get Clonezilla
Clonezilla is used for back-up and recovery of partitions and disks of GNU, Linux, MS Windows, Intel-based Mac OS, FreeBSD, NETBSD and many other systems. A stable release of Clonezilla can be downloaded from http://sourceforge.net/projects/clonezilla/files/clonezilla_live_stable/. The current release is 133 MB in size. You can burn the downloaded ISO to a CD/DVD or make a bootable USB pen drive using Universal USB Installer.
In this article, I will be using Clonezilla to take a back-up and restore the Windows partition on a NFS server. However, the steps mentioned here are very general and can be used to take a back-up of and restore of any system on a local disk, SSH, NFS or Samba server.
The steps to set up the NFS server
We need to first set up the NFS server to back up and restore our partition/disks. On your Ubuntu server, install nfs-kernel-server by issuing the following command:
:~$ sudo-apt-get install nfs-kernel-server
There are three configuration files that relate to an NFSv4 server: /etc/default/nfs-kernel-server, /etc/default/nfs-common and /etc/exports.
These config files, in our example, would look like what’s shown below.
In /etc/default/nfs-kernel-server, I have set: NEED_SVCGSSD = no # no is default because I am not activating NFSv4 security this time. In /etc/default/nfs-common I set: NEED_IDMAPD = yes NEED_GSSD = no # no is default
because I want the UID/GUID to be mapped from names.
In order that the ID names get automatically mapped, you should modify the /etc/idmapd.conf file with the following lines in the Mapping section:
[Mapping]

Nobody-User = nobody
Nobody-Group = nogroup
We need NFS to share files on the network at one common place.
Create a folder backup in /mnt/

:~$    sudo mkdir /mnt/backup
:~$    sudo chmod 777 /mnt/backup
Inform the network about this folder. Edit the file /etc/exports using the commands mentioned below:
:~$ sudo su :~$ echo /mnt/backup *(rw,sync,no_root_squash) >> /etc/exports
This completes the set-up of the NFS server on an Ubuntu machine.
Backing up a Windows partition
In this section, I will demonstrate how to back-up a Windows partition using Clonezilla. Boot Clonezilla using a CD/DVD or USB pen drive. Note that you may need to configure your BIOS before you can boot from these devices. Upon booting, you will get a screen as shown in Figure 1.

Select the first option ‘Clonzilla live’. On the next screen, you will get to choose your default language. On the following screen, select the ‘Start_Clonezilla’ option. On the next screen, you will get the menu to select ‘local dev’, ‘ssh server’, ‘samba server’, ‘nfs server or ‘enter shell’ as shown in Figure 2.
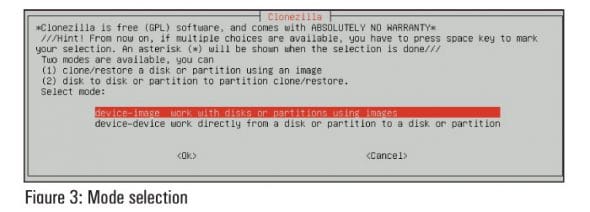
Select ‘nfs_server’ on this screen. On the following screen, select the ‘device-image’ option as shown in Figure 3.
On the following screen, select the network you will use, as shown in Figure 4.
Depending on your network configuration, you can choose dhcp or static to configure your Clonezilla on the 

 network. This is very straightforward. In some cases, you may need to contact the systems administrator to set the values for the gateway and mask. Home users can leave the default values and go ahead with the next step.
After correctly setting up the network, Clonezilla will ask to mount the NFS server directory on to the local directory as shown in Figure 5 and Figure 6. In our case, the nfs directory is /mnt/backup.
This nfs directory is mapped to /home/partimag. In the next screen, select the Beginner option. Depending on your requirements, you can choose ‘saveparts’ or the ‘savedisk’ option. In this tutorial, I will choose only Windows partitions to back up, as shown in Figure 7. The * indicates that the particular partition is selected for back-up.
In the screens that follow, you can choose default options as necessary. It asks for final confirmation before continuing with the backup. On this screen, you can cross check the configuration and restart the procedure, if that is what you want to do. Clonezilla verifies the health of the backup and whether there is a possibility of corruption on its own, hence ensuring that the backup is clean and usable. Finally, choose the Power off option to exit Clonezilla, as shown in Figure 8.
This completes the back-up steps.
Restore Windows partition(s)
If there is any adverse situation that requires you to restore this partition or deploy this back-up to the homogeneous systems over the network, you can use the Restore option of Clonezilla. Follow all the steps of the previous section up to the point of mounting the NFS server directory to the local Clonzilla/home/partimag directory. After this step, Clonezilla will automatically recognise that this directory has a previously saved back-up and it will show the restoredisks and restoreparts options (Figure 9). At this point, you can choose to create a new back-up or restore the old one.
To restore the back-up, choose restoreparts. On the next screen, Clonezilla will ask you to choose the name of the backup, in case you have more than one. Select the latest back-up that you want to restore. On the next screen, it will ask you to choose the target partitions that you want to restore. Be sure to choose the same partition that you made the backup of, or else Windows will not be able to boot. This is shown in Figure 10.
After this step, select all the default options and continue with the restore. And after it is completed, you can safely reboot the system. This completes the restore procedure.
In this article, we have explored a simple way to back up and restore Windows partitions over NFS server. However, the steps mentioned are general and applicable to Samba servers also. One needs to know the Samba server address and configuration.


