 Close on the heels of the LAMP development platform is WAMP. Read on to learn the right steps to install and set it up. This article also outlines a few of the typical problems faced and offers some troubleshooting tips.
LAMP (Linux, Apache, MySQL and PHP) is a very popular development platform in the open source world. Many mission critical websites are developed on this platform to leverage the best of the three open source technologies. WAMP extends this platform further to the Microsoft Windows open source community. While the installation is straightforward on Windows, sometimes it gets tricky to set up WAMP and use it for serious software development.
What is WAMP?
WAMP stands for Windows, Apache, MySQL and PHP. It is a consolidated package designed to install smoothly on almost any Windows operating system. Needless to say, WAMP has Apache as a Web server, MySQL as the open source backend database engine, and a stack of PHP, Perl and Python script compilers to provide the necessary programming language support. There is also a similar flavour on Mac, called MAMP. The Apache Web server is an open source replacement for Microsoft IIS server, while the MySQL engine replaces the need for Microsoft or any other commercial database engine. The beauty of the WAMP installation is that every component can be individually upgraded without the need to uninstall and reinstall the entire installation stack.
Why WAMP?
WAMP, being an open source platform, doesn’t need any commercial licence, thus making it the most cost-effective and the quickest way of getting a programming platform ready. The Windows machine on which the WAMP is to be installed, however, needs a Microsoft licence. This doesn’t diminish the power of WAMP in terms of programmability, ease of use or performance. Typically, the main purpose of a WAMP server is to run test applications before being uploaded on to the actual server. Similar to LAMP, it has PHPMyAdmin to manage the database engine. And it also comes with a built-in GUI interface, which lets you fine tune the installation without touching sensitive settings and configurations.
Installing WAMP
You can download an authentic copy of the WAMP server from www.wampserver.com. Depending upon your operating system, you need to choose a 32-bit or 64-bit installation pack. Since the installation has a fairly small footprint, there are no special pre-requisites for it. The installation itself is very straightforward and is entirely driven by the GUI interface. Besides choosing the default browser and selecting the install path, there is not much else, in terms of installation.
After installation, it is usually a good idea to test it. Here are a few tips on how to go about it. First check the folder named wamp under the drive you have selected. That folder will have many other folders such as alias, apps, bin, lang, logs, scripts, tmp, etc. The important one for developers is the www folder, because this is where the projects under development reside. To run your project in WAMP, you need to create a directory for your own project in the www directory. You can keep your PHP files in this directory that you have created. Folders other than www do have their own significance as explained in the WAMP documentation. To access your project, first check the mode of your WAMP server to see whether it is online or offline. By default, it is offline after a fresh installation. You need to set it to online mode, by clicking ‘Start wampserver’ or by double clicking the WAMP server icon found in the task bar. Please refer to Figure 1. The icon colour is red when WAMP is offline. Once started, it first turns orange and then green, when all services are successfully started.
 Before we test the installation, let’s get a better understanding of a few critical files that need to be tweaked to enable features that can be essential for advanced programmers. The critical files and their installation paths on a Windows machine are mentioned in the accompanying table. As you can see, the three components of WAMP can be easily controlled, configured as well as monitored.
Testing your WAMP installation
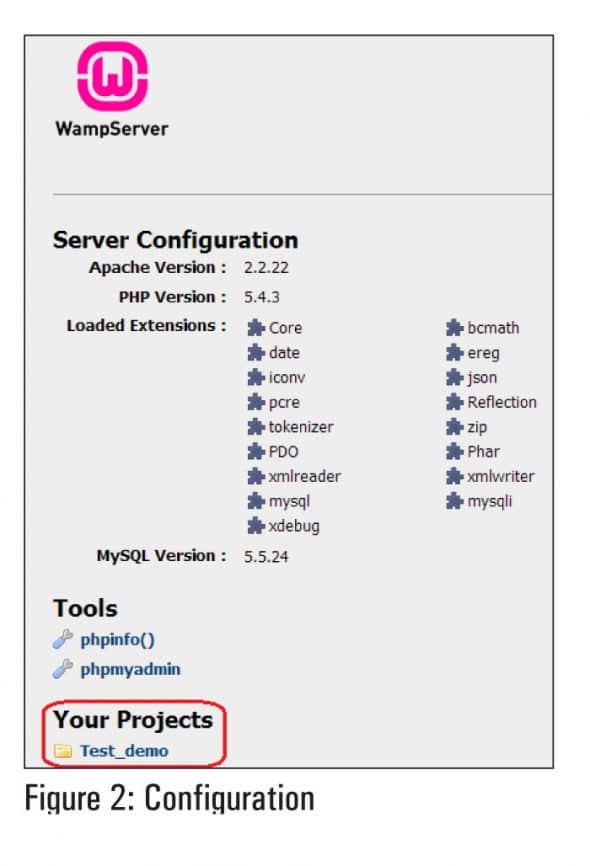
If your WAMP default page is not displayed as shown in Figure 2, it means that all services are not running. In which case, follow either of the steps shown below:
Left click on the icon, select Apache, go to the service option, click on the Start/Resume service.
Left click on the icon and select Restart all services.
Now the next step to test this installation is to open up a browser and access http://localhost. This can also be done by clicking on the link localhost in the WampServer menu. This shows the project folder list which you can access to test the code being developed, as shown in Figure 2. This page shows the version information of the components such as Apache, MySQL and PHP. It also shows loaded extensions of PHP that are useful for advanced programmers. Bringing up this page only tests the Apache server. However, to check the health of the MySQL and PHP engine installations, you can refer to the phpinfo link on the same page. It also contains information for advanced PHP programmers, such as various PHP modules, environment variables, HTTP headers, etc. It is important to note here that the real test for the PHP engine is to write sample code and test it, while for MySQL, the test is to create a database and access it programmatically.
 Setting up WAMP with special requirements
Now let’s set up this installation to develop PHP code. To write a Hello World program, just create a .php file containing code and copy it in the project folder. This project can be accessed via the localhost page in the browser to run the code and enhance it further. However if you are considering advanced PHP programming, you would need to enable additional modules, change execution timeout, increase memory size, etc. All these settings can be found in the httpd.conf file. To increase the execution time of the server, open the php.ini file and search for max_execution_time, which is typically set to 30 seconds, by default. If the application being developed is going to depend heavily on the database, it is advisable to increase the timeout value to 120 seconds or more, depending on the situation. Similarly, search for the memory_limit variable in the file to increase the maximum amount of memory to be consumed by the script.
As for the Apache server, there may be a need to access it from a remote machine in the same network. This feature is disabled by default. To enable it, open the httpd.conf file and make the changes as shown in the screen below. Always remember to select Restart All Services from the WAMP menu for these changes to take effect.
<Directory "cgi-bin"> AllowOverride None Options None Order allow,deny Deny from all</Directory>Change to <Directory "cgi-bin"> AllowOverride None Options None Order allow,deny Allow from all</Directory> |
Now let’s create a database on the WAMP platform, which is easy. Go to phpMyAdmin from the localhost menu of the WAMP server. It will show you a list of default databases. Click on the Databases tab to create a new database, and click it to further create tables and apply privileges, etc. To ensure that the database has been created successfully, you can manually populate the table and, in the SQL tab, run a simple SELECT query to fetch the records. This ensures the database and table creation, as well as the healthy running of the database engine. There are many such settings for each component, and you can find out about them in the WAMP documentation. Be careful while changing some settings, because they could render the installation useless if not done correctly.
 Back-up and maintenance
Backing up code is an easy process, because all you need to do is to copy the project folder to the back-up drive. As for database back-up, the phpmyadmin interface allows you to export the entire database in various formats such as csv, sql, pdf, zip, etc. To restore it, you need to simply use the import option and restart services for the import to take effect. Besides back-up, WAMP doesn’t need any special maintenance as long as there is enough disk space available. For advanced programmers, occasional tuning may be required, which can be achieved by modifying the configuration files.
Summary
WAMP is a popular platform in the Windows world and it seems like it is catching up with the LAMP installation base. Ease of installation and component-based upgradability make WAMP a great development platform for serious PHP and database programmers. So, happy open source programming.


