 Grub, also known as GR and Unified Bootloader, has been the main boot loader for many Linux distributions. Grub was initially released as a part of the GNU HURD project and later was merged in the public repository of the GNU project. It is presently available in two versionsthe legacy Grub and the new version marketed as Grub 2, which has a number of interesting features and options.
Grub2 was derived from a project called PUPA. The project’s aim was to enhance the GNU boot loader, make the code more secure and provide a robust platform for the end user. The magnitude of changes called for an immediate rewrite of the code from scratch. Grub2, with the completely rewritten code, boasts of a highly modular and secure structure offering a variety of expandable designs.
While newly written code and a completely new design offer many advantages, they also have their own drawbacks. For starters, Grub2 tries to be simple and looks similar to the legacy Grub, providing users with a familiar feeling. The new model brings into play a completely new set-up wizard, which is too perplexing for newbies, while at the same time creating new opportunities for developers to get the most out of the modular design. Here are some of the key features that make Grub2 more sophisticated and easier for developers to maintain.
Scripting support: Grub2 offers scripting support. Developers and users can create custom scripts to carry out specialised functions. Grub2 even allows you to make use of conditional statements.
Dynamic module loading: Boasting of a modular design, Grub2 offers a dynamic module, which means that each and every module can be loaded when needed, during selection time or after it.
Custom menus and themes: Eye candy has never been a Grub feature but with Grub2 developers aim to provide ample leeway for designers to create gorgeous themes.
Support for UUID: Grub2 has native support for UUID (Universal Unique Identifier), providing a more concrete solution to identifying partitions.
A centralised system for rescue and setting up: Grub2 offers even more robust rescue measures in case of some problems.
The above mentioned features provide only a glimpse of what Grub2 is really capable of, covering only some of the newly released features. Such robust features and a completely new approach have unfortunately brought along many drawbacks as well. The incorporation of a new set-up wizard is one. Users conversant with the older configuration wizard will have difficulties getting used to the new one.
 Grub2: An in-depth look
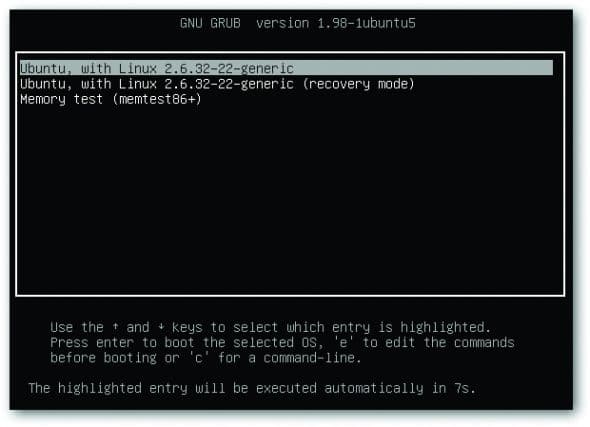
Grub2 offers new configuration files and is not at all similar to the older version even in terms of how it looks. There are also major changes in the functionality of the new Grub. It displays the menu when the Shift key is held while, previously, the Esc key needed to be used if only a single Linux installation was found.
The configuration panel has got refurbished in the new avatar. The older menu.lst file in the /boot/grub folder no longer exists and has been replaced by a new grub.cfg file. The new config files are dynamic and depend on many modules for data. As a result the grub.cfg gets rewritten after the system update. Once the file gets updated, all the changes will be lost. To make static changes, Grub2 has introduced a new user-defined file called 40_custom, which is located at /etc/grub.d director. This file is independent of the modules, and the changes made will remain untouched irrespective of changes made to the grub.cfg file.
The noticeable change in Grub2 is perhaps a complete new nomenclature for the partitions. Grub2 now denotes the first partition as 1, unlike Grub, where the first partition was denoted by 0. However, the first hard disk device is still denoted by hd0, keeping the older device convention intact.
Directory layout
/boot/grub: Contains most of the configuration files and modules that are needed for the system to boot. The centralised config file grub.cfg resides in this folder.
/etc/grub.d: Contains most of the scripts and user defined files through which grub.cfg files are created. When the requisite commands are run, files and scripts within this folder are read to amend changes in the main configuration file, i.e., grub.cfg
/etc/defaults/grub: Contains the config files for menu settings that are further implemented in the grub.cfg file.
Note: It is not advisable to edit the grub.cfg file. There are multiple reasons for this, the most important one being if anything goes wrong, the chances of a boot failure are very high. Also, data in the grub.cfg file is dynamic and dependent on other config files. So it is advisable to edit the config files in the other directories upon which the grub.cfg files rely.
General configuration
Accompanying new config files, Grub2 now offers a completely new command line interface. With new commands used to manage Grub2, things can be cumbersome at times. To make things easier for new users, I will try to cover the general Grub2 commands that will come handy.
Updating Grub: The update-grub command lets you update Grub by rewriting grub.cfg file reading various system modules and configuration files. The command will ensure and enlist all the scripts and config files in the Grub2 directories.
Switching menu entries: Since it is not recommended to edit the grub.cfg file, lets edit the requisite source file in order to make changes. To make a boot entry default, edit /etc/default/grub. The Grub file under the /etc/default directory has many useful customisation parameters for editing menus.
To make an entry default, change the numerical value of the entry GRUB_DEFAULT=0 to whichever entry you wish to boot into automatically. Similarly, you can change the time-out seconds in the same file by editing the GRUB_TIMEOUT=10 value.
Recovering Grub 2: The most important aspect of configuring Grub is recovery. Most of the time, during the installation of some other operating system, Grub could get lost or replaced with some other boot loader. In that case, you have to re-install Grub. In order to do that, a bootable Linux medium with Grub2 as the main boot loader is required. Once booted into the live environment, open a terminal. As the root user, issue the following commands:
mount /dev/sdaXY /mnt
grub-install root-directory=/mnt /dev/hdZ
where /dev/sdaXY is the partition in which /boot of the system is installed, and /dev/hdZ is the hard disk number in which the /(root) partition resides.
Reinstalling Grub will restore and enlist all the entries and settings that you have previously applied. Once Grub is restored, the update-grub command will add newer operating system entries from the installed system.
General customisation options: Grub2 offers many customisation options. Most of the set-up files needed to tweak the default look and feel are available under the /etc/grub.d directory.
Working with Grub2
Working with Grub2 can be daunting given the number of changes it carries. So you first need to get acquainted with the newer terms and files needed for editing.
Note: The main configuration file grub.cfg is automatically generated; thus the changes made are temporary and tend to fade away with grub update. During Grub2 configuration the most important thing is to avoid making changes directly to the grub.cfg file.
Adding custom entries: Even though the detection mechanism is robust and efficient, there may be a scenario when Grub fails to add an entry or you want to add your own entry. For adding a custom entry in Grub2, you have to modify the file /etc/grub.d/40_custom. The format in which the entry should be written is as follows:
- menuentry name: This is the name that is shown in the Grub2 bootloader for selection.
- set root=(hdx, y): Defines the partition from where the boot files are loaded and booting has progressed, where X denotes the disk number and Y the partition number.
- linux /vmlinuz-xyz: Defines the path to the Linux image; add this if you are adding a Linux entry.
- initrd /initramfs.img: Defines the ramfs for the system, which is only needed if the system depends on initrd for booting. It is not required for Windows systems.
 Here is what our /etc/grub.d/40_custom looks like after making a user defined Grub entry:
# (1) OSFY_Linux
menuentry Open Source For You {
set root=(hd0,2)
linux /vmlinuz-linux root=/dev/sda2 ro nomodeset
initrd /initramfs-linux26.img
}
To append these changes in the main configuration file, run the grub update commands. Grub2 can be updated by using two commands. As root user, issue any of the following commands:
update-grub
mkconfig-grub o /boot/grub/grub.cfg
Booting an ISO with Grub2: With the Grub2 custom menu and entry wizard, booting an ISO directly from Grub2 has become much easier. There is no need to burn an optical disk when you have a nifty bootloader at your disposal. Booting an ISO is very much like adding an entry, the only difference is that rather than pointing to a kernel, you point to the ISO for booting. To boot an Ubuntu ISO, append the following statement in the /etc/grub.d/40_custom file:
menuentry ubuntu-11.04-desktop-amd64.iso" {
set isofile="/media/hd1/ubuntu-11.04-desktop-amd64.iso"
loopback loop (hd0,1)$isofile
linux (loop)/casper/vmlinuz boot=casper iso-scan/filename=$isofile quiet noeject noprompt splash --
initrd (loop)/casper/initrd.lz
}
Change the path of the ISO and replace the (hd0,1) where 0 is the disk number and 1 is the partition number.
Securing Grub2: Security was one of the key features underlying Grub2 development. Grub2 boasts of a highly secure system. To further aid security, you can define a password and allow users to boot into a specified OS. Grub2 is still in the active development stage, so settings can vary depending on how developers want to streamline things.
Grub2 offers multiple solutions for displaying Grub entries. A user can have both protected and unprotected entries in the Grub2 boot loader menu.
The Grub2 securing system takes a step forward by allowing you to select users and assign them different booting privileges. From a secure point of view Grub2 offers multiple users and Grub configuration files, making it more perplexing for users to tinker with the settings on their own.
To get started, let us initially set up users and passwords to configure security in Grub2. Open the /etc/grub.d/00_header and add the following commands to set up security based on authentication:
cat << EOF
set superusers=osfy
password osfy l1nux
EOF
The aforementioned statement creates a super-user with the name osfy and assigns the password l1nux to it.
Note: It is not necessary to have the same user name present in the current Linux system. You can have any ambiguous name to secure the Grub system, irrespective of its availability as a system user.
To set up multiple users, you can simply assign multiple users and passwords with the password field:
cat << EOF
set superusers=osfy
password osfy ll1nux
password linux ubUntU
EOF
The password mentioned above is in plain text and can be read by anyone with administrator privileges. For further security enhancements and fortifications, Grub allows encryption of the password using an inbuilt tool, namely, grub-mkpasswd_pbkdf2. Running the command will bring up a prompt asking you to enter the password. Once entered, it will generate an encrypted string. To use the generated string, replace it with the password in front of the user of choice in the /etc/grub.d/00_header:
cat << EOF set superusers=osfy password osfy grub.pbkdf2.sha512.10000.9FF12B1401811430D664B62473FE2CE19FA6B04563FE908ED7CF0462 E60CB06BD94320662BBC4D0 16609A4F613B2C45BEAE2C0BBB23944D4CBA205C3EA78E093.9047CDC6FE852574B9AEFBACD1275700557066ADA7EE307C98765E04E6997056D748BF21C369617B94BB2DD3C096FA541A5F4C19BDDDF4D731D3785A16409652 password linux ubUntU EOF
The string generated is too long and looks messy. Perhaps developers should fix the shortcomings of generating such long strings. Once you have got the user setting fixed, define which user should be able to boot or which entries should be secured.
To configure Grub2 further, you will have to edit /etc/grub.d/40_custom:
# (1) OSFY_Linux
menuentry Open Source For You users osfy
set root=(hd0,2)
linux /vmlinuz-linux root=/dev/sda2 ro nomodeset
initrd /initramfs-linux26.img
Simply append users <user_name> in front of menuentry and that segment will be secured. Make sure you enter a valid username; else it can result in boot failure.
Customising Grub2: The next step in managing Grub2 is to customise it. Unfortunately, Grub2 is not as customisable as the legacy Grub. Intuitive and fancy configuration options like Gfx Grub are missing at the time of writing, but might reappear in the near future. Grub2 offers some nifty cosmetic changes out-of-the-box, such as changing the Grub menu background and changing its colours.
To change the Grub background, copy a jpeg, png or tga format image in the /boot/grub folder. Once you have saved the file, open the configuration file /etc/defaults/grub with a text editor and add the following statement:
GRUB_BACKGROUND=/boot/grub/test.png
Replace test.png with the filename that you have saved. Append the changes to the main configuration file by updating Grub. Use one of the following commands as the super user:
update-grub grub-mkconfig o /boot/grub/grub.cfg
To change the menu colours, add the following command:
GRUB_COLOR_NORMAL=red/white GRUB_COLOR_HIGHLIGHT=black
To check the supported colour and gradients, please visit GNU Grub Theme Site: http://www.gnu.org/software/grub/manual/html_node/Theme-file-format.html#Theme-file-format
Third-party applications
A generalised modular architecture allows developers to release applications, making it easier for end users to edit and play around with Grub2. Currently, there are a number of applications available for editing Grub2. Here are three such applications.
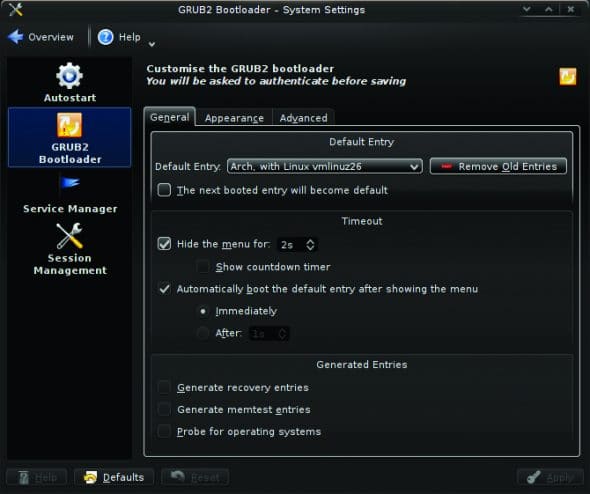
Grub2 boot loader editor: This is a KDE system add-on and graphics front-end for editing and customising Grub2. This software add-on lets you manage Grub2 entries, timeout seconds, manage default entries, and manage kernel parameters on-the-fly.
Grub2 boot loader editor lets you create and manage Grub2 Splashes with easy to follow steps. The best part is that with just a single click, you can even restore Grub2. The Grub2 boot loader editor is one handy tool for managing Grub2.
Grub2 KCM: Another KDE system settings add-on, Grub2 KCM offers a stripped down set-up wizard. Though not as fancy as the bootloader editor, Grub2 KCM allows you to manage and update basic functionality.
Start-up manager: Touted to be the most widely used Grub manager, this set-up tool is a full-fledged GUI application unlike the above two, which acts as an add-on to KDE systems settings. Start-up managers offer a large number of general configuration options and have the ability to manage more than just Grub2. This software has specifications for managing the legacy Grub, Grub2, Splashy and Uslpash. Unfortunately, development for this software has come to a halt.
Grub2 comes with a new and robust technology, and provides users with a more sophisticated environment to work with. The modular approach and a more streamlined customisation system are added advantages. Though still under heavy development, users can get the sources and use it.
With the halt in the legacy Grubs development, it is pretty clear that the future of the GNU bootloader is Grub2. But even though its ready for mainstream use, distro vendors have stuck to the legacy Grub. Right now, apart from Ubuntu and Fedora, Grub2 does not have many takers.


However, Grub2 is a positive step forward. With efficiency comes complexity, and that seems to be the case with the Grub2 set-up. Grub2 will sooner or later become the mainstream boot loader, so if you want to try out the top-of-the-line and most secure booting environment, do give it a try.
References
[1] Grub Home Page: http://www.gnu.org/software/grub/
[2] GNU Grub Theme Site: http://www.gnu.org/software/grub/manual/html_node/Theme-file-format.html#Theme-file-format


How To Set Your Photo in grub loader as background
Step By Step And Very easy
http://www.tricksuniversity.in/2015/07/how-to-change-ubuntu-boot-loader.html