You are spending a weekend at your cousin’s. Suddenly you feel like working on your Web project. You ask your cousin’s permission to use his computer. Unfortunately, you realise that the installed OS, Windows, lacks your favourite programs and tools! So how do you work? In times like this, a live-Linux USB flash drive can come to the rescue!
You can just plug in your USB drive, and boot into your favourite desktop environment — with all your vital programs like HTML editors and Web browsers customised for debugging; with all your project files and reference material ready and waiting for you. And you even have your favourite wallpaper on display! This is the concept behind Pocket Linux, which lets you backup your entire system onto your pen drive. You can store network configurations, bookmarks, wallpapers, theme settings, your “must-have” programs, and even other files that you need (including that Hendrix album that you can’t live without!).
Let me take you through my experience of creating a Lucid Linux bootable USB flash drive, which I use when I am on the move (it’s easier than carrying a laptop), or as a fallback option since I keep changing my laptop’s OS from Ubuntu to Fedora to Frugalware, and anything else that’s new.
Persistence file
So what is it that turns your flash drive into a portable hard disk with an OS installed? Well, it is the persistence file that stores your personal settings and installed programs on your flash drive. Ubuntu documentation of the live CD feature states that the use of a persistence image has a clear advantage over cloud computing, as it does not require a working Internet connection, and provides better privacy and security. After all, your pocket Linux always remains in your pocket!
Prerequisites
Here is a check-list of the things you need to collect, to create your very own personalised pocket penguin:
- A host system (your computer + your OS).
- A live USB creator tool.
- The ISO image file of the target distro.
- A USB flash drive with enough space to store the distro along with the other files you intend to carry around. The minimum recommended is 1 GB; if the idea is just to have your bookmarks, network settings and a few small files, then this is enough. But if you want to install loads of programs, and store project files, music and a lot more, 4-8GB or more would be a good idea. While using a flash drive as a live USB potentially reduces its life due to the large number of write operations, the ever-decreasing price of these storage devices nullifies such worries.
Host system specs
The most common question here would be, “Can I create this live USB thing from XXX distro?” Well, the simple answer to that would be “Yes!”. We can create a live USB drive from almost any OS, even Windows! You just need to install the required software (for your OS) that allows you to create the live USB.
Live USB creator tools
Choosing the right tool for the job can be trickier than expected. A small search with Google reveals quite a few software designed for just this job. To name a few:
- UNetBootin (works with both Linux and Windows)
- Portable Linux (mainly for Linux systems)
- DasBoot (designed for the Mac)
You can find an entire list of these in a Wikipedia article.
Both Ubuntu and Fedora have their own live USB creator tools — the problem with them is that they don’t recognise/use image files (ISOs) of other distros. On the other hand, with software like UNetBootin, you can create live copies of any distro, from any host OS. Portable Linux can be used for any distribution that uses Casper as its live CD technology.
However, all was not sunshine and roses — at least, not for me. I remember how I cursed on seeing a black screen with the painful message, “No root device found”. This happened when I tried to create a live USB for Fedora with UNetBootin, by downloading the image file separately (Fedora 13 was not in the list of distros UNetBootin supports by default). Human psychology made me blame Fedora — so I decided to try Ubuntu Lucid Lynx with UNetBootin, but got the same response from my computer.
Then I decided to try Portable Linux, which ended up shrinking my pen drive from 4 GB to 2 GB. I had to format my pen drive again to restore it to its original capacity. This was my experience; yours might be different — and hopefully, better.
Given these problems, I decided to stick to each distro’s built-in live USB creation utility. Ubuntu’s built-in Startup Disk Creator utility is accessible at System –> Administration –> Startup Disk Creator. For Fedora, you need to install the Fedora live USB creator with the following command:
yum install liveusb-creator |
After it’s installed, you can find the utility at Applications –> System Tools –> Fedora LiveUSB Creator.
Creating the live USB disk
With all the pieces in hand, it’s time for some action. Creating a USB start-up disk in Ubuntu is really simple and straightforward. The GUI tool saves having to type any commands, even if you’re a command-line-loving geek (I love to hear this adjective applied to me!). I have tested this particular tool on quite a few occasions, and it works every time. When you have a good, stable GUI application, the least you can do is use it. The procedure (though simple enough), and more, can be found here. We’ll step through it briefly, though.
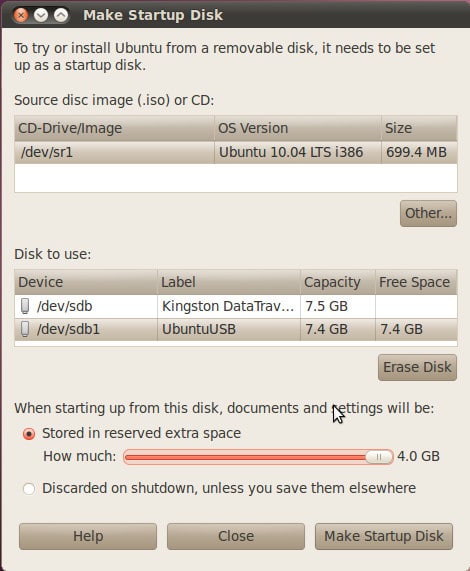
Plug in the emptied flash drive, and launch the Startup Disk Creator (see Figure 1). For Source disc image (.iso) or CD, choose the downloaded Ubuntu ISO file. (If you’re doing this from a live CD session, it will automatically detect the image file as the CD/DVD drive — else, you can click the “Other” tab and locate the image file on your system.)

For the “Disk to use” option, Ubuntu should automatically select your USB flash drive as the target. Next, we come to the third option, relating to persistence: “When starting up from this disk, documents and settings will be:
- Stored in reserved extra space.
- Discarded on shutdown.”
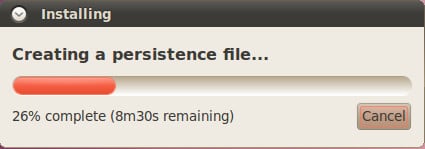
Of course, we select the first option, which enables a slider for the size of the persistence file. Make the file as large as you can, so you get the maximum storage space. Finally, click “Make Startup Disk” and let the utility copy files, create the persistence file with an ext3 filesystem, and install the bootloader to the drive. Figure 2 shows the stage at which the persistence file is being created.

I found the install process to be quite smooth, every time I tried it. The whole process takes about 15 to 20 minutes, depending on your computer’s specifications.
For Fedora users, the process is very similar, and you should not face any problems.
Using your pocket penguin
Now, your “pocket penguin” is ready for use! Plug it in to a computer, boot (or reboot) your machine, and choose (BIOS settings or boot menu) to boot from the USB device (I don’t know why I forget this every time!). Select the
“Try Live” option to boot into the live session. Whatever changes you make will be saved to the flash drive, including environment changes, wallpaper settings, Internet connection settings, software that you install, etc. When you shut down, all of it will be available in your next “Live” session. Enjoy!


