
Let’s explore the power and usability of Base, a database-management program included in the OpenOffice.org (OOo) suite. To get you familiar with Base, we will develop a small database to store the personal records of factory workers, along with the hours they worked.
Base is a powerful database management program that you can use even at your office, without spending a single penny. It supports a number of databases/formats, including MySQL, MS Access, Oracle JDBC, spreadsheets and DBase, besides its own native database format (HSQLDB). Structured Query Language (SQL) is also supported by Base.
OpenOffice.org should come preinstalled on most “desktop” Linux distributions nowadays. If it’s not, then look in your software package management program; you should be able to install it from there. If you are on Windows (like I am right now while composing this article — XP is what we need to use at work) you can download the latest version from the project website.
Our first Base database
A database can contain tables, queries, forms, reports and code. Data is stored in tables, as records, and queries can be used to retrieve the records. Forms are used to provide a user-friendly interface to data from tables or queries.
To create your first database, launch OpenOffice.org Base from your application menu. Select Create new database and click Next. In the next screen, select Register my database and click Finish. Name the database (I named mine “personal”) and click Save. After saving the database, a new screen will appear, as shown in Figure 1.
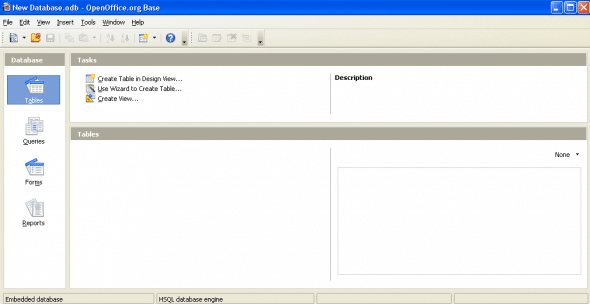
Here, as you can see, the window contains four icons, for Tables, Queries, Forms and Reports. First select Tables and click Create Table in Design View. This will open a new window in which you define the fields for the table. Your table will consist of the following fields, as shown in Figure 2:
| Name | Type | Purpose |
| empid | Integer [INTEGER] | Primary key |
| name | Text [VARCHAR] | |
| address | Memo [LONGVARCHAR] | |
| dob | Date [DATE] | Date of birth |
| photo | Text [VARCHAR |
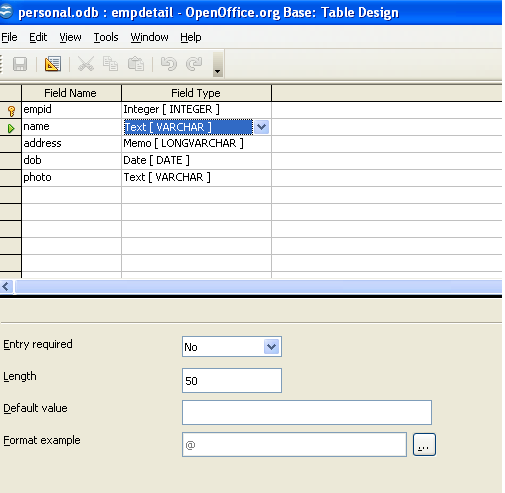
Here, VARCHAR are character-type fields with variable length, and INTEGER are numeric fields. Some fields require special explanation, such as address and photo. Since the address will contain more than one line, we use a memo-type field, LONGVARCHAR.
I want to have an employee photo, but not store the actual image in the database, since image fields consume too much memory, and tend to slow down the system. Therefore, the field named photo will store the path and file name of the photo image file. The path is not required if the photo is stored in the same directory as the database. In this case, I have stored the image files (PNG and JPG files) in a directory named base.
The field named empidis meant to have a unique number that will uniquely identify the record, and so will require some modification. First, in order to define this field as the primary key, right-click on the field and select Primary Key from the pop-up menu. Next, from the options at the bottom of the window, choose Auto increment, so that each record will have a unique number. Finally, your table structure will look like what’s shown in Figure 3.
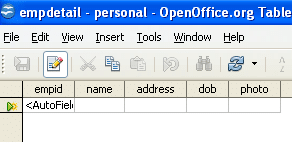
Save the table, naming it “empdetail”. If you click the Tables icon and then “personal” table, you will get a window like the one shown in Figure 3. You can enter data directly into the table in this data view, but this is not user-friendly or convenient. Instead, let’s create a form for data entry.
Creating a form
Click the Forms icon in the database window, and then click Use Wizard to Create Form. This will start the form wizard, as shown in Figure 4. The wizard has eight steps, as you can see in the left pane of the window in Figure 4, including Field Selection, Set up sub form, and ending with Set name.

First, select the “empdetail” table in the combo box; its fields will be listed in the Available Fields list box. Click the >> icon to add all the fields to the form, and click Next. When asked if you want to include a sub-form, ignore it and click Next. You will be presented with another screen, offering you a choice of how to arrange the controls. I have selected the second one.
Click Next through the rest of the steps, and finally you will get a form as shown in Figure 5. You can rearrange the fields by dragging and dropping, if you wish. I will keep the design as it is, except for the dob field, for which we will use a more sophisticated entry method.
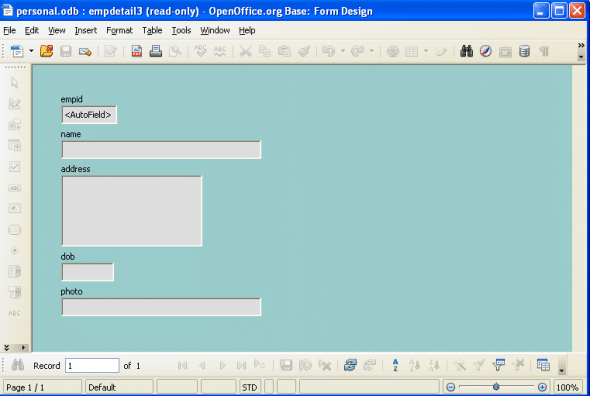
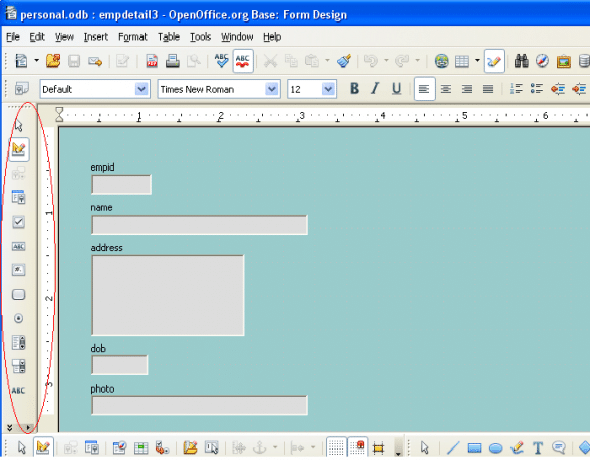
First, close the form, saving it with the name “empdetail”. Right-click the form and choose Edit, and it will be opened in design mode (Figure 6). Look at the tool box toolbar at the left side of the window (in a red ellipse in the figure). It provides different widgets that you can draw on the form. We will change the dob field’s widget from a textbox to a datefield, as shown in Figure 7.
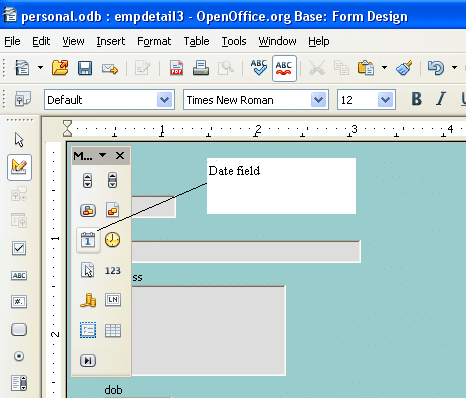
Click the More controls icon in the toolbox, and select the date-field. Click on the form, and draw the control by dragging the mouse pointer. To adjust the new widget to make data entry more user-friendly and include a drop-down calendar, double-click the date field, and you will get a Properties window, as shown in Figure 8.
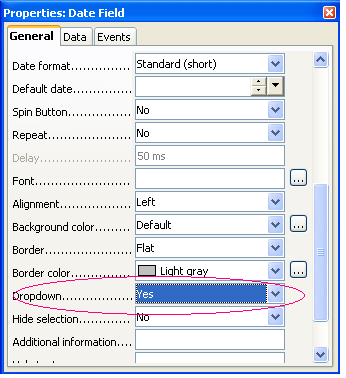
Select the General tab, and change the Dropdown property to Yes, as shown in Figure 8. Also set the Default date to 1/1/1960, to help in selecting the workers’ date of birth.
Next, choose the Data tab, and from the drop-down menu of the date, choose dob as the field. This will bind the dob field of our table to the new control on the form. We now almost have our final form for data entry. After making some ornamental adjustments, my form looks like what’s shown in Figure 9.

Save the form and reopen it by double clicking it. Observe that to enter the date, you just click the field for a drop-down calendar and choose the desired date. In the photo field, just enter the name of the corresponding image file (for example, riya.jpg, binay.jpg, etc).
So far, the form does not display the photograph; so let’s try to add that feature in a copy of this form. In the Forms view of the database, copy the “empdetails” form (Ctrl+C) and paste it (Ctrl+V); give it the name “empdetailsview”. Open this form in design view (right-click and choose Edit), and add an image field from the toolbox. Double-click the image field to open the Properties window. Select the Data tab, and choose the photo field from the drop-down menu. Save the form. The final result will be as shown in Figure 10.

Database relationships
Let’s suppose I want to record the working hours of our employees on different dates. I create a table named “hrsbooking” containing the following fields:
| Name of field | Type of field |
| id | Integer [INTEGER] |
| empid | Integer [INTEGER] |
| date | Date [DATE] |
| hrs | Integer [INTEGER] |
We need not define redundant fields like the name of the worker, address, and other details, because those are already stored in the “empdetails” table. Using the “empid” field that’s common to both tables, we can define a relationship between the two tables. For each employee (single row in the “empdetail” table), there can be, and probably will be, multiple records in the “hrsbooking” table. This is known as a one-to-many relationship. There are also one-to-one and many-to-many types of relationships.
For data entry into the “hrsbooking” table, let’s create a new form that combines both the “empdetail” and “hrsbooking” tables, related on the common field “empid”.
Launch the Form wizard. Select the “empdetail” table and add all its fields, as before. Click Next. This time, tick Add Subform, as shown in Figure 11.
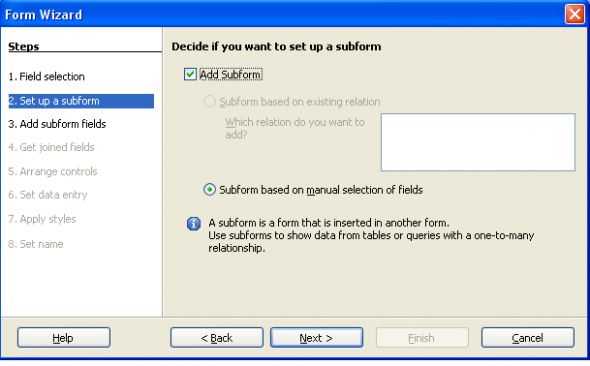
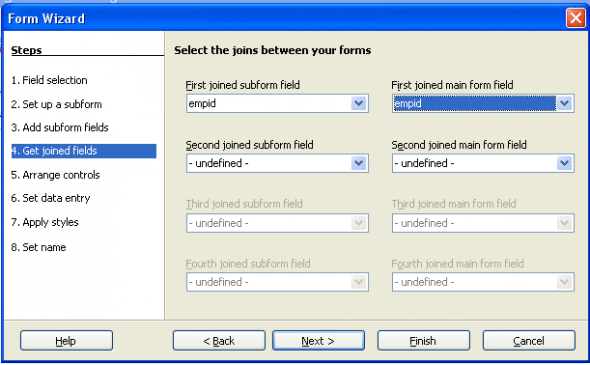
Select Subform based on manual selection and click Next. Select the sub-form table “hrsbooking”, and all its fields before clicking Next. To define the relationship, select “empid” from First joined subform field, and also in the First joined main form field drop-down and then click Next.
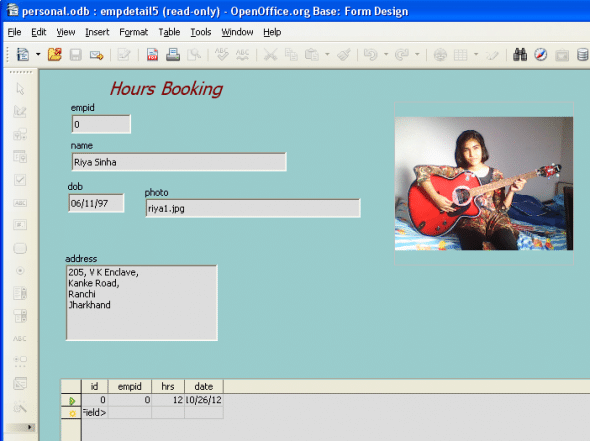
In the subsequent steps of the wizard, keep the default selection. Save the form as “formdetail5”. Open the form in Edit mode, and include an image field as earlier. Finally, you should have a form like what’s shown in Figure 13 (but with your own customisation). Enter some data into the “hrsbooking” table for some of your employees, to see how it works.
Queries
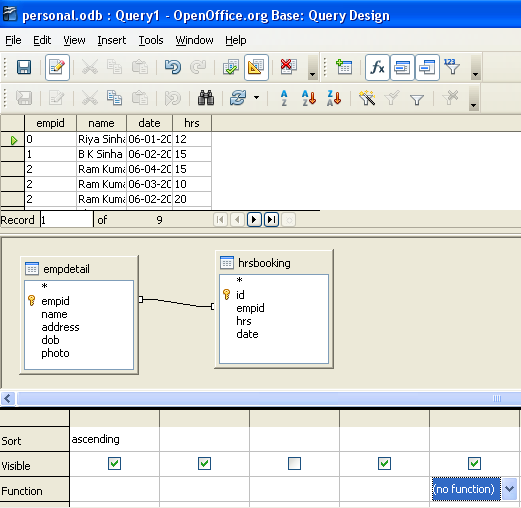
Queries are used to view records, possibly filtering data, restricting the fields displayed, and/or retrieving a combined set of data from multiple tables. We will design a simple query to list all the names of the workers, along with the hours worked by them. Click the Queries icon in the database window, and then Create query in design view. This will open a Query Design window, as shown in Figure 14.

In the Add Table or Query window, in turn, double-click the “empdetail” and “hrsbooking” tables to add them to the query. Click the “empid” field of “empdetail” and drag it to the “empid” field of “hrsbooking” to set up a one-to-many join between the two tables. Now select the fields that you want to view (tick the Visible checkbox for each) and click the Run query icon. You should see results similar to Figure 15.
The beauty of using queries is that forms can also use a query instead of a table as the data source for the form. There are a number of different possibilities in designing queries.


Thank you for this… I as actually wondering where to start