With the evolution of embedded systems, porting has become extremely important. Whenever you have new hardware at hand, the first and the most critical thing to be done is porting. For hobbyists, what has made this even more interesting is the open source nature of the Linux kernel. So, lets dive into porting and understand the nitty-gritty of it.
Porting means making something work on an environment it is not designed for. Embedded Linux porting means making Linux work on an embedded platform, for which it was not designed. Porting is a broader term and when I say embedded Linux porting, it not only involves Linux kernel porting, but also porting a first stage bootloader, a second stage bootloader and, last but not the least, the applications. Porting differs from development. Usually, porting doesn’t involve as much of coding as in development. This means that there is already some code available and it only needs to be fine-tuned to the desired target. There may be a need to change a few lines here and there, before it is up and running. But, the key thing to know is, what needs to be changed and where.
What Linux kernel porting involves
Linux kernel porting involves two things at a higher level: architecture porting and board porting. Architecture, in Linux terminology, refers to CPU. So, architecture porting means adapting the Linux kernel to the target CPU, which may be ARM, Power PC, MIPS, and so on. In addition to this, SOC porting can also be considered as part of architecture porting. As far as the Linux kernel is concerned, most of the times, you don’t need to port it for architecture as this would already be supported in Linux. However, you still need to port Linux for the board and this is where the major focus lies. Architecture porting entails porting of initial start-up code, interrupt service routines, dispatcher routine, timer routine, memory management, and so on. Whereas board porting involves writing custom drivers and initialisation code for devices specific to the board.
Building a Linux kernel for the target platform
Kernel building is a two-step process: first, the kernel needs to be configured for the target platform. There are many ways to configure the kernel, based on the preferred configuration interface. Given below are some of the common methods.
To run the text-based configuration, execute the following command:
$ make config |
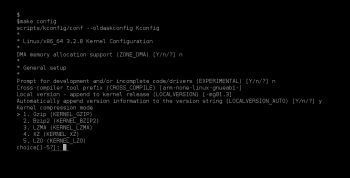
This will show the configuration options on the console as seen in Figure 1. It is a little cumbersome to configure the kernel with this, as it prompts every configuration option, in order, and doesn’t allow the reversion of changes.
To run the menu-driven configuration, execute the following command:
$ make menuconfig |
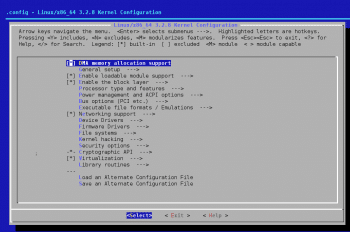
This will show the menu options for configuring the kernel, as seen in Figure 2. This requires the ncurses library to be installed on the system. This is the most popular interface used to configure the kernel.
To run the window-based configuration, execute the following command:
$ make xconfig |
This allows configuration using the mouse. It requires QT to be installed on the system.
For details on other options, execute the following command in the kernel top directory:
$ make help |
Once the kernel is configured, the next step is to build the kernel with the make command. A few commonly used commands are given below:
$ make vmlinux - Builds the bare kernel$ make modules - Builds the modules$ make modules_prepare Sets up the kernel for building the modules external to kernel. |
If the above commands are executed as stated, the kernel will be configured and compiled for the host system, which is generally the x86 platform. But, for porting, the intention is to configure and build the kernel for the target platform, which in turn, requires configuration of makefile. Two things that need to be changed in the makefile are given below:
ARCH=<architecture>CROSS-COMPILE = <toolchain prefix> |
The first line defines the architecture the kernel needs to be built for, and the second line defines the cross compilation toolchain prefix. So, if the architecture is ARM and the toolchain is say, from CodeSourcery, then it would be:
ARCH=armCROSS_COMPILE=arm-none-linux-gnueabi- |
Optionally, make can be invoked as shown below:
$ make ARCH=arm menuconfig - For configuring the kernel$ make ARCH=arm CROSS_COMPILE=arm-none-linux-gnueabi- - For compiling the kernel |
The kernel image generated after the compilation is usually vmlinux, which is in ELF format. This image can’t be used directly with embedded system bootloaders such as u-boot. So convert it into the format suitable for a second stage bootloader. Conversion is a two-step process and is done with the following commands:
arm-none-linux-gnueabi-objcopy -O binary vmlinux vmlinux.binmkimage -A arm -O linux -T kernel -C none -a 0x80008000 -e 0x80008000 -n linux-3.2.8 -d vmlinux.bin uImage-A ==> set architecture-O ==> set operating system-T ==> set image type-C ==> set compression type-a ==> set load address (hex)-e ==> set entry point (hex)-n ==> set image name-d ==> use image data from file |
The first command converts the ELF into a raw binary. This binary is then passed to mkimage, which is a utility to generate the u-boot specific kernel image. mkimage is the utility provided by u-boot. The generated kernel image is named uImage.
The Linux kernel build system
One of the beautiful things about the Linux kernel is that it is highly configurable and the same code base can be used for a variety of applications, ranging from high end servers to tiny embedded devices. And the infrastructure, which plays an important role in achieving this in an efficient manner, is the kernel build system, also known as kbuild. The kernel build system has two main components makefile and Kconfig.
Makefile: Every sub-directory has its own makefile, which is used to compile the files in that directory and generate the object code out of that. The top level makefile percolates recursively into its sub-directories and invokes the corresponding makefile to build the modules and finally, the Linux kernel image. The makefile builds only the files for which the configuration option is enabled through the configuration tool.
Kconfig: As with the makefile, every sub-directory has a Kconfig file. Kconfig is in configuration language and Kconfig files located inside each sub-directory are the programs. Kconfig contains the entries, which are read by configuration targets such as make menuconfig to show a menu-like structure.
So we have covered makefile and Kconfig and at present they seem to be pretty much disconnected. For kbuild to work properly, there has to be some link between the Kconfig and makefile. And that link is nothing but the configuration symbols, which generally have a prefix CONFIG_. These symbols are generated by a configuration target such as menuconfig, based on entries defined in the Kconfig file. And based on what the user has selected in the menu, these symbols can have the values y’, n’, or m’.
Now, as most of us are aware, Linux supports hot plugging of the drivers, which means, we can dynamically add and remove the drivers from the running kernel. The drivers which can be added/removed dynamically are known as modules. However, drivers that are part of the kernel image can’t be removed dynamically. So, there are two ways to have a driver in the kernel. One is to build it as a part of the kernel, and the other is to build it separately as a module for hot-plugging. The value y’ for CONFIG_, means the corresponding driver will be part of the kernel image; the value m’ means it will be built as a module and value n’ means it won’t be built at all. Where are these values stored? There is a file called .config in the top level directory, which holds these values. So, the .config file is the output of the configuration target such as menuconfig.
Where are these symbols used? In makefile, as shown below:
obj-$(CONFIG_MYDRIVER) += my_driver.o |
So, if CONFIG_MYDRIVER is set to value y’, the driver my_driver.c will be built as part of the kernel image and if set to value m’, it will be built as a module with the extension .ko. And, for value n’, it won’t be compiled at all.
As you now know a little more about kbuild, lets consider adding a simple character driver to the kernel tree.
The first step is to write a driver and place it at the correct location. I have a file named my_driver.c. Since its a character driver, I will prefer adding it at the drivers/char/ sub-directory. So copy this at the location drivers/char in the kernel.
The next step is to add a configuration entry in the drivers/char/Kconfig file. Each entry can be of type bool, tristate, int, string or hex. bool means that the configuration symbol can have the values y’ or n’, while tristate means it can have values y’, m’ or n’. And int’, string’ and hex’ mean that the value can be an integer, string or hexadecimal, respectively. Given below is the segment of code added in drivers/char/Kconfig:
config MY_DRIVERtristate "Demo for My Driver"default mhelpAdding this small driver to kernel fordemonstrating the kbuild |
The first line defines the configuration symbol. The second specifies the type for the symbol and the text which will be shown as the menu. The third specifies the default value for this symbol and the last two lines are for the help message. Another thing that you will generally find in a Kconfig file is depends on’. This is very useful when you want to select the particular feature, only if its dependency is selected. For example, if we are writing a driver for i2c EEPROM, then the menu option for the driver should appear only if the 2c driver is selected. This can be achieved with the depends on’ entry.
After saving the above changes in Kconfig, execute the following command:
$ make menuconfig |
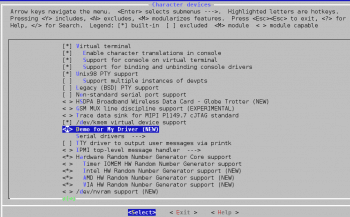
Now, navigate to Device Drivers->Character devices and you will see an entry for My Driver.
By default, it is supposed to be built as a module. Once you are done with configuration, exit the menu and save the configuration. This saves the configuration in .config file. Now, open the .config file, and there will be an entry as shown below:
CONFIG_MY_DRIVER=m |
Here, the driver is configured to be built as a module. Also, one thing worth noting is that the symbol MY_DRIVER’ in Kconfig is prefixed with CONFIG_.
Now, just adding an entry in the Kconfig file and configuration alone won’t compile the driver. There has to be the corresponding change in makefile as well. So, add the following line to makefile:
obj-$(CONFIG_MYDRIVER) += my_driver.o |
After the kernel is compiled, the module my_driver.ko will be placed at drivers/char/. This module can be inserted in the kernel with the following command:
$ insmod my_driver.ko |
Aren’t these configuration symbols needed in the C code? Yes, or else how will the conditional compilation be taken care of? How are these symbols included in C code? During the kernel compilation, the Kconfig and .config files are read, and are used to generate the C header file named autoconf.h. This is placed at include/generated and contains the #defines for the configuration symbols. These symbols are used by the C code to conditionally compile the required code.
Now, lets suppose I have configured the kernel and that it works fine with this configuration. And, if I make some new changes in the kernel configuration, the earlier ones will be overwritten. In order to avoid this from happening, we can save .config file in the arch/arm/configs directory with a name like my_config, for instance. And next time, we can execute the following command to configure the kernel with older options:
$ make my_config_defconfig |
Linux Support Packages (LSP)/Board Support Packages (BSP)
One of the most important and probably the most challenging thing in porting is the development of Board Support Packages (BSP). BSP development is a one-time effort during the product development lifecycle and, obviously, the most critical. As we have discussed, porting involves architecture porting and board porting. Board porting involves board-specific initialisation code that includes initialisation of the various interfaces such as memory, peripherals such as serial, and i2c, which in turn, involves the driver porting.
There are two categories of drivers. One is the standard device driver such as the i2c driver and block driver located at the standard directory location. Another is the custom interface or device driver, which includes the board-specific custom code and needs to be specifically brought in with the kernel. And this collection of board-specific initialisation and custom code is referred to as a Board Support Package or, in Linux terminology, a LSP. In simple words, whatever software code you require (which is specific to the target platform) to boot up the target with the operating system can be called LSP.
Components of LSP
As the name itself suggests, BSP is dependent on the things that are specific to the target board. So, it consists of the code which is specific to that particular board, and it applies only to that board. The usual list includes Interrupt Request Numbers (IRQ), which are dependent on how the various devices are connected on the board. Also, some boards have an audio codec and you need to have a driver for that codec. Likewise, there would be switch interfaces, a matrix keypad, external eeprom, and so on.
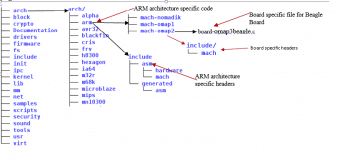
LSP placement
LSP is placed under a specific <arch> folder of the kernel’s arch folder. For example, architecture-specific code for ARM resides in the arch/arm directory. This is about the code, but you also need the headers which are placed under arch/arm/include/asm. However, board-specific code is placed at arch/arm/mach-<board_name> and corresponding headers are placed at arch/arm/mach-<soc architecture>/include. For example, LSP for Beagle Board is placed at arch/arm/mach-omap2/board-omap3beagle.c and corresponding headers are placed at arch/arm/mach-omap2/include/mach/. This is shown in figure 4.
Machine ID
Every board in the kernel is identified by a machine ID. This helps the kernel maintainers to manage the boards based on ARM architecture in the source tree. This ID is passed to the kernel from the second stage bootloader such as u-boot. For the kernel to boot properly, there has to be a match between the kernel and the second stage boot loader. This information is available in arch/arm/tools/mach-types and is used to generate the file linux/include/generated/mach-types.h. The macros defined by mach-types.h are used by the rest of the kernel code. For example, the machine ID for Beagle Board is 1546, and this is the number which the second stage bootloader passes to the kernel. For registering the new board for ARM, provide the board details at http://www.arm.linux.org.uk/developer/machines/?action=new.
Note: The porting concepts described over here are specific to boards based on the ARM platform and may differ for other architectures.
MACHINE_START macro
One of the steps involved in kernel porting is to define the initialisation functions for the various interfaces on the board, such as serial, Ethernet, Gpio, etc. Once these functions are defined, they need to be linked with the kernel so that it can invoke them during boot-up. For this, the kernel provides the macro MACHINE_START. Typically, a MACHINE_START macro looks like whats shown below:
MACHINE_START(MY_BOARD, "My Board for Demo").atag_offset = 0x100,.init_early = my_board_early,.init_irq = my_board_irq,.init_machine = my_board_init,MACHINE_END |
Let’s understand this macro. MY_BOARD is machine ID defined in arch/arm/tools/mach-types. The second parameter to the macro is a string describing the board. The next few lines specify the various initialisation functions, which the kernel has to invoke during boot-up. These include the following:
.atag_offset: Defines the offset in RAM, where the boot parameters will be placed. These parameters are passed from the second stage bootloader, such as u-boot.
my_board_early: Calls the SOC initialisation functions. This function will be defined by the SOC vendor, if the kernel is ported for it.
my_board_irq: Intialisation related to interrupts is done over here.
my_board_init: All the board-specific initialisation is done here. This function should be defined during the board porting. This includes things such as setting up the pin multiplexing, initialisation of the serial console, initialisation of RAM, initialisation of Ethernet, USB and so on.
MACHINE_END ends the macro. This macro is defined in arch/arm/include/asm/mach/arch.h.
How to begin with porting
The most common and recommended way to begin with porting is to start with some reference board, which closely resembles yours. So, if you are porting for a board based on OMAP3 architecture, take Beagle Board as a reference. Also, for porting, you should understand the system very well. Depending on the features available on your board, configure the kernel accordingly. To start with, just enable the minimal set of features required to boot the kernel. This may include but not be limited to initialisation of RAM, Gpio subsystems, serial interfaces, and filesystems drivers for mounting the root filesystem. Once the kernel boots up with the minimal configuration, start adding the new features, as required.
So, lets summarise the steps involved in porting:
1. The first step is to register the machine with the kernel maintainer and get the unique ID for your board. While this is not necessary to begin with porting, it needs to be done eventually, if patches are to be submitted to the mainline. Place the machine ID in arch/arm/tools/mach-types.
2. Create the board-specific file board-<board_name>’ at arch/arm/mach-<soc> and define the MACHINE_START for the new board. For example, the board-specific file for the Panda Board resides at arch/arm/mach-omap2/board-omap4panda.c.
3. Update the Kconfig file at arch/arm/mach_<soc> to add an entry for the new board as shown below:
config MACH_MY_BOARDbool My Board for Demodepends on ARCH_OMAP3default y |
4. Update the corresponding makefile, so that the board-specific file gets compiled. This is shown below:
obj-$(CONFIG_MACH_MY_BOARD) += board-my_board.o |
5. Create a default configuration file for the new board. To begin with, take any .config file as a starting point and customise it for the new board. Place the working .config file at arch/arm/configs/my_board_defconfig.





Informative. Thumbs up :)
Hi,
I am a beginner in kernel porting. I am trying to port
Linux kernel (version- 4.9.22) on Custom SoC (cpu = arm1176jzfs based)
for custom evaluation Board. I am having ARM Prime cell pl011
UART in my SoC. And it is physically mapped to 0x5800_1000 address.
While i am trying to use it as Debug UART, kernel is asking for its
virtual Address. How should i configure this option.
i.e:
-> Kernel low-level debugging functions
-> kernel low-level debugging port (Kernel low-level debugging on via ARM Ltd PL01x Primecell UART)
(0x58001000) Physical base address of debug UART
(??) Virtual base address of debug UART
Thanks,
Vivek T.