

Carrying out container acceptance testing early saves precious time, money and the cloud service provider’s reputation, and avoids hard-to-fix infra downtimes. Container Structure Tests have been designed for this purpose.
Misconfiguration has been a major problem in the IT world for a long time. It gives birth to a disconnect between software versions, configs, processes, etc, while taking software from development to production. Who can forget the painful meetings wondering where things went wrong, and doing some patchwork to make the software work? In fact, software misconfiguration was found to be the root cause for many recent public cloud outages even for tech giants like Amazon, Google and Microsoft. So how do we address this issue?
Containers have largely replaced running native applications directly on modern cloud infrastructure. But these present a few challenges at runtime. The container images are expected to have a minimal footprint to launch and run containerised applications dynamically and properly. Acceptance testing becomes very important in the case of containers, as software version and configuration disconnects can be a headache. Unfortunately, I have witnessed even industry folks creating containers using images without any standards and then suffering major outages due to their unstable lifecycle.
The good news is that we have some great free and open source tools that can enhance the quality of code for our container workloads. We’ll explore these tools for acceptance testing of containers that run independently in Docker Compose stack and Kubernetes mechanisms, respectively. I have tested everything on my Ubuntu 18.04 LTS on an AMD64 laptop and the latest Raspberry PI OS on RPI4, respectively. But the code examples should run on any modern GNU/Linux based machine able to run on a Docker engine.
Structural acceptance testing for containers with CST
How do you verify a server configured to run a single service or a set of services? You get into the server and run a set of commands to verify the required packages are installed with proper versions; you check their configuration files have correct values, the required services are configured to start automatically, those services are running and listening on the configured ports, etc. You can add tests for acceptance testing to cover more possibilities of misconfigurations, e.g., the required disk space, partitions and their file systems, required amount of RAM, leftover large artifacts not required, etc. So, you are asking your server a set of questions and expecting the correct answers as per the specifications required to run a correctly configured server. The modern automated way to do this is that you bake all the necessary acceptance tests in your server, and the server gives you a report on demand about which tests have been passed or failed.
The lifecycle of Docker containers starts with creating an image that packs in all the necessary artifacts. So our first acceptance testing tool is based on the structure of the image, verifying all the required (and must be absent) artifacts and the properties of the artifacts packed in. You can also call it static testing, as it’s the image build time verification rather than the runtime verification. Our tool of choice, the Container Structure Tests (CST), is all about verifying container images to ensure that these consist of only working artifacts; this will save us from the runtime blues. Let’s quickly see this in action by creating a Docker image with the command:
docker build --no-cache --progress plain . -f Dockerfile_CSTestPrblm -t cstestprblm:1.19.3
You will need to create the dockerfile shown below before running the command:
--- Start of Dockerfile_CSTestPrblm ---

ARG ALPINEVER=3.20

FROM alpine:${ALPINEVER}

LABEL “com.richnusgeeks.vendor”=”richnusgeeks”

LABEL “com.richnusgeeks.category”=”utility”

LABEL version=”1.19.3”

LABEL description=”docker based testing driver for container structure test”

ARG CSTVER=1.19.3

SHELL [“/bin/ash”, “-x”, “-o”, “pipefail”, “-c”]

WORKDIR /tmp

RUN apk add --no-cache --virtual .dwnld-deps ca-certificates curl \

&& apk add --no-cache bash \

&& if [[ $(uname -m) == ‘aarch64’ ]];then CSTPLT=arm64;else CSTPLT=amd64;fi \

&& curl -sSL -o /usr/local/bin/cstest “https://github.com/GoogleContainerTools/container-structure-test/releases/download/v${CSTVER}/container-structure-test-$(uname|tr A-Z a-z)-${CSTPLT}” \

&& chmod +x /usr/local/bin/cstest \

&& mkdir -p /etc/cstest \

&& if [[ “${CSTPLT}” == ‘arm64’ ]];then CSTPLT=aarch64;else CSTPLT=’x86_64’;fi \

&& curl -sSL -o /tmp/docker.tgz “https://download.docker.com/linux/static/stable/${CSTPLT}/$(curl -sSkL https://download.docker.com/linux/static/stable/${CSTPLT}/|grep ‘^ *<a’|grep docker|grep -v rootless|awk -F ‘\”’ ‘{print $2}’|sort -nr|head -1)” \

&& tar zxvf docker.tgz

WORKDIR /etc/cstest

ENTRYPOINT [“cstest”]

CMD [“-h”]

--- End of Dockerfile_CSTestPrblm ---
Now let’s create the test cases file shown below to feed to the CST:
config.yaml

schemaVersion: 2.0.0

commandTests:

- name: “dump cstest version”

command: “/usr/local/bin/cstest”

args: [“version”]

expectedOutput: [“1.1[6-9].[0-9]”]

fileExistenceTests:

- name: “downloaded docker.tgz absence in /tmp”

path: “/tmp/docker.tgz”

shouldExist: false

- name: “extracted docker folder absence in /tmp”

path: “/tmp/docker”

shouldExist: false

- name: “curl absence in /usr/bin”

path: “/usr/bin/curl”

shouldExist: false

- name: “ca-certificates absence in /etc”

path: “/etc/ca-certificates”

shouldExist: false

- name: “cstest absence in /sbin”

path: “/sbin/container-structure-test”

shouldExist: false

- name: “cstest absence in /bin”

path: “/bin/container-structure-test”

shouldExist: false

metadataTest:

labels:

- key: ‘com.richnusgeeks.vendor’

value: ‘richnusgeeks’

exposedPorts: []

volumes: []

entrypoint: [“cstest”]

cmd: [“-h”]

workdir: “/etc/cstest”
Finally, let’s trigger a static test run to verify the structure of the already created Docker image through a command in your terminal:
docker run -it --rm -v ${PWD}:/etc/cstest:ro -v /var/run/docker.sock:/var/run/docker.sock:ro ghcr.io/googlecontainertools/container-structure-test:1.19.3 test -c /etc/cstest/config.yaml -i cstestprblm:1.19.3
The output of the command is shown in Figure 1, clearly indicating which test cases have passed or failed against our desired structure of the Docker image.
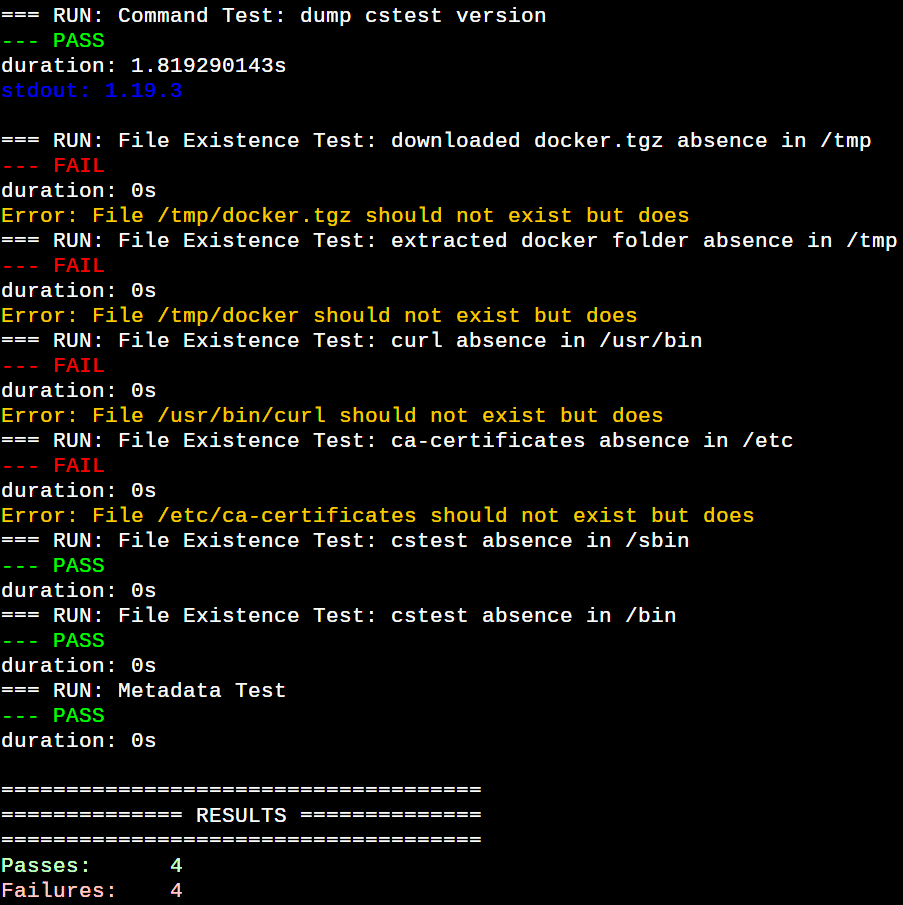
Now, let’s decipher everything line by line. The config.yaml is a CST configuration file setting baseline test cases to vet a container image against it. We verify that the CST command packed in the image runs properly and is of a particular version that matches a regular expression under the commandTests section. Command tests ensure that certain commands run properly in the target image. Regexes can be used to check for expected or excluded strings in both stdout and stderr. The fileExistenceTests section ensures that desired files and/or directories are present and/or absent in a container image. The Metadata test ensures the container is configured correctly. The CST also provides file content tests to open a file in the container image system and check its contents. All these checks are optional and you can choose your tests based on your needs. All the tests provided by CST have their property fields to finetune the tests. Please go through the CST GitHub documentation to explore these test fields.
Let’s fix the structure of our problematic Docker image by creating Dockerfile_CSTestFxd as per the diff shown below:
21c21,24

< && tar zxvf docker.tgz

---

> && tar zxvf docker.tgz \

> && mv docker/docker /usr/local/bin \

> && rm -rfv docker docker.tgz \

> && apk del .dwnld-deps
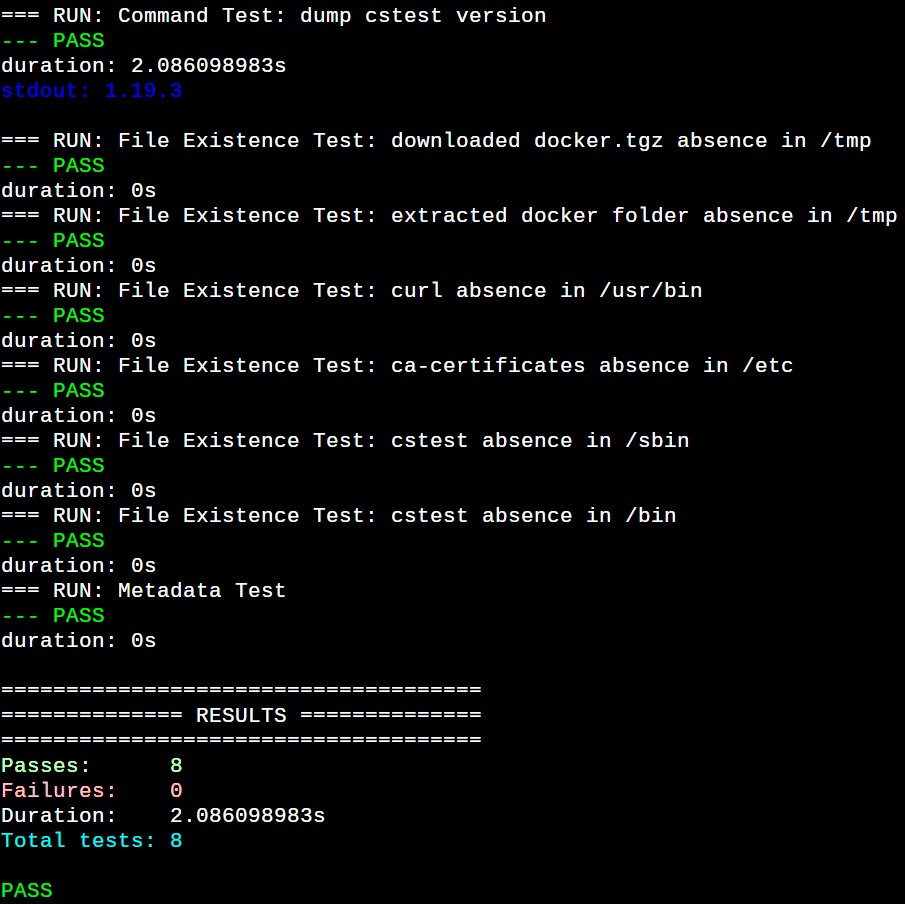
Execute the command docker build –no-cache –progress plain . -f Dockerfile_CSTestFxd -t cstestfxd:1.19.3 in your terminal to build a new, structurally corrected Docker image.
The command docker run -it –rm -v ${PWD}:/etc/cstest:ro -v /var/run/docker.sock:/var/run/docker.sock:ro ghcr.io/googlecontainertools/container-structure-test:1.19.3 test -c /etc/cstest/config.yaml -i cstestfxd:1.19.3 triggers another static test run to verify the structure of the corrected image. Voila! All the structural tests are passing now against the corrected image, as shown in Figure 2.
Now you have enough working knowledge to make CST part of your acceptance testing pipeline. The CST GitHub README is a great place to explore this amazing framework.
Runtime acceptance testing for containers with dgoss
GOlang based Server Spec is a lightweight, no dependencies, FOSS solution you can bake into your servers to achieve the much-needed machine level acceptance testing. It’s a golang static binary (macOS and Windows binaries are in alpha, currently). So put it in your servers, define your acceptance tests in their respective YAML files, feed those to the running goss, and that’s it! The goss configuration is built around a set of resources and their properties creating a set of test criteria. The goss run checks the current state of those resources in your running machine and declares them passed (or green) or failed (or red), accordingly. The default test configuration file is goss.yaml but that could be changed using the -g global option, as we have done in our case. The goss requires an action argument which is v (or validate) in our case. Typing only goss on the command line dumps all the possible actions as well as various global options. Every goss action can take a set of options, which is dumped when you suffix that with the -h (or –help) option. The -f (or –format) option to validate dumps the test report in various formats including documentation, json, junit, nagios, etc. There is also a silent format which doesn’t dump anything but only indicates overall tests passed or failed when accessed through the last command status with the shell variable $?. You can use environment variables also to set various options.
Just to give you a taste of this, the example given below is a goss config to verify a GNU/Linux based test server that has at least working ssh login functionality, root formatted with a particular filesystem and not filled up beyond 90%, and Docker engine components properly set up and running. The goss test run verifies our needs versus reality in a report form to catch the misconfiguration early.
--- example goss.yaml ---

kernel-param:

kernel.ostype:

value: Linux

mount:

/:

exists: true

filesystem: overlay

usage:

lt: 90

port:

tcp:22:

listening: true

ip:

- 0.0.0.0

tcp6:22:

listening: true

ip:

- ‘::’

user:

sshd:

exists: true

package:

docker-ce:

installed: true

service:kernel-param:

kernel.ostype:

value: Linux

mount:

/:

exists: true

filesystem: overlay

usage:

lt: 90

port:

sshd:

enabled: true

running: true

docker:

enabled: true

running: true

process:

sshd:

running: true

containerd:

running: true

dns:

localhost:

resolvable: true

addrs:

consist-of: [“127.0.0.1”,”::1”]

timeout: 500 # in milliseconds
Goss provides more resources than we saw in our basic example above, to build tests covering almost every aspect of a modern running machine. You can browse through the link provided in the References section at the end of the article to know about all the tests currently provided by it. You don’t always need to create the goss test configuration from scratch. You can use the add command to append a test for a resource. If the mentioned resources are absent on your machine, the added tests ensure they do not exist on the system. It’s recommended you use the add command on a fully configured system matching your desired end state. Otherwise, you could tweak the resource properties in the generated test configuration as per your need. There is also an autoadd command to automatically add many, but not all, existing resources in your server matching the provided argument. Do go through the goss documentation and try these commands.
The dgoss is a shell wrapper over goss to use its capabilities, with a few extra functionalities to create acceptance as code gate in your container image build and release pipelines. The usual way to run dgoss is to download it (and goss, if not already in your test system) and then launch it with your goss test configurations. But we’ll use it through a Docker driver image to run it containerised without downloading anything.
First, let’s create a dgoss driver image with all the necessary artifacts in it. Execute the command docker build –no-cache –progress plain . -f Dockerfile_DGossDriver -t dgoss:0.4.9 in your terminal in a working directory, where the dockerfile shown below and goss.yaml are located to create the dgoss driver image:
--- goss.yaml ---

port:

tcp:22:

listening: true

ip:

- 0.0.0.0

tcp6:22:

listening: true

ip:

- ‘::’

user:

sshd:

exists: true

uid: 101

gid: 65534

groups:

- nogroup

home: /run/sshd

shell: /usr/sbin/nologin

process:

sshd:

running: true

--- Dockerfile_DGossDriver ---

ARG ALPINEVER=3.20

FROM alpine:${ALPINEVER}

LABEL “com.richnusgeeks.vendor”=”richnusgeeks”

LABEL version=”0.4.9”

LABEL description=”dgoss test driver docker image”

ARG GOSS_VERSION=0.4.9

SHELL [“/bin/ash”, “-x”, “-o”, “pipefail”, “-c”]

WORKDIR /tmp

RUN apk add --no-cache --virtual .dwnld-deps ca-certificates curl \

&& apk add --no-cache bash \

&& if [[ $(uname -m) == ‘aarch64’ ]];then DGSPLT=arm64;else DGSPLT=amd64;fi \

&& curl -sSL “https://github.com/goss-org/goss/releases/download/v${GOSS_VERSION}/goss-$(uname|tr A-Z a-z)-${DGSPLT}” -o /usr/local/bin/goss \

&& curl -sSL “https://github.com/goss-org/goss/releases/download/v${GOSS_VERSION}/dgoss” -o /usr/local/bin/dgoss \

&& chmod +x /usr/local/bin/*goss \

&& mkdir -p /etc/goss \

&& if [[ “${DGSPLT}” == ‘arm64’ ]];then DGSPLT=aarch64;else DGSPLT=’x86_64’;fi \

&& curl -sSL -o /tmp/docker.tgz “https://download.docker.com/linux/static/stable/${DGSPLT}/$(curl -sSkL https://download.docker.com/linux/static/stable/${DGSPLT}/|grep ‘^ *<a’|grep docker|grep -v rootless|awk -F ‘\”’ ‘{print $2}’|sort -nr|head -1)” \

&& tar zxf docker.tgz \

&& mv docker/docker /usr/local/bin \

&& rm -rf docker docker.tgz \

&& apk del .dwnld-deps

WORKDIR /etc/goss/

CMD [“dgoss”, “-h”]
Now, let’s see dgoss in action by running the following command in your terminal:
docker run -it --rm -v ${PWD}/:/etc/goss:ro -v /var/run/docker.sock:/var/run/docker.sock:ro -e GOSS_SLEEP=2 -e GOSS_FILES_STRATEGY=cp -e GOSS_OPTS=’--color -format tap’ dgoss:0.4.9 dgoss run dgoss:0.4.9 sleep infinity.
You should see the output shown in Figure 3.
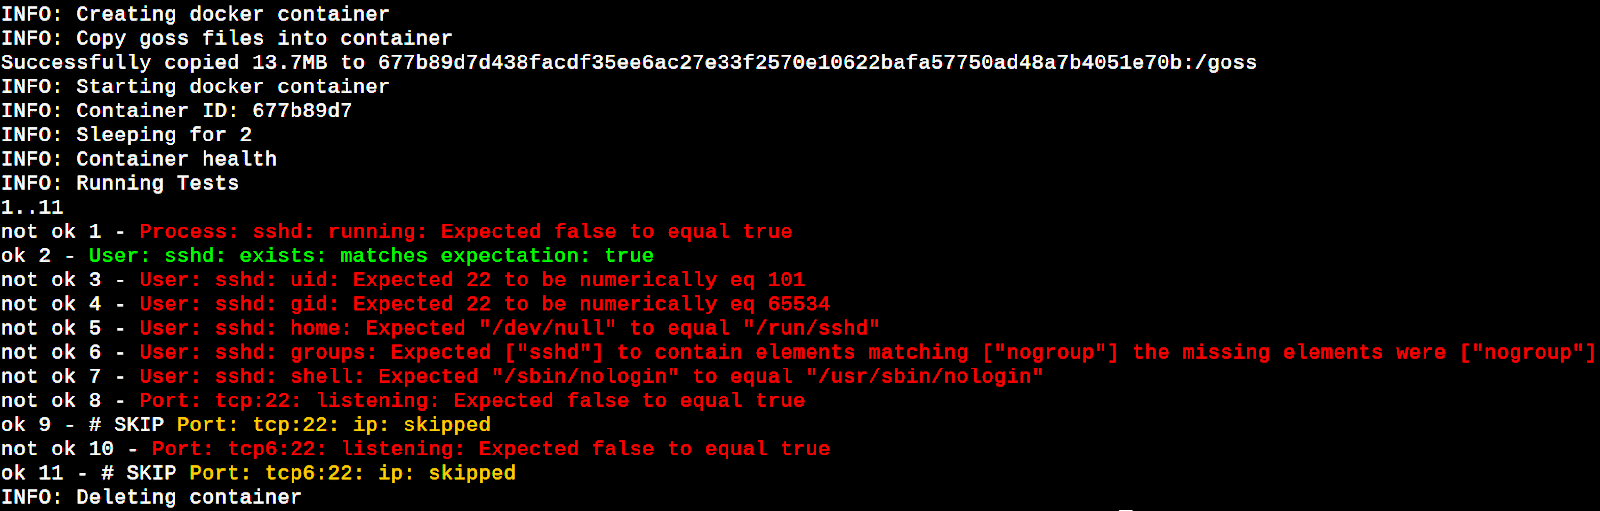
The failures flashed in the above run are due to a quick testing criterion of running sshd in containers, which is not true in the case of our image. Our image is not a continuously running service and that’s why we gave it a sleep command. This way the launched service container is present during the dgoss operations of copying goss and goss.yaml into it and launching a goss test run in it. The dgoss behaviour is configurable by a number of environment variables, which can be seen in its documentation link provided in the References section.
Now let’s run a more standard example using a Docker image of a very popular high-performance engine for large-scale computing tasks, known as Apache Spark. First, pull the official Spark Docker image using the command docker pull bitnami/spark:latest. Next, prepare a goss tests configuration file spark.yaml in your current working directory, as shown below:
--- spark.yaml ---

port:

tcp:7077:

listening: true

tcp6:7077:

listening: true

tcp:8080:

listening: true

tcp6:8080:

listening: true

process:

java:

running: true
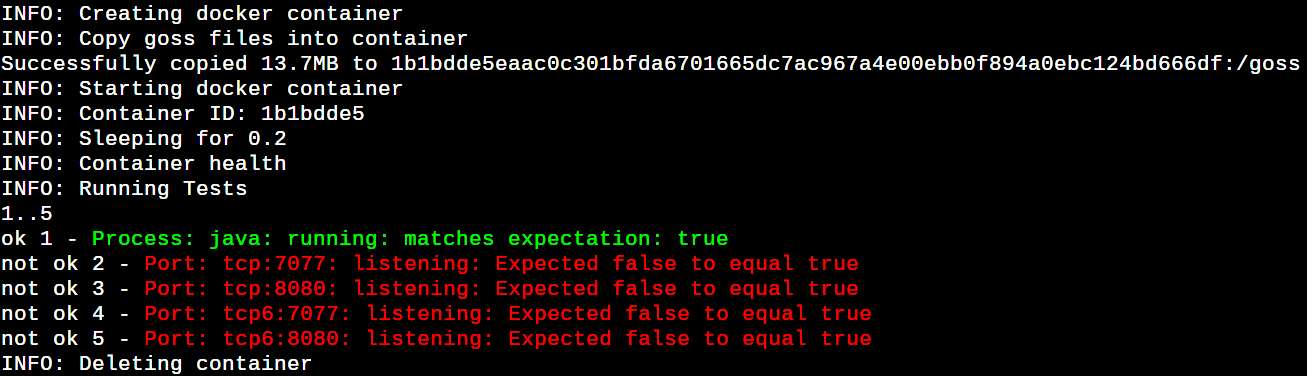
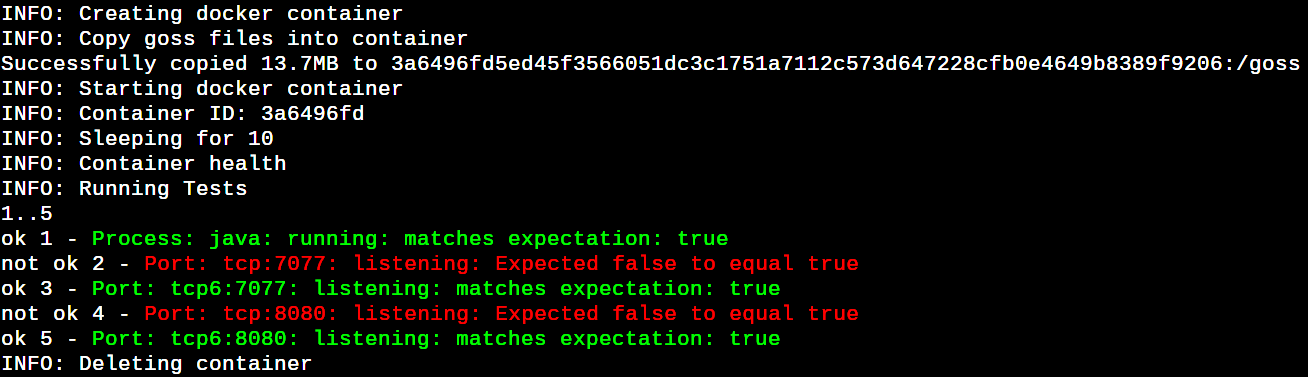
Now, run the command docker run -it –rm -v ${PWD}/:/etc/goss:ro -v /var/run/docker.sock:/var/run/docker.sock:ro -e GOSS_FILE=spark.yaml -e GOSS_FILES_STRATEGY=cp -e GOSS_OPTS=’–color -format tap’ dgoss:0.4.9 dgoss run -e SPARK_MODE=master bitnami/spark to launch a test run against the official Spark image. It’s a bit surprising that although the Spark Java service is running, the master and UI port tests are failing, as shown in Figure 4.
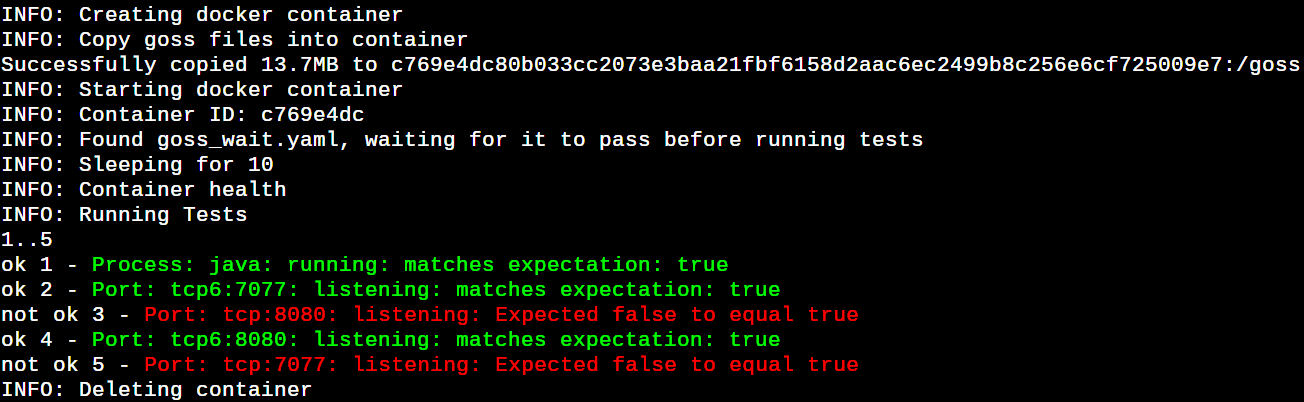
Let’s try once again by executing the command docker run -it –rm -v ${PWD}/:/etc/goss:ro -v /var/run/ docker.sock:/var/run/docker.sock:ro -e GOSS_SLEEP=10 -e GOSS_FILE=spark.yaml -e GOSS_FILES_STRATEGY=cp -e GOSS_OPTS=’–color -format tap’ dgoss:0.4.9 dgoss run -e SPARK_MODE=master bitnami/spark. Now things look better. If you have a Dockerized service, which has startup delays to run and respond to (e.g., Java/Ruby, etc), then GOSS_SLEEP helps to wait before launching a goss run in the spawned service container. All the IPv6 port tests are passing now, as shown in Figure 5.
Finally, it’s time to show another important feature of dgoss. Create a file goss_wait.yaml, as shown below, in your working directory. Wait for the tests in the goss_wait.yaml to be passed before executing the Docker command shown in the last section. This is useful when there is a set of precondition tests to move further. In our case, we ensured that no ssh functionality is part of the Spark image, as shown in Figure 6.
--- goss_wait.yaml ---

port:

tcp:22:

listening: false

ip:

- 0.0.0.0

user:

sshd:

exists: false

process:

sshd:

running: false
Try to change a test in the goss_wait.yaml to true and you should see dgoss aborting the test run due to the failure of the goss_wait.yaml testing.
Validation of stack runtime of containers through dcgoss
Docker Compose is a popular tool to maintain the lifecycle of a multi-container stack. There is another wrapper created over goss to accept test containers constituting the entire compose stack. Let’s jump into it and create Dockerfile_DCGossDriver as per the diff shown below, in your current working directory. Now run the command docker build -f Dockerfile_DCGossDriver . -t dcgoss:0.4.9 in your terminal to build the driver image.
8a9

> ARG DCPS_VERSION=2.31.0

16c17

< && curl -sSL “https://github.com/goss-org/goss/releases/download/v${GOSS_VERSION}/dgoss” -o /usr/local/bin/dgoss \

---

> && curl -sSL “https://github.com/goss-org/goss/releases/download/v${GOSS_VERSION}/dcgoss” -o /usr/local/bin/dcgoss \

20a22,23

> && curl -sSL “https://github.com/docker/compose/releases/download/v${DCPS_VERSION}/docker-compose-$(uname|tr A-Z a-z)-${DGSPLT}” -o /usr/local/bin/docker-compose \

> && chmod +x /usr/local/bin/docker-compose \

28c31

< CMD [“dgoss”, “-h”]

---

> CMD [“dcgoss”, “-h”]
Next, create the docker-compose.yaml, shown below, and kafka.yaml to bring up the ZooKeeper+Kafka containers stack and run goss tests over these, respectively.
--- docker-compose.yaml ---

services:

zookeeper:

image: ‘bitnami/zookeeper:latest’

ports:

- ‘2181:2181’

environment:

- ALLOW_ANONYMOUS_LOGIN=yes

kafka:

image: ‘bitnami/kafka:latest’

ports:

- ‘9092:9092’

environment:

- KAFKA_BROKER_ID=1

- KAFKA_CFG_LISTENERS=PLAINTEXT://:9092

- KAFKA_CFG_ADVERTISED_LISTENERS=PLAINTEXT://127.0.0.1:9092

- KAFKA_CFG_ZOOKEEPER_CONNECT=zookeeper:2181

- ALLOW_PLAINTEXT_LISTENER=yes

depends_on:

- zookeeper

--- kafka.yaml ---

port:

tcp6:2181:

listening: true

tcp6:9092:

listening: true

process:

java:

running: true
It’s time to fire dcgoss to test each service container. Run the command docker run -it –rm -v ${PWD}/:/etc/goss:ro -v /var/run/docker.sock:/var/run/docker.sock:ro -e GOSS_FILE=kafka.yaml -e GOSS_SLEEP=5 -e GOSS_FILES_STRATEGY=cp -e GOSS_OPTS=’–color -format tap’ dcgoss:0.4.9 dcgoss run zookeeper to run all goss tests in the ZooKeeper service container. You should see all the ZooKeeper tests passed, as shown in Figure 7.

Run the command docker run -it –rm -v ${PWD}/:/etc/goss:ro -v /var/run/docker.sock:/var/run/docker.sock:ro -e GOSS_FILE=kafka.yaml -e GOSS_SLEEP=20 -e GOSS_FILES_STRATEGY=cp -e GOSS_OPTS=’–color -format tap’ dcgoss:0.4.9 dcgoss run kafka to goss acceptance test the Kafka container. You should see all the Kafka tests passing now.
We have combined both ZooKeeper and Kafka goss tests in a common file for quick testing showing ‘ok’, ‘not ok’ and ‘skip test’ results. But you can separate the tests in their respective goss files and mention the corresponding one through the GOSS_FILE environment variable.
Finally, we can clean up the running service containers brought up by dcgoss using the command docker ps -q|xargs -I % docker rm -f % to say goodbye to it.
Last but not the least, Kubernetes has become a de-facto platform to run and manage containerised services at scale. The goss project also provides another wrapper in the form of kgoss to acceptance test containers running in Kubernetes pods. You need to run kgoss on a machine where kubectl is already installed and configured to talk to your local or remote Kubernetes cluster. The kgoss help page describes its installation and usage clearly.
Container Structure Tests should be the first stage in your container acceptance testing pipeline to static test container images. The goss wrappers created for services running in containers are very useful for runtime quality gating mechanisms in modern build and release pipelines. This way we can be highly confident that the created container images pass all the necessary acceptance criteria.


