


Eclipse Kura is an open source IoT edge framework that helps design IoT systems. A project of the Eclipse Foundation, it supports interoperability across devices at the edge. Here’s a short tutorial on how you can install Eclipse Kura, and develop and deploy an application with it.
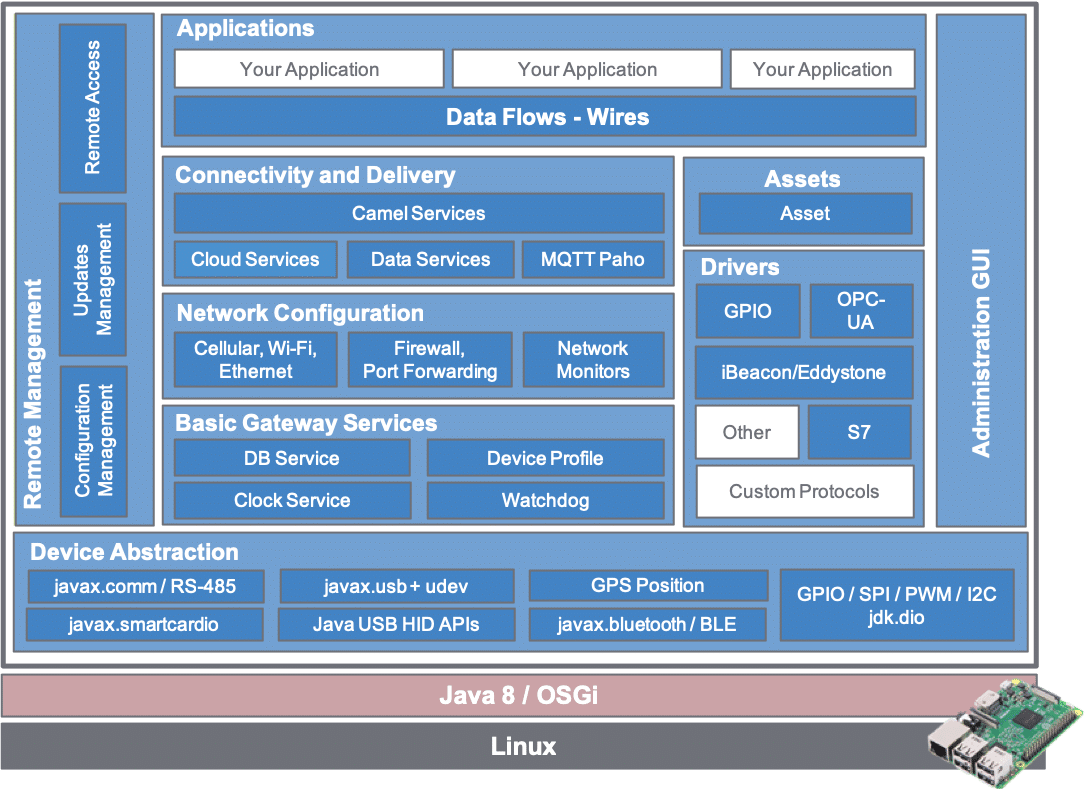
Eclipse Kura works on the Java Virtual Machine (JVM) and utilises OSGi, a dynamic component system for Java, to streamline the development of reusable software building blocks. The Kura APIs provide access to underlying hardware components such as serial ports, GPS, watchdog timers, USB, GPIOs, I2C, and more. Additionally, Kura offers OSGi bundles that simplify network configuration management, communication with IoT servers, and remote gateway administration.
Kura components are implemented as configurable OSGi Declarative Services, which expose service APIs and generate events. While many Kura components are written purely in Java, some rely on JNI (Java Native Interface) and require a Linux operating system to function. Kura comes with the services shown in Figure 1.
Before installing Kura, ensure the following requirements are met.
Hardware requirements: A compatible gateway or device (e.g., Raspberry Pi, industrial IoT gateway) with sufficient storage and memory to run the Java Virtual Machine (JVM).
Operating system: A supported Linux-based operating system (e.g., Ubuntu, Raspbian, or Debian). Ensure that the device is running a 32-bit or 64-bit Linux OS as required.
Java Virtual Machine (JVM): Java Development Kit (JDK) 11 or later. Ensure that Java is installed and properly configured. Verify the installation using the java -version command.
Network configuration: Internet access for downloading Kura packages and dependencies.
Tools and dependencies: Tools like SSH for remote access (optional).
MQTT broker: Install or use an MQTT broker like Eclipse Mosquitto for testing.
Setting up Eclipse Kura
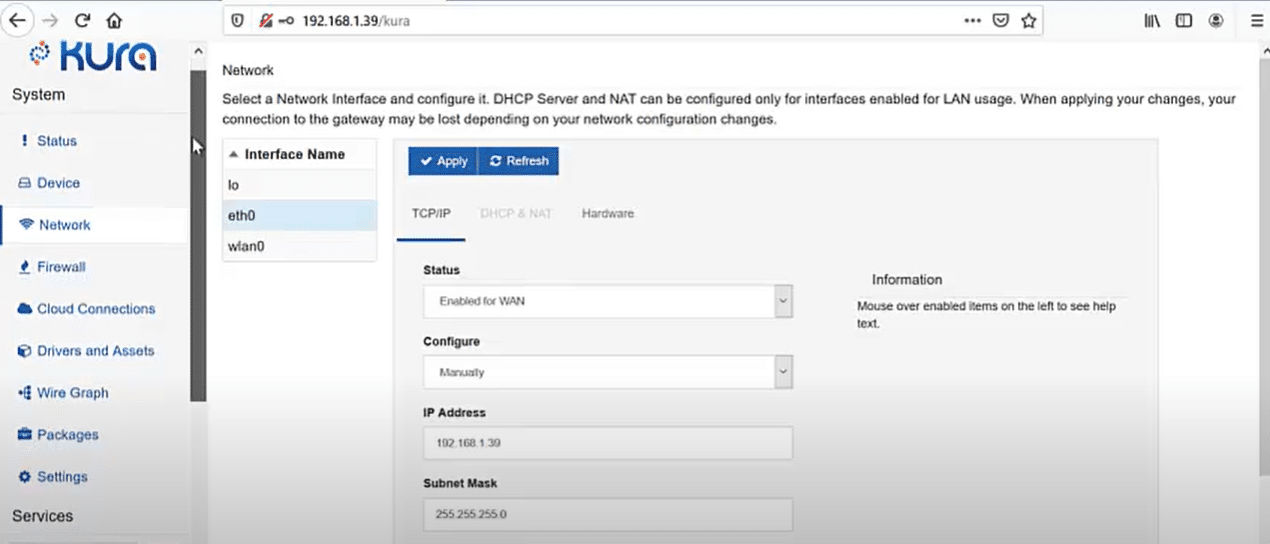
Install Eclipse Kura on your target IoT gateway or test on an emulator like Raspberry Pi. Access the Kura Web UI by entering the gateway’s IP address and the default port in your browser (e.g., http://<ip_address>:8080). Next, log in with the default credentials as mentioned below:
Username: admin
Password: admin
Creating a simple application
Install the Eclipse IDE for Java developers. Add the Eclipse Kura development environment using the Kura plugins.
To create a new Maven project, open Eclipse. Go to File > New > Maven Project. Choose a suitable group ID and artifact ID (e.g., com.example.osfy).
Add Kura dependencies by updating the pom.xml file with the following:
dependencies:xml

<dependencies>

<dependency>

<groupId>org.eclipse.kura</groupId>

<artifactId>org.eclipse.kura.api</artifactId>

<version>5.1.0</version> <!-- Replace with your version -->

</dependency>

</dependencies>
To develop a simple Kura application in Java code, create a class SensorPublisher that implements org.eclipse.kura.application.KuraApplication.
package com.example.kuraapp;

import org.eclipse.kura.KuraException;

import org.eclipse.kura.application.KuraApplication;

import org.eclipse.kura.configuration.ConfigurableComponent;

import org.eclipse.kura.message.KuraPayload;

import org.eclipse.kura.message.KuraPayload.KuraPayloadBuilder;

import org.eclipse.kura.data.DataService;

import org.osgi.service.component.annotations.Component;

import org.osgi.service.component.annotations.Reference;

@Component(service = KuraApplication.class)

public class SensorPublisher implements KuraApplication, ConfigurableComponent {

private DataService dataService;

@Reference

public void setDataService(DataService dataService) {

this.dataService = dataService;

}

@Override

public void start() {

System.out.println(“Application Started”);

}

@Override

public void stop() {

System.out.println(“Application Stopped”);

}

public void publishMessage() {

try {

KuraPayload payload = new KuraPayloadBuilder()

.withMetric(“temperature”, 25.5)

.withMetric(“humidity”, 60)

.build();

dataService.publish(“sensors/data”, payload, 0, false, 10);

System.out.println(“Message Published”);

} catch (KuraException e) {

e.printStackTrace();

}

}

}
Packaging and deploying the application
Run mvn clean package to create a .jar file in the target directory. To upload to Kura, access the Kura web UI. Go to Applications > Install/Upgrade. Upload the .jar file of your application.
To run the application, start it from the Kura Web UI. Check logs to verify the application is running by going to System > Log.
Test MQTT publishing
Several steps are required to test MQTT publishing in Eclipse Kura to ensure that your system can send (publish) data to an MQTT broker successfully. Eclipse Kura offers a comprehensive platform for connecting devices to the Internet of Things (IoT), and MQTT is a popular messaging protocol for communicating between devices and servers.
Ensure your MQTT broker is running.
Use a client like MQTT Explorer to subscribe to the sensors/data topic.
Verify the published data. For example:
Json code:
{

“temperature”: 25.5,

“humidity”: 60

}
Add configuration parameters for the MQTT topic, QoS, or sensor intervals using Kura’s configuration service. Implement data filtering or transformation and integrate with other protocols (e.g., Modbus or OPC-UA).
The Kura framework enables easy interconnectedness of sensors and devices without the source code modifications intended to collect temperature data in real-time. Using its extensive features, including device management, connectivity, and data storage, Kura can assist in the deployment of temperature monitoring systems for smart homes, industrial automation, and environmental monitoring, among other applications.


