


Here’s a simple machine learning model to help detect the personally identifiable information of your customers and maintain its confidentiality.
Data is a great resource and we all know that we need to be very careful about ensuring its privacy and confidentiality, especially if we have access to a large amount of customer data as an organisation. To ensure that we are not letting any PII or personally identifiable information out of the organisation, one popular strategy is to extract and identify this information in each file and mask it either with cryptography or with random characters. Many other strategies can be followed to extract this information. If the given data is always in a specific format, methods like regular expressions can be used. If that is not the case, but we have enough data, we can build a machine learning model. Generative AI models like OpenAI can be used if we don’t have enough data to train, but this is an expensive solution.
So let’s learn how to build an ML model for detecting PII. This is basically information that can be used to identify individuals — it may be their name, phone number, government identity information, address, etc. One strategy is to build and deploy a model for each of these categories. We will follow a better and a simpler approach, and build a generic model for identifying and detecting any kind of PII.
Let’s get started. I am using a Google Colab notebook as the IDE here. You can use your local Jupyter Notebook or Anaconda environment or even a Visual Studio Code – Jupyter Notebook extension for this experiment.
If you are using Google Colab notebooks like me, open the following link and click on ‘new notebook’ as shown in Figure 1.

The first step is to import the required libraries. We will use the Pandas and Sklearn libraries to build the machine learning model. You can use the following code for this:
import sklearnimport pandas as pdimport numpy as np |
If you don’t have the libraries already installed, use the following command:
pip install “library name” |
I have taken a sample dataset that has a few of these categories, like name, credit card number, phone number, date of birth, etc. You can create this on your own using different formats of the category. Then load the dataset and view it as shown below and in Figure 2.
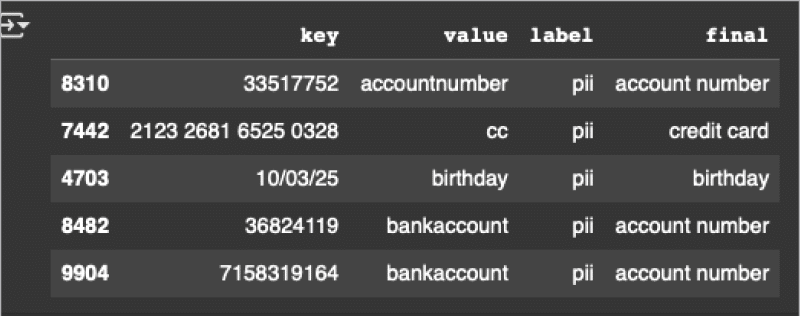
df = pd.read_csv(“/content/drive/MyDrive/data.csv”)df = df.sample(frac = 1)df.head() |
The first step after collecting and building the dataset in the data science life cycle is to extract or identify the features. The first feature we are using here is the length of the string. We can do this using the following code, as shown in Figure 3.
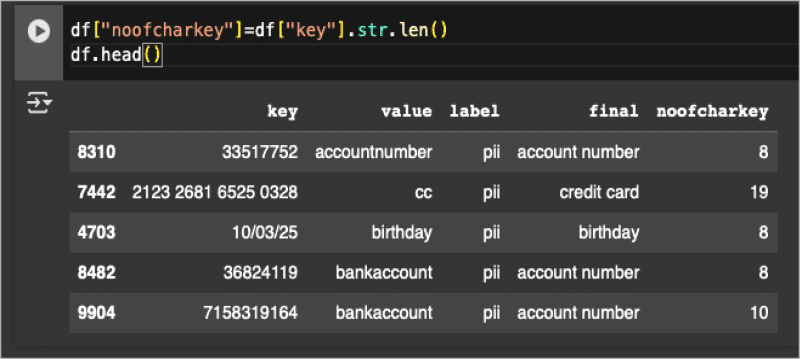
df[“noofcharkey”]=df[“key”].str.len()df.head() |
Similarly, we can extract a few more features – for example, if the string has an ‘@’ in it, contains spaces, has a ‘/’, is a number, is a decimal, and so on. The following code can be used to do this, and our dataset then looks as shown in Figure 4.
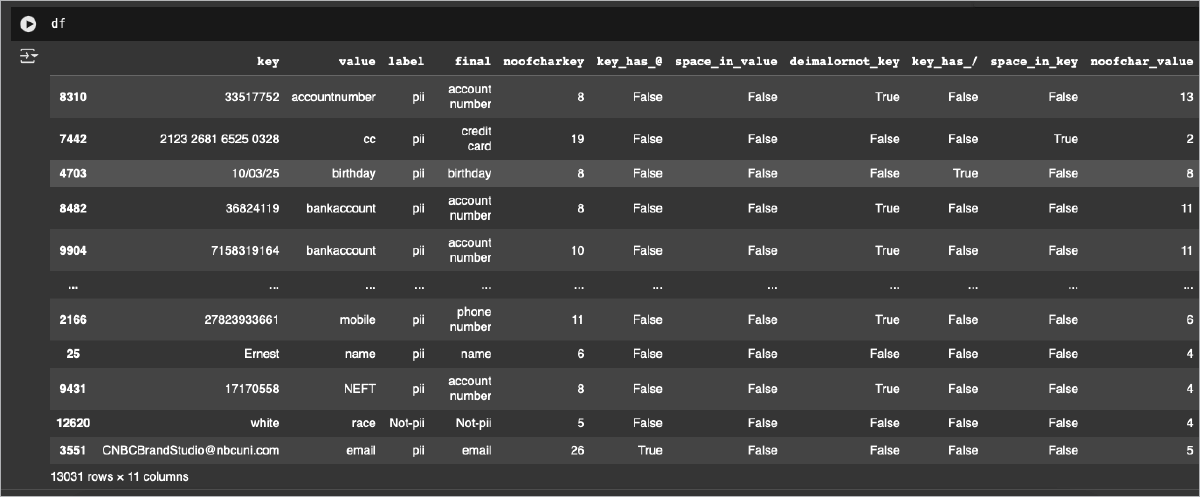
abc=pd.DataFrame(df[‘key’].str.contains(“@”, case=False))abc.head()list1=abc[“key”]df[“key_has_@”]=list1abc=pd.DataFrame(df[‘value’].str.contains(“ “, case=False))abc.head()list1=abc[“value”]df[“space_in_value”]=list1d={‘noofchark’:’noofchar_key’}df.rename(columns = d, inplace = False)abc=pd.DataFrame(df[‘key’].str.isdecimal())abc.head()list1=abc[“key”]df[“deimalornot_key”]=list1abc=pd.DataFrame(df[‘key’].str.contains(“/”, case=False))abc.head()list1=abc[“key”]df[“key_has_/”]=list1abc=pd.DataFrame(df[‘key’].str.contains(“ “, case=False))abc.head()list1=abc[“key”]df[“space_in_key”]=list1df[“noofchar_value”]=df[“value”].str.len()df.head() |
Now that the features are extracted and built, the next step is to train the model. We are using the Sklearn library for the machine learning models. The following lines are used for assigning the features:
cols=[“noofcharkey”,”key_has_@”,”deimalornot_key”,”key_has_/”,”space_in_key”]X = df[cols] # Featuresy = df[“label”] # Target variable |
For this particular use case, after trying all the algorithms, I have concluded that random forests and decision tree algorithms give close to 94% accuracy and hence the best results. The following code is used to train the model using the given dataset and algorithm, as shown in Figure 5.

from sklearn.model_selection import train_test_splitX_train, X_test, y_train, y_test = train_test_split(X,y, test_size = 0.20, random_state = 99)from sklearn.ensemble import RandomForestClassifiermodel = RandomForestClassifier()model.fit(X_train, y_train)model.score(X_test,y_test) |
We can save this model as a pickle file or a .pmml file and use it in Python or Java codes, respectively. For that, use the following code:
from sklearn2pmml import sklearn2pmmlsklearn2pmml(pipeline, “regression_model.pmml”, with_repr = True) |
That’s it! The model file will be saved and will detect if a given piece of text is PII or not. To detect the type of PII, we can build another model in the same way using the code given below.
cols=[“noofcharkey”,”key_has_@”,”deimalornot_key”,”key_has_/”,”space_in_key”,”noofchar_value”,”space_in_value”]X = df[cols] # Featuresy = df[“final”] # Target variablefrom sklearn.model_selection import train_test_splitX_train, X_test, y_train, y_test = train_test_split(X,y, test_size = 0.20, random_state = 99)from sklearn.ensemble import RandomForestClassifiercont = RandomForestClassifier()cont.fit(X_train, y_train)cont.score(X_test,y_test)from sklearn2pmml import PMMLPipelinefrom sklearn.metrics import mean_absolute_errorpipeline = PMMLPipeline([(“abc”, cont)])pipeline.fit(X_train, y_train)y_pred = pipeline.predict(X_test)pipeline.score(X_test,y_test)from sklearn2pmml import sklearn2pmmlsklearn2pmml(pipeline, “type_of_pii.pmml”, with_repr = True) |
You have now learnt how to build an ML model to identify PII!! You can try this out with other algorithms and datasets too, and explore further in this field!


