Welcome to the world of Git! If you’re new to software development, understanding Git is like learning a new language — essential for effective collaboration and project management.
Git is like a time machine for your projects, allowing you to revisit previous versions, experiment with new ideas, and work seamlessly with others. In this guide, we’ll give a clear explanation of Git’s purpose and core concepts and understand its benefits for both individual and team projects. We will discuss essential terminology and workflows to kickstart your Git journey, and learn how to install, configure, and create your first repository.
What is Git?
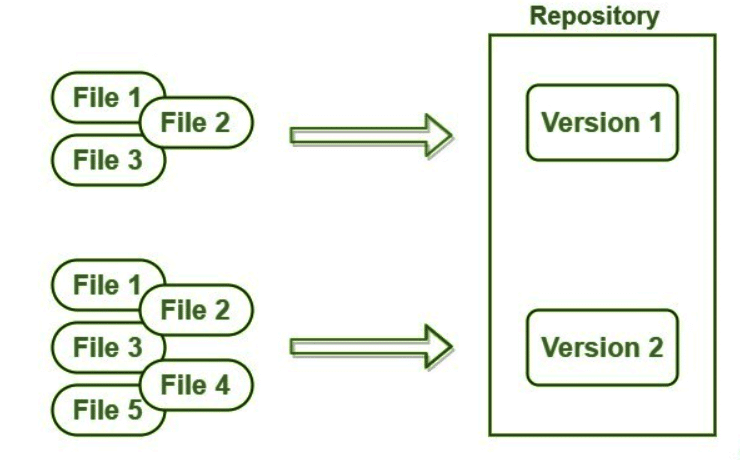
Git is essentially a tool that helps you track changes in your code over time. Imagine you’re writing a novel. You start with a blank page and gradually add chapters, characters, and plot twists. Without a backup or a detailed record of your writing process, it would be difficult to go back and change something without affecting the entire story.
| Feature | Git | GitHub or GitLab |
|
Distributed version control system (DVCS) | Cloud-based platform for hosting Git repositories |
|
Tracks change in code over time | Provides a central location for code collaboration and sharing |
|
Local version control, branching, merging, committing | Code hosting, issue tracking, pull requests, code review |
|
Command-line | Web-based interface |
|
Linux Foundation | Microsoft |
|
Free and open source | Free tier available; paid plans for additional features |
|
Primarily local; requires manual syncing | Built-in collaboration features like pull requests, issues |
|
git add, git commit, git push | Creating repositories, managing issues, code reviews |
Table 1: Git vs GitHub (GitLab)
Git is like a digital notebook for your code. It records every change you make, allowing you to:
- Revert to previous versions: If you introduce a bug, you can go back to a working version and figure out what went wrong.
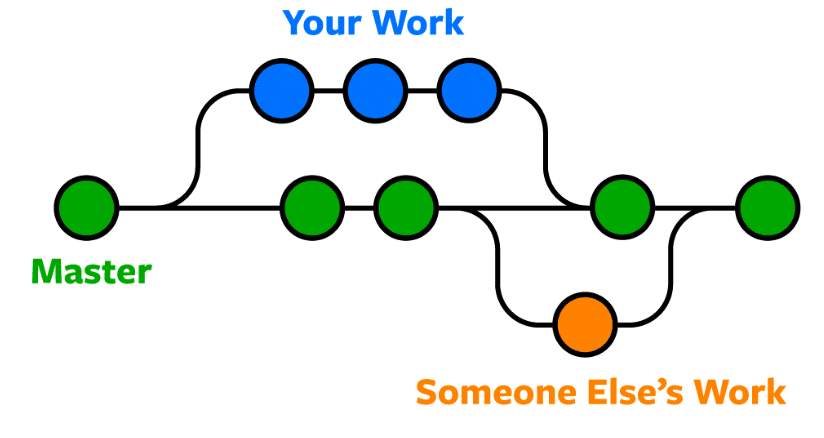
- Experiment freely: You can try out new features without affecting the main project.
- Collaborate with others: Multiple people can work on the same codebase without overwriting each other’s changes.
Many software developers are often confused between Git and GitHub. Table 1 compares the two to clear this confusion.
As we know, Git is a powerful version control system (VCS) that is essential for modern software development. Table 2 lists key reasons why Git is important for both individual and team projects.
Table 2: Why Git is important
| Aspect | Individual projects | Team projects |
| Version control | Track changes and revert versions | Track all team changes |
| Branching and merging | Experiment without affecting the main code | Work on features simultaneously |
| Collaboration | Share code and collaborate easily | Enable team collaboration |
| Backup and restore | Backup project to prevent data loss | Restore the project state anytime |
| History | Maintain change history | Log who made changes and why |
| Code review | Self-review code before integrating | Facilitate peer reviews |
| Conflict resolution | Simplify conflict resolution | Manage and resolve team conflicts |
| Continuous integration | Integrate with CI tools for automated testing | Support automated testing and deployment |
| Efficiency | Improve productivity and manage changes | Enhance team efficiency with streamlined workflows |
| Skill development | Encourage best practices in version control | Promote good practices and skill enhancement |
What are the core concepts of Git?
Git is built on a few fundamental concepts that are essential to understanding how it works.
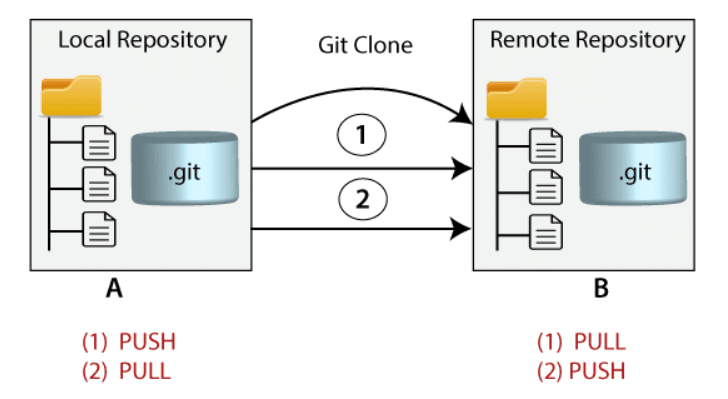
Repository (Repo): A Git repository is a storage space for your project. It holds all your project’s files and the history of their changes. It can be local (on your own machine) or remote (on a server like GitHub or GitLab).

If you start a new project called MyWebsite, you can initialise a Git repository by running git init in the project directory which creates a .git directory that tracks all your changes.
Commit: A commit records a snapshot of your project’s files at a specific point in time. Each commit includes a unique identifier (a hash), an author, a timestamp, and a commit message describing the changes.
After adding a new feature, you would use git add . to stage changes and git commit -m “Add user authentication feature” to create a commit. This records your changes and provides a message that helps explain what was done.
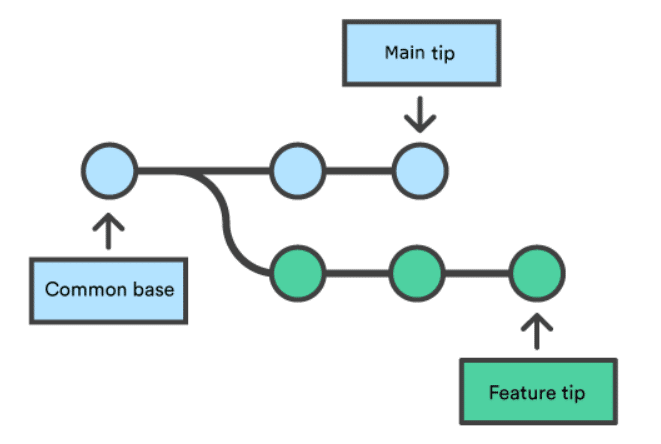
Branch: Branches allow you to work on different lines of development independently. They also help to manage multiple features or fixes without interfering with the main codebase.
If you’re working on a new feature called ‘contact form’, you can create a branch with git branch contact-form and switch to it with git checkout contact-form. This keeps your work separate from the main branch until it’s ready.
Merge: Merging integrates changes from one branch into another. Git automatically handles many merges, but conflicts may need manual resolution.
Once the contact form feature is complete and tested, you can merge it into the main branch using git checkout main followed by git merge contact-form. If there are no conflicts, Git combines the changes automatically.
Pull request (PR): A pull request is a request to merge changes from one branch into another, usually accompanied by a review process.
On GitHub, after pushing your contact-form branch to the remote repository, you create a pull request to merge it into the main branch that allows team members to review your code and suggest improvements before merging.
Clone: Cloning creates a copy of a remote repository on your local machine, enabling you to work on the project offline.
To work on an existing project hosted on GitHub, use git clone https://github.com/user/repository.git to create a local copy of the repository on your computer.
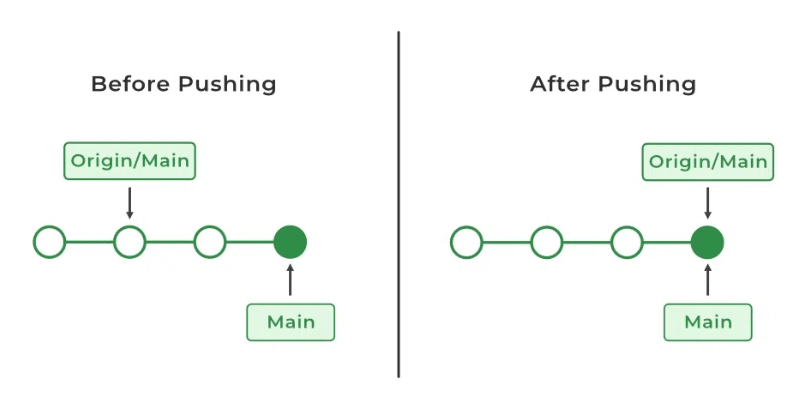
Push: Pushing sends your local commits to a remote repository. It’s how you share your changes with others and update the remote repo with your local work.
After committing changes locally, use git push origin main to upload your changes to the remote repository on GitHub. This updates the remote main branch with your local changes.
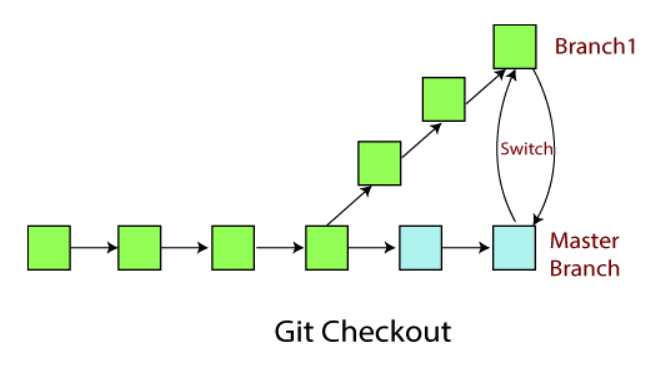
Checkout: Checking out a branch or commit changes your working directory to reflect the state of that branch or commit.
Use git checkout contact-form to switch to the contact-form branch. To view the state of your project at a specific commit, use git checkout <commit-hash>.
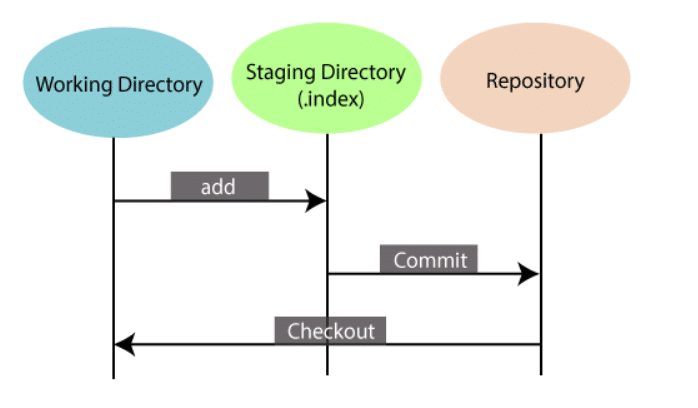
Staging area: The staging area (index) allows you to prepare changes before committing them, letting you select specific changes for inclusion in a commit.
After modifying multiple files, use git add file1.txt to stage changes to file1.txt and git add file2.txt for file2.txt. When you commit, only the staged files are included.
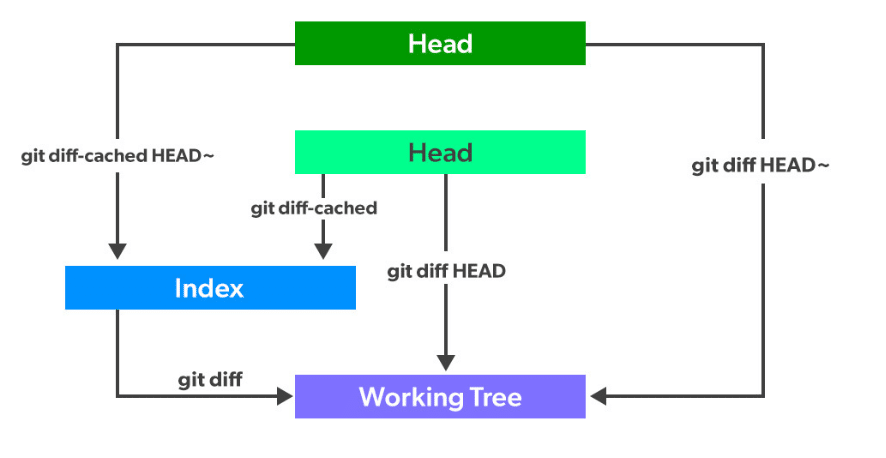
Diff: The diff command shows the differences between file versions, which is useful for reviewing changes before committing or merging.
To see changes between your working directory and the last commit, use git diff. To compare two commits, use git diff <commit1> <commit2>.
Basic overview of common Git workflows
Git offers flexibility in how teams can manage their code, but some workflows have become popular due to their effectiveness. Let’s explore a few common ones.
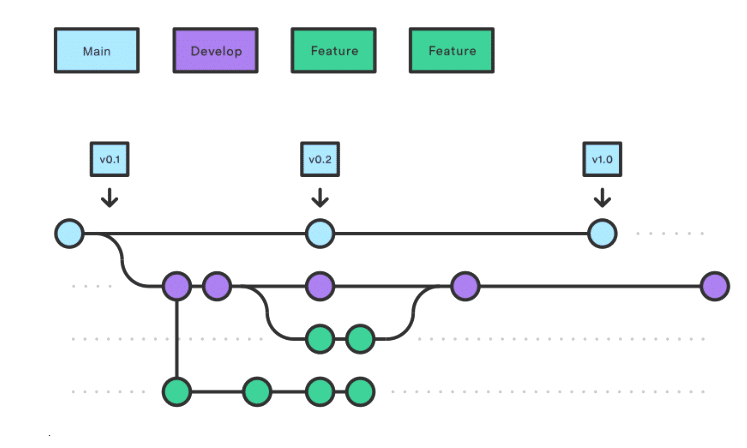
- Feature branching
Feature branching workflow involves creating separate branches for each new feature or bug fix. It keeps the main branch clean and stable.
Process:
-
- Create a new branch from the main or develop branch for each new feature or fix.
- Work on the feature or fix in the new branch.
- Once complete, merge the feature branch back into the main branch, usually through a pull request or merge request.
Use case: Ideal for teams looking for a straightforward way to manage new features and fixes without disrupting the main codebase.
- Git Flow
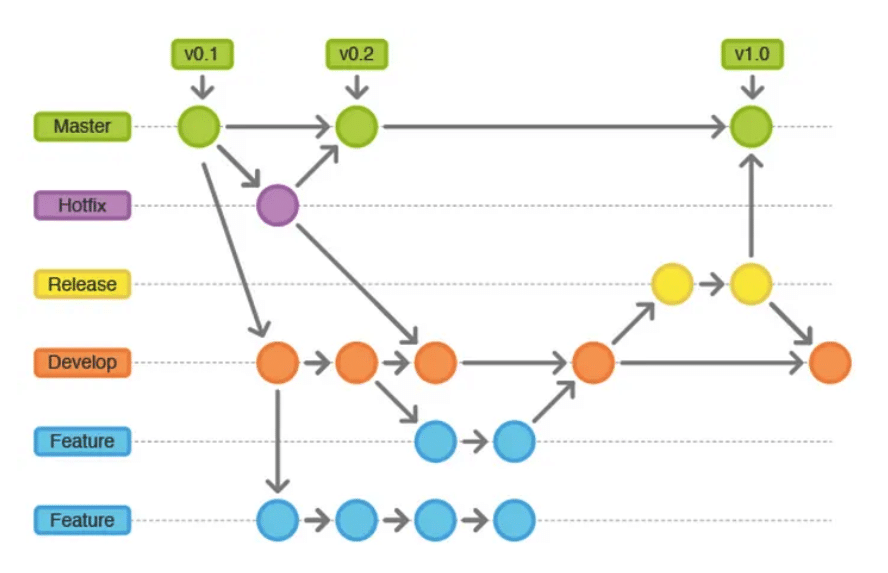
Git Flow is a more structured branching model with specific roles for branches. It involves a set of branches with defined purposes and is particularly useful for managing releases and hotfixes.
Branches:
main (or master): The production-ready branch.
develop: The integration branch where features are merged.
feature/*: Branches for individual features created from develop.
release/*: Branches for preparing a new release created from develop.
hotfix/*: Branches for urgent fixes created from main.
Process:
-
- Develop features on feature branches.
- Merge feature branches into develop.
- Create a release branch from develop to finalise and prepare for a release.
- Merge release branch into both main and develop.
- Create a hotfix branch from main for urgent fixes and merge it into both main and develop.
Use case: Best suited for projects with a regular release cycle and where a structured approach to feature development, releases, and hotfixes is needed.
- Forking workflow
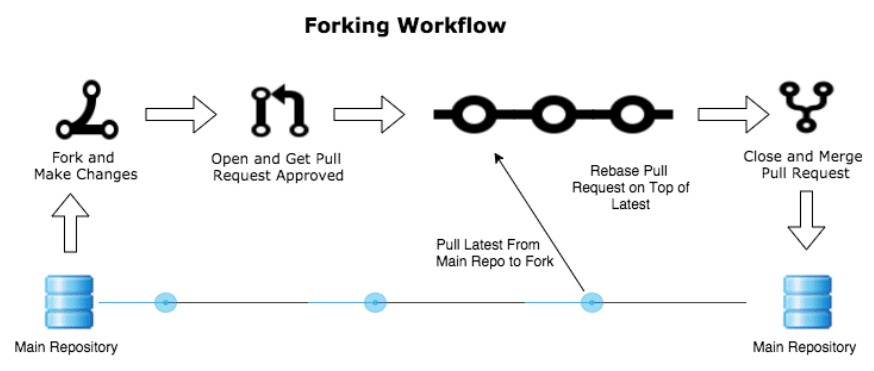
Forking workflow is commonly used in open source projects. Each contributor forks the repository, works on their own copy, and then submits pull requests to the original repository.
Process:
-
- Create a personal copy of the repository (fork) on a hosting service like GitHub.
- Clone the forked repository to your local machine.
- Make changes and commit them to your forked repository.
- Push the changes to your fork and submit a pull request to the original repository.
Use case: Ideal for open source projects or projects where many contributors are involved, especially when contributors do not have direct write access to the main repository.
Installing and configuring Git
To install and configure Git, start by downloading the appropriate installer for your operating system (Windows, macOS, Linux (Debian/Ubuntu)).
For Windows, visit git-scm.com, download the installer, and follow the on-screen instructions with the default settings.
On macOS, open Terminal and install Git using Homebrew by running brew install git.
For Linux users, particularly those on Debian or Ubuntu, open Terminal and execute sudo apt update followed by sudo apt install git to install Git.
Once Git is installed, you need to configure it with your user information. Open your terminal and set your username by running git config –global user.name “Your Name”, and then set your email with git config –global user.email “youremail@example.com”.
To ensure that Git has been installed correctly, check the version by running git –version and view your configuration with git config –list. This will prepare Git for version control tasks and ensure it recognises your commits with the correct user information.
How to create a Git repository
Creating a Git repository involves initialising a new repository in your project directory or cloning an existing repository. Here’s a step-by-step guide on how to create a Git repository.
Step 1: Ensure Git is installed on your system. You can download it from git-scm.com.
- Open your terminal or command prompt.
- Navigate to your project directory using the cd command. For example:
cd path/to/your/project |
- Initialise the repository by running:
git init |
This command creates a new subdirectory named .git that contains all the necessary repository files.
Step 2: Add the files you want to track by Git. You can add individual files or all files in the directory. For example:
git add . |
This adds all files in the directory.
Step 3: Commit the files with a message describing what you have done. For example:
git commit -m “Initial commit” |
This records the snapshot of the project in the repository.
How to clone existing repositories
Step 1: Copy the URL of the repository you want to clone. It can be an HTTPS or SSH URL.
Step 2: Open your terminal or command prompt.
Step 3: Navigate to the directory where you want to clone the repository using the cd command.
Step 4: Clone the repository by running:
git clone repository_url |
Replace ‘repository_url’ with the actual URL of the repository. For example:
git clone https://github.com/user/repository.git |
So, there you have it! You’ve taken a deep dive into the world of Git. From understanding the basics of version control to mastering essential Git commands and workflows, you’ve covered a lot of ground.
You’ve learned how Git revolutionises collaboration, accelerates development, and ensures code integrity. With this knowledge, you’re well-equipped to leverage the power of Git in your projects and contribute effectively to DevOps teams.
Remember: Practice is key! The more you use Git, the better you’ll become. Happy coding!


