

In today’s digital landscape, securing online identities is more crucial than ever. Traditional passwords are no longer sufficient to protect sensitive information, which is where advanced passwordless authentication mechanisms like FIDO2 and WebAuthn come into play. These technologies offer a powerful solution for secure user authentication in a browser-based environment.
FIDO2, combined with WebAuthn, uses a challenge-response mechanism to authenticate users. This process involves a series of cryptographic requests and responses, ensuring that only the rightful users can access their account. Here’s a simplified look at how this works.
A user signs up on a web scanner and a security key, such as a USB device or a biometric scanner, and enters a PIN for verification. This setup process ensures that only the user can authenticate himself/herself in the future. This mechanism is not just limited to personal accounts but is also integrated into enterprise solutions. For instance, Microsoft’s cloud services, including Active Directory and Entra, utilise security keys as a secure method for users to sign in. Microsoft Entra is a cloud based identity and access management (IAM) solution for an organisation. It keeps a record of the roles and responsibilities of its members with the help of their ID known as Entra ID.
How data is managed
All information related to Entra ID is securely stored in Microsoft Graph, a platform that requires Graph API calls to perform various operations. Graph API is an HTTP-based API that apps can use to programmatically query data and perform a wide variety of other tasks. Typically, these operations are carried out through a user-friendly graphical interface. However, for developers and IT administrators, understanding the behind-the-scenes mechanics of these API calls is essential.
Accessing the Graph API
There are two primary methods to access the Graph API.
Delegated permissions: This method allows an application to access the API on behalf of the signed-in user. It’s particularly useful when the application needs to perform actions as the user.
Application permissions: This approach enables the application to run as a background service or daemon, without needing a user to be signed in. It’s ideal for automated processes and services.
For example, to access the Graph API using delegated permissions, developers need to use an authorisation link. This link includes the tenant ID and client ID, among other details, and looks something like this:
curl --location --request GET ‘https://login.microsoftonline.com/{tenant}/oauth2/v2.0/authorize?client_id=11111111-1111-1111-1111-111111111111&response_type=code&redirect_uri=https%3A%2F%2Flocalhost%2Fmyapp%2F&response_mode=query&scope=offline_access%20User.Read%20Mail.Read&state=12345’
In this URL, permissions like `Mail.Read` can be adjusted based on the access level of the user in the Entra platform. For instance, if the Entra ID does not have permission to read emails for guest users, this scope should be removed.
Challenges in automation
One significant challenge with the current cloud service implementations is the reliance on a web browser for user authentication. This dependency prevents the full automation of background (daemon) processes. To create an automated environment for delegated access, developers need to reverse-engineer the WebAuthn process. This involves inspecting and analysing the requests and responses that occur in the background during WebAuthn in the browser. Let us meticulously map these requests and responses so that developers can understand how to replicate these steps programmatically.
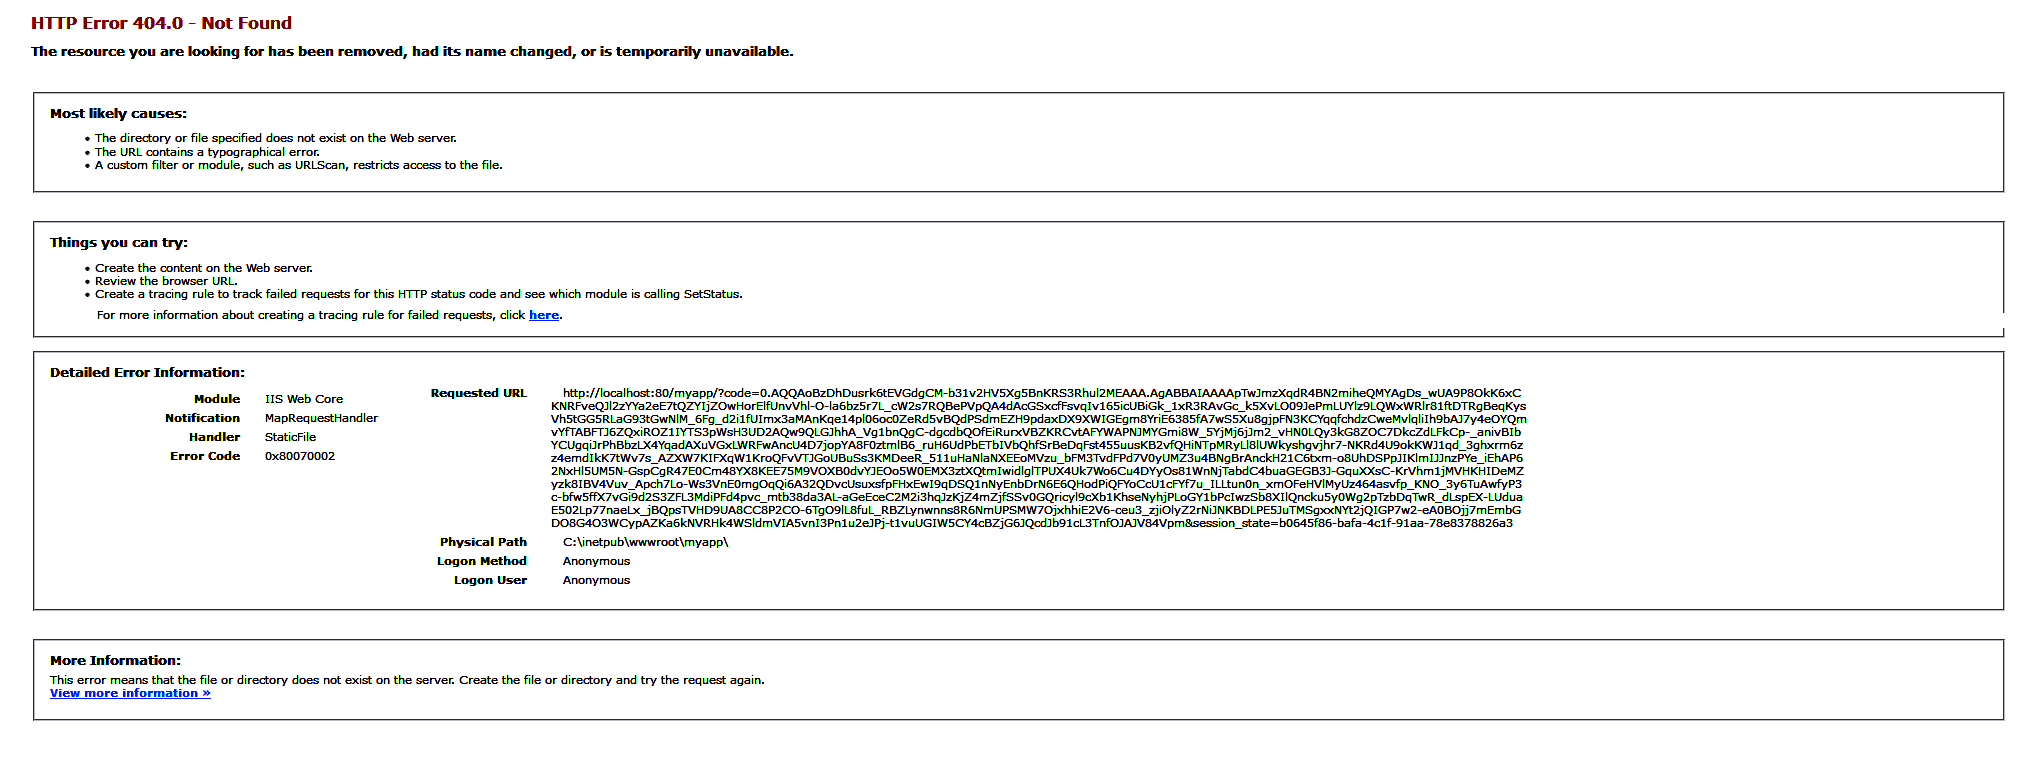
Figure 1 is a screenshot of a completed authentication from my sample user account after finishing WebAuthn.
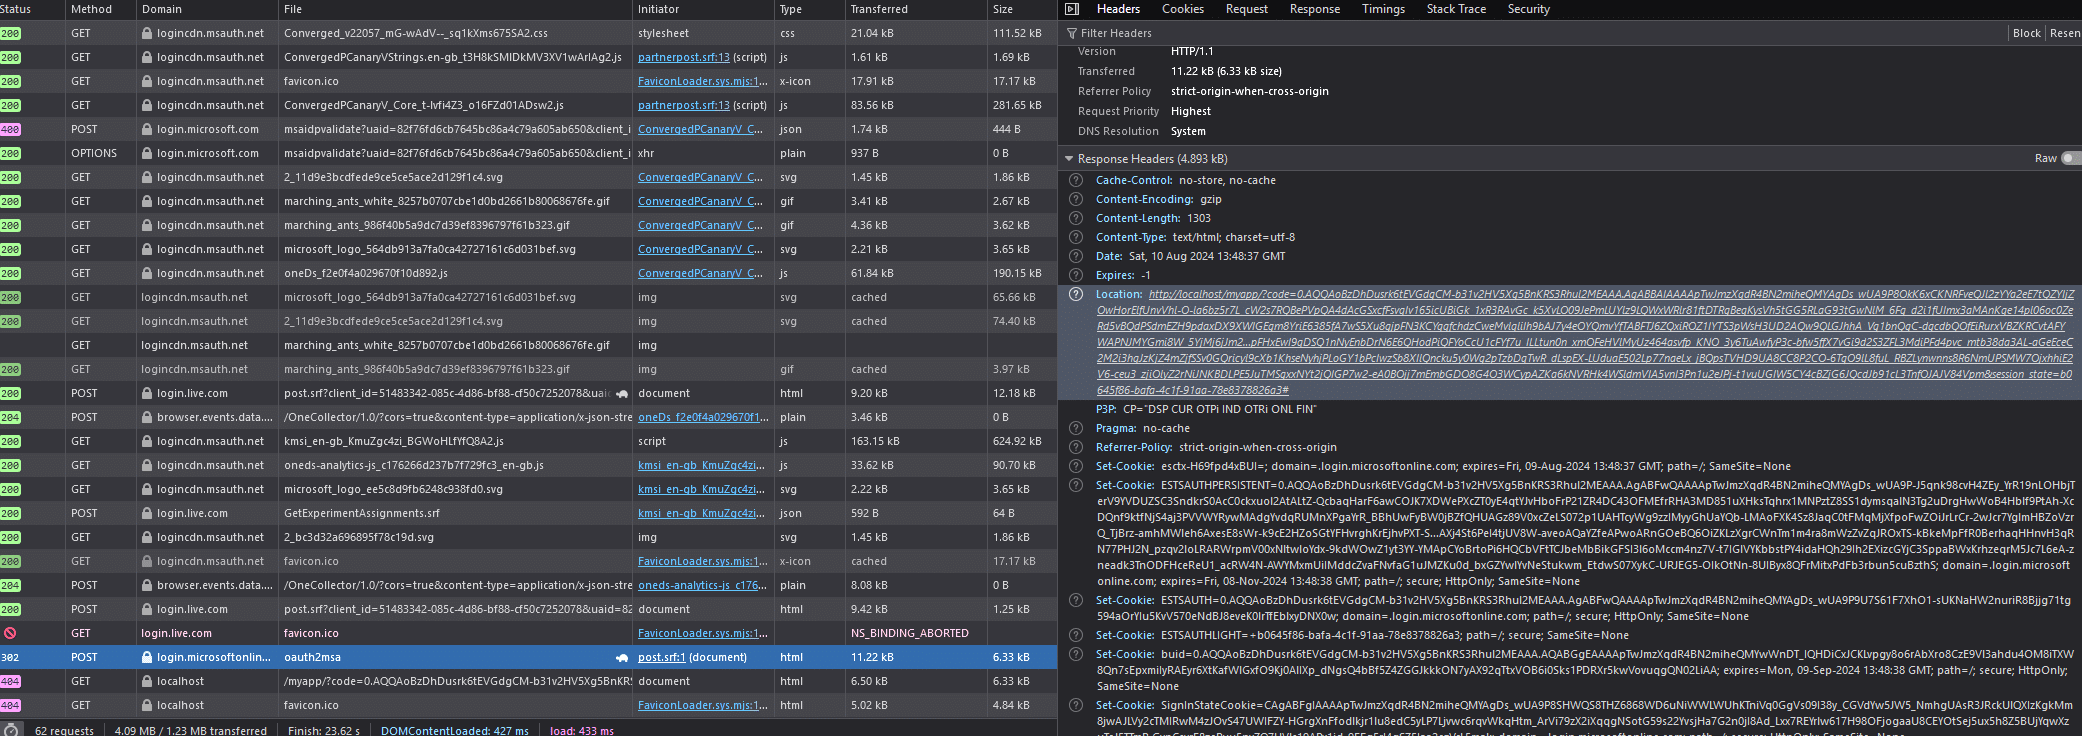
To trace back the steps and understand what went wrong, it’s necessary to reverse-engineer the process by examining the requests and responses that occurred before the authorisation code was returned. This can be done by going to the network tab under the browser’s inspect element tool, where you will find a series of recorded logs showing the sequence of network activities.
By analysing these logs, you can map out the requests and responses, identify where the process deviated from the expected flow, and correct any issues to ensure successful API access in future attempts.
WebAuthn mapping
To prepare an appropriate WebAuthn mapping, it is beneficial to start by inspecting the most recent GET/POST requests. Begin by identifying the request that contains the authorisation code. Check the header and payload of this request. In this case, the authorisation code is found in the header of a GET request to the localhost domain, which shows a 404 Not Found status code in the web browser.
Here’s how one can do it.
Open network tab: In the browser, open the developer tools and navigate to the Network tab.
Locate the authorisation code request: Find the most recent GET request that contains the authorisation code in its header. This request will typically be directed to the localhost domain.
Inspect the request and response:
- Header: Look at the headers to find the authorisation code.
- Payload: Examine the payload to understand the data being sent and received.
Identify the 404 error: Notice the 404 Not Found status code, which indicates that the access policies, grant types, or PKCE parameters were not handled correctly. This happens because the request was made directly through the browser.
By following these steps, you can trace back the process, identify where the problem occurred, and map out the appropriate requests and responses needed for successful WebAuthn implementation.
By meticulously analysing these logs, one can create an accurate WebAuthn mapping and ensure that future requests are handled correctly, avoiding issues like the 404 error.
While the 404 response to the localhost request might seem like an error, it provides crucial information: the authorisation code sent as a query to the localhost. Additionally, the response header contains a state parameter that helps restore the previous state of your application. The state parameter preserves an object set by the client in the authorisation request and makes it available in the response.
The primary purpose of the state parameter is to mitigate cross-site request forgery (CSRF) attacks. By using a unique, non-guessable value, the state parameter ensures that the response matches each authentication request, enhancing security.
In the previous POST request to oauth2msa, the authorisation code is embedded in the query component of the `Location` header. This request returns a successful 302 Found status, which triggers a redirect to the specified location—localhost, in this case.
The response packet also includes the POST link https://login.microsoftonline.com/common/federation/oauth2msa. The subsequent request is initiated based on this POST response. The 302 Found status indicates that the resource requested has been temporarily moved to a different URL, as specified by the Location header. This successful response is a crucial step in obtaining the authorisation code necessary for accessing the Graph API.
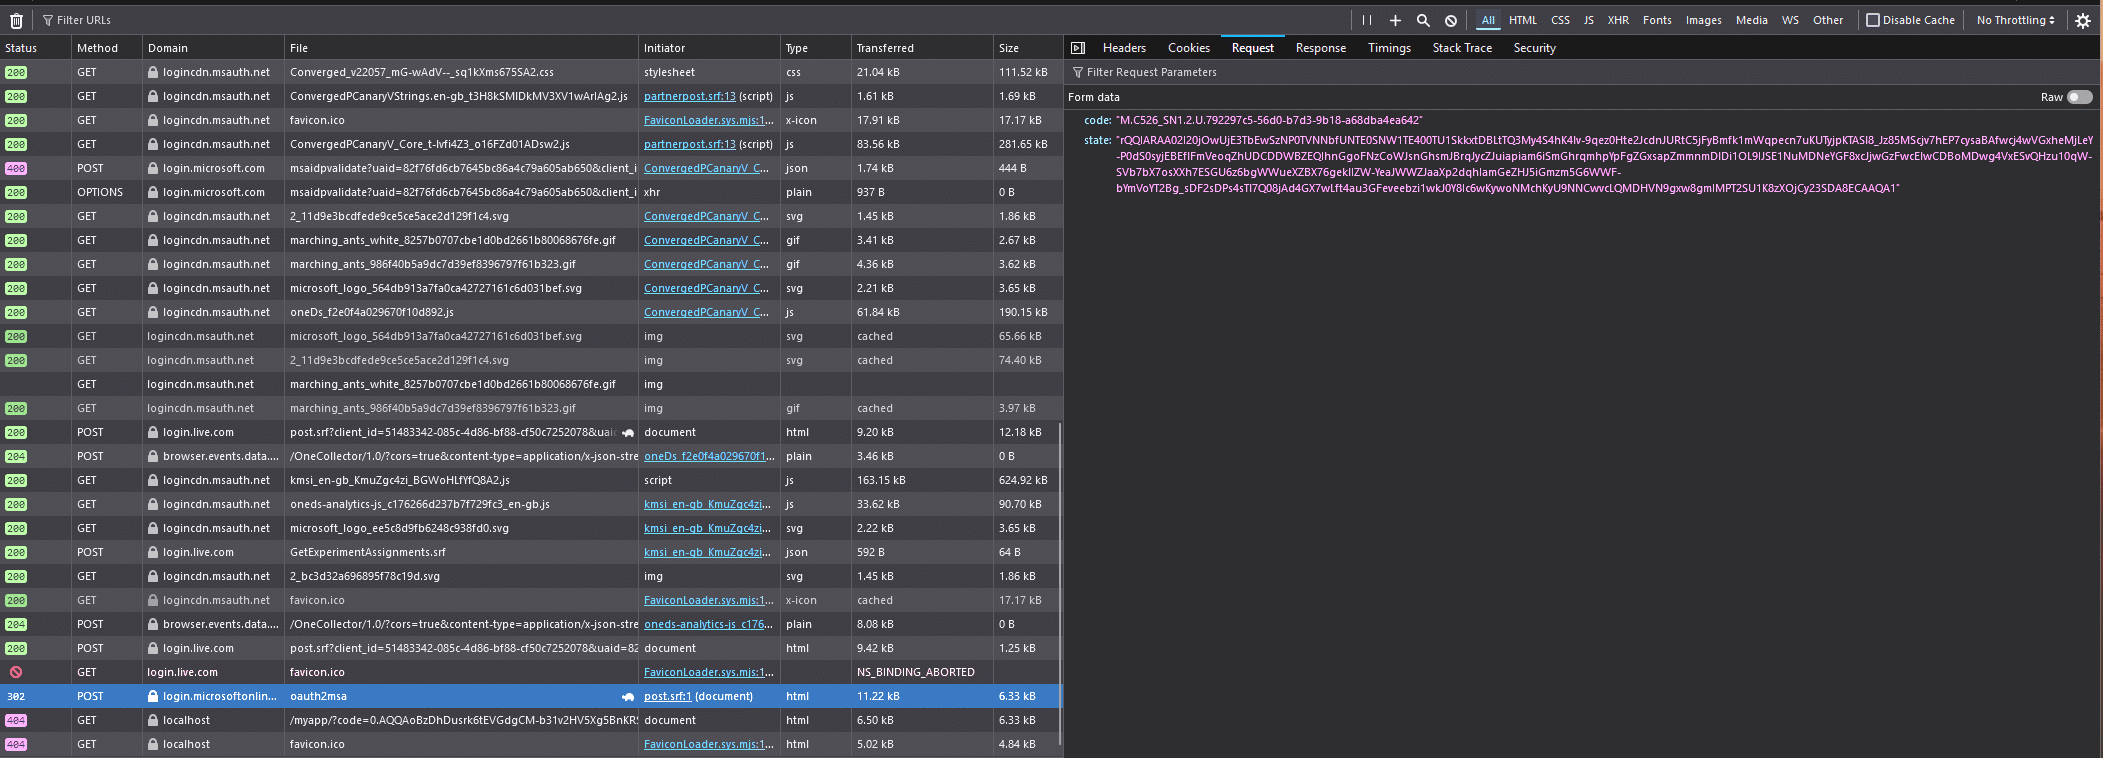
This is the link used to redirect towards the current packet. The response parameter includes the link as the action URL. This URL serves as the endpoint for the next request in the sequence. The subsequent request, triggered by the redirect, is essential for completing the authentication process and obtaining the necessary authorisation code for accessing the Graph API.
The authorisation code is returned as an HTML value, which can be found in the response body. By analysing these series of request-response modules, you can extract the necessary parameters from the response headers or payload. These parameters can then be implemented in Python code to perform backend-based sign-in to any portal, such as Microsoft Entra, without relying on a web browser.
Authentication in low-end IoT devices
This method can be particularly useful for hardware-based IoT solutions, such as Arduino or Raspberry Pi (RPI), where authentication using FIDO2 technologies can be implemented on low-end devices. Here’s a summary of how this process works.
Authorisation code in HTML: The authorisation code returned in the HTML value of the response body is critical for authentication.
Series of request-response modules: By closely examining the requests and responses, you can identify and extract key parameters required for the authentication process.
Python implementation: Using Python, these parameters can be programmatically handled to automate the backend sign-in process, bypassing the need for a web browser.
Application in IoT devices: This approach can be applied to low-end IoT devices, like Arduino or Raspberry Pi, allowing them to authenticate using FIDO2 technologies without a browser dependency.
By leveraging these techniques, developers can create more efficient and secure authentication processes for various applications, including IoT devices. This ensures robust security and streamlined operations, even on low-power hardware platforms.


